概述
多渠道对于android来说是一个比较常见的概念,举几个常见的用法:
- 根据不同的渠道使用不同的资源
- 根据不同的渠道使用不同的依赖
- 根据不同的渠道作不同的数据统计
- 根据不同的渠道,游戏app中对应不同的服务区
github地址
本文项目基于笔者自己写的demo,对其有兴趣的读者可以自行下载:
https://github.com/Double2hao/MultiChannelTest
android studio的多渠道
如果要使用多渠道,仅需要在该项目的build.gradle文件中增加以下代码:
android {
  flavorDimensions "version"
  productFlavors {
    oneTest {
    }
    twoTest {
    }
    threeTest {
    }
  }
}
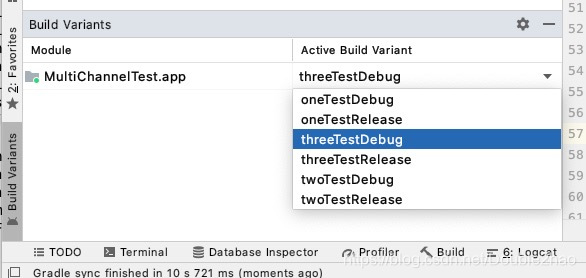
然后可以在android studio左侧栏中的 Build Variants 中选择module的渠道,如下图:

buildConfig区分不同的渠道
通过buildConfigField可以在BuildConfig中设置不同的参数,然后在代码中可以通过BuildConfig的参数来区分不同的渠道。
  productFlavors {
    oneTest {
      buildConfigField("String", "TEST_CHANNEL", "\"one\"")
    }
    twoTest {
      buildConfigField("String", "TEST_CHANNEL", "\"two\"")
    }
    threeTest {
      buildConfigField("String", "TEST_CHANNEL", "\"three\"")
    }
  }
Demo中BuildConfig的代码如下:
public final class BuildConfig {
  public static final boolean DEBUG = Boolean.parseBoolean("true");
  public static final String APPLICATION_ID = "com.example.multichanneltest";
  public static final String BUILD_TYPE = "debug";
  public static final String FLAVOR = "threeTest";
  public static final int VERSION_CODE = 1;
  public static final String VERSION_NAME = "1.0";
  // Field from product flavor: threeTest
  public static final String TEST_CHANNEL = "three";
}
Demo中BuildConfig的使用代码如下:
public class MainActivity extends Activity {

  @Override
  protected void onCreate(Bundle savedInstanceState) {
    super.onCreate(savedInstanceState);
    setContentView(R.layout.activity_main);

    //根据不同的渠道参数来作不同的逻辑
    if (TextUtils.equals(BuildConfig.TEST_CHANNEL, "one")) {

    } else if (TextUtils.equals(BuildConfig.TEST_CHANNEL, "two")) {

    } else if (TextUtils.equals(BuildConfig.TEST_CHANNEL, "three")) {

    }
  }
}
manifest区分不同的渠道
通过使用manifestPlaceholders,为不同的渠道设置不同的值。
  productFlavors {
    oneTest {
      manifestPlaceholders = [test_app_name: "TestOneApp"]
    }
    twoTest {
      manifestPlaceholders = [test_app_name: "TestTwoApp"]
    }
    threeTest {
      manifestPlaceholders = [test_app_name: "TestThreeApp"]
    }
  }
Demo中为不同的渠道设置了不同的appName,代码如下:
  <application
      android:allowBackup="true"
      android:icon="@mipmap/ic_launcher"
      android:label="${test_app_name}"
      android:roundIcon="@mipmap/ic_launcher_round"
      android:supportsRtl="true"
      android:theme="@style/Theme.MultiChannelTest">
  </application>
设置不同渠道的资源
通过设置sourceSets,可以为不同的渠道设置不同的资源。
如下,Demo中的代码,在不同的渠道下,使用不同的java资源。
如果在oneTest的渠道下,"src/main/twoTest"与"src/main/threeTest"目录下的文件不会参与编译。
android {
  sourceSets {
    oneTest {
      java {
        srcDirs = ["src/main/java", "src/main/oneTest"]
      }
    }
    twoTest {
      java {
        srcDirs = ["src/main/java", "src/main/twoTest"]
      }
    }
    threeTest {
      java {
        srcDirs = ["src/main/java", "src/main/threeTest"]
      }
    }
  }
}