目录
一、接口(补)
1.1. 数组对象排序
1.2. 克隆接口
1.3. 浅拷贝和深拷贝
1.4. 抽象类和接口的区别
一、接口(补)
1.1. 数组对象排序
我们在讲一维数组的时候,使用到冒泡排序来对数组里的元素进行从小到大或从大到小的排序。上一期里面我们通过Comparable接口来比较Student对象里面的成员变量,如果Student对象实例化一个数组,并且数组里面有多个元素,我们也是可以通过冒泡排序来实现。
//定义Student类public class Student implements Comparable<Student>{ public int age; public Student(int age) { this.age = age; } @Override public String toString() { return "Student{" + "age=" + age + '}'; } @Override public int compareTo(Student o) { return o.age - this.age; }}import java.util.Arrays;import java.util.Comparator;public class Main { public static void BubbleSort(Comparable[] compare){ for (int i = 0; i < compare.length-1; i++) {//表示比较的趟数 for (int j = 0; j < compare.length-1-i; j++) { if(compare[j].compareTo(compare[j+1]) > 0){ Comparable temp = compare[j]; compare[j] = compare[j+1]; compare[j+1] = temp; } } } } public static void main(String[] args) { Student[] stu = new Student[3]; stu[0] = new Student(10); stu[1] = new Student(8); stu[2] = new Student(11); BubbleSort(stu); System.out.println(Arrays.toString(stu)); }}以上代码可以参考博主之前的博客,这里就不做过多讲解了。以下为运行结果:
1.2. 克隆接口
public class Person { public String name; public int age; public Person(String name, int age) { this.name = name; this.age = age; } @Override public String toString() { return "Person{" + "name='" + name + '\'' + ", age=" + age + '}'; }}、public class Main { public static void main(String[] args) { Person one = new Person("Paul",17); Person two = one.clone();//报错:'clone()' has protected access in 'java.lang.Object' }}我们如果想把one这个对象克隆到two这个对象,就可以使用clone这个方法,但是会报错,我们可以查看一下源码。双击shift,勾选“include non-project items”,在搜素框里面输入Object,点击Object java.lang,就可以看源码了。可以看到被protected关键字修饰Main类与clone方法不在同一个包路径下,所以在Main类里面无法通过Person类来访问。


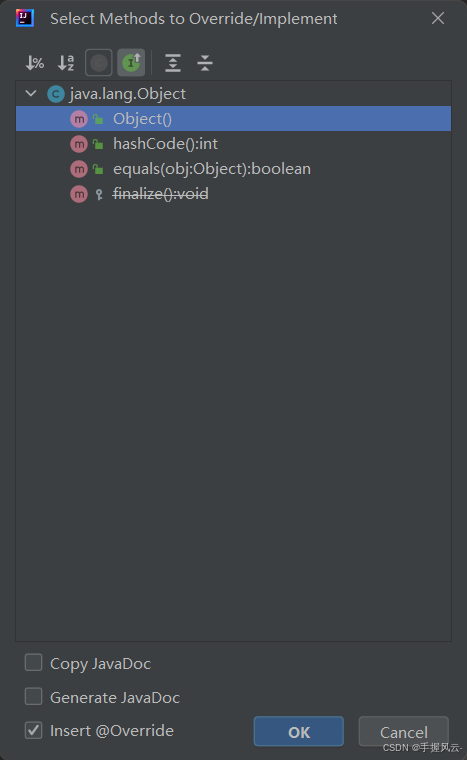
package java.lang;import jdk.internal.vm.annotation.IntrinsicCandidate;@IntrinsicCandidateprotected native Object clone() throws CloneNotSupportedException;既然不能直接访问,那我们只能进行间接访问。此时我们还需要再重写一个方法,重写之后依然会报错。我们来看一下Object里面的源码,把“throws CloneNotSupportedException”复制粘贴到main方法后面,可以看到等号左边是子类Person,右面却是父类Object,此时就需要向下转型并强转来对父类进行赋值。


但光有这些还是不够的,我们还差最后一步,实现克隆接口。Cloneable接口里面没有任何实现,所以就是一个空接口。
public class Person implements Cloneable//Cloneable的源码public interface Cloneable {}以下是完整代码和运行结果:
public class Person implements Cloneable{ public String name; public int age; public Person(String name, int age) { this.name = name; this.age = age; } @Override public String toString() { return "Person{" + "name='" + name + '\'' + ", age=" + age + '}'; } @Override protected Object clone() throws CloneNotSupportedException { return super.clone(); }}public class Main { public static void main(String[] args) throws CloneNotSupportedException{ Person one = new Person("Paul",17); Person two = (Person) one.clone(); System.out.println(two); }}
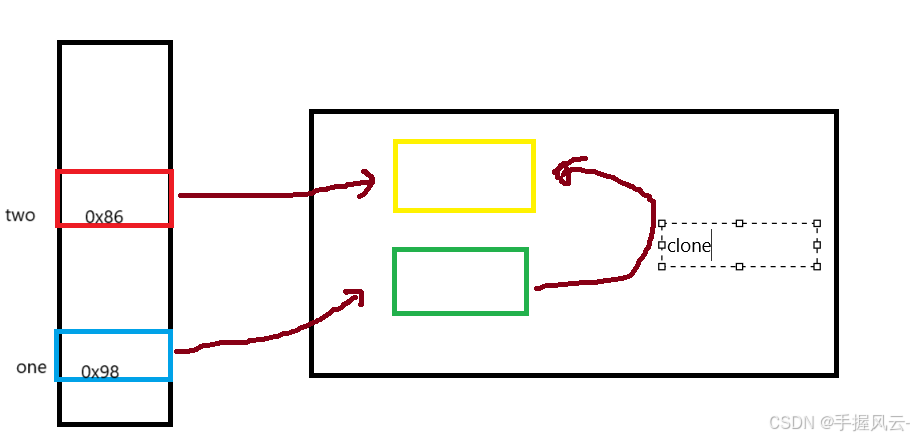
下面我们来画图讲一下克隆是如何在栈和堆上工作的: one对象先在栈上开辟一块内存空间,指向堆上的地址,调用clone方法之后,直接又在堆上创建出一块,而two对象也指向了新克隆的空间。

1.3. 浅拷贝和深拷贝
(1)浅拷贝
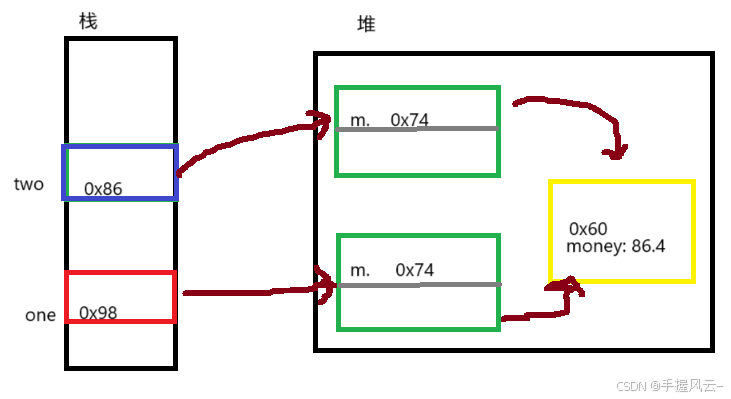
看下面一段代码,我们在上面的代码基础上新增了一个Money类,在Main,我们先访问并打印两个对象的成员变量Money,然后修改two对象中的money的值,然后再打印,可以看到我明明只修改了two对象的成员变量,但one对象也被修改了。
class Money{ public double money = 93.5;}public class Person implements Cloneable{ public String name; public int age; public Money m; public Person(String name, int age) { this.name = name; this.age = age; this.m = new Money(); } @Override public String toString() { return "Person{" + "name='" + name + '\'' + ", age=" + age + '}'; } @Override protected Object clone() throws CloneNotSupportedException { return super.clone(); }}public class Main { public static void main(String[] args) throws CloneNotSupportedException{ Person one = new Person("Paul",19); Person two = (Person) one.clone(); System.out.println(one.m.money); System.out.println(two.m.money); System.out.println("==============="); two.m.money = 86.4; System.out.println(one.m.money); System.out.println(two.m.money); }}
相信老铁们看到这个图之后,就一目了然了。虽然说one所指向的对象被拷贝克隆了一份,但m所指向的money对象却没有被克隆,one和two所指向的是同一个money对象,这就会导致我们修改了money对象的值,两个变量都会被修改。这就是浅拷贝。那么老铁们想一下如何实现深拷贝呢?

(2)深拷贝
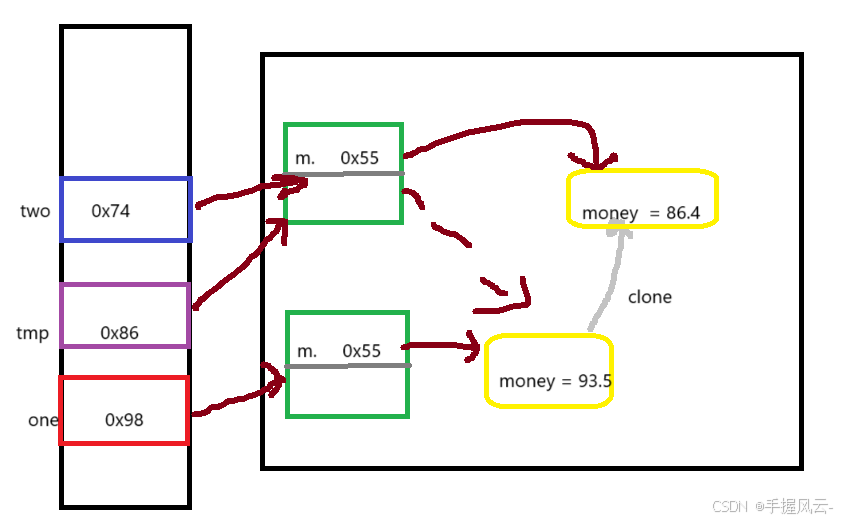
我们给Money这个类后面也来上接口Cloneable,也需要对Money类里面进行方法重写,与上面的浅拷贝不同的是,我们对Person类里面的克隆重写进行了改动。
class Money implements Cloneable{ public double money = 93.5; @Override protected Object clone() throws CloneNotSupportedException { return super.clone(); }}public class Person implements Cloneable{ public String name; public int age; public Money m; public Person(String name, int age) { this.name = name; this.age = age; this.m = new Money(); } @Override protected Object clone() throws CloneNotSupportedException { Person tmp = (Person)super.clone(); tmp.m = (Money) this.m.clone(); return tmp; }}public class Main { public static void main(String[] args) throws CloneNotSupportedException{ Person one = new Person("Paul",19); Person two = (Person) one.clone(); System.out.println(one.m.money); System.out.println(two.m.money); System.out.println("==============="); two.m.money = 86.4; System.out.println(one.m.money); System.out.println(two.m.money); }}
1.4. 抽象类和接口的区别
抽象类和接口都是 Java 中多态的常见使用方式,都需要重点掌握,同时又要认清两者的区别。
核心区别: 抽象类中可以包含普通方法和普通字段,这样的普通方法和字段可以被子类直接使用(不必重写),而接口中 不能包含普通方法, 子类必须重写所有的抽象方法。
再次提醒,抽象类存在的意义是为了让编译器更好的校验,像 Animal 这样的类我们并不会直接使用,而是使用它的子类. 万一不小心创建了 Animal 的实例, 编译器会及时提醒我们。
