参考文章:
1.Unity打包WebGL: 导入Vue
2.unity文档-WebGL:与浏览器脚本交互
3.unity与vue交互(无第三方插件)
目录
一、前期工作1.新建.jslib文件2.新建.cs脚本3. 新建一个Text对象和button按钮对象4.添加脚本空对象UIEvent5.导出unity为webgl6.vue项目中引入unity打包的文件 二、从unity脚本调用js函数(vue发起,unity接收):三、从js调用unity脚本函数(unity发起,vue接收):四、结果展示五、全部代码JsTalker.cscommunication.jslib打包后的index.htmlvue页面
一、前期工作
1.新建.jslib文件
操作步骤:
在unity项目的Assets/Plugins 文件夹下新建一个txt文本文档,保存并关掉文档;将文档命名为 communication.jslib ,保存;双击 communication.jslib 文件,用其它工具打开编辑即可(我这里用的是HBuilder),编辑内容后面有介绍(三、从js调用unity脚本函数)。 在 Unity 和 Vue 的交互中,jslib 插件用于实现 JavaScript 与 Unity 的桥接。它允许你在 JavaScript 中调用 Unity 的 C# 方法,或从 Unity 调用 JavaScript 函数。
以下是为什么需要 jslib 插件以及文件位置的重要性:
桥接功能:jslib 插件使得 JavaScript 和 Unity 之间可以进行函数调用,这在处理 WebGL 平台时尤其重要。Unity 的 WebGL 构建运行在浏览器中,而浏览器环境与 Unity 的运行环境(C#)是隔离的,jslib 通过定义如何在两者之间传递数据和调用方法来实现桥接。
函数调用:通过在 jslib 中定义的函数,你可以从 JavaScript 直接调用 Unity 的 C# 方法,或者反向操作。这种方式简化了两者之间的通信,使得复杂的数据交换和操作变得可行。
文件位置:将 jslib 文件放置在 Unity 项目的 Assets/Plugins 文件夹中的 WebGL 子文件夹下是为了确保 Unity 能够识别和正确加载这些插件文件。Unity 在构建 WebGL 项目时,会自动将 Plugins 文件夹中的 jslib 文件包含在内,并按照预期执行其中定义的 JavaScript 代码。
这种结构确保了 JavaScript 与 Unity 之间的高效且可靠的通信。
2.新建.cs脚本
操作步骤
在unity项目的Assets 文件夹下新建一个script文件夹,在script文件夹中新建一个C# Script脚本,命名为JsTalker.cs; 当 Unity 项目导出为 WebGL 时,Unity 引擎会生成一些 JavaScript 文件,这些文件用于与浏览器进行交互。.cs 脚本可以与这些 JavaScript 文件集成,允许我们通过 Unity 的 C# 代码来调用 JavaScript 函数,或者从 JavaScript 函数中接收消息
3. 新建一个Text对象和button按钮对象
操作步骤
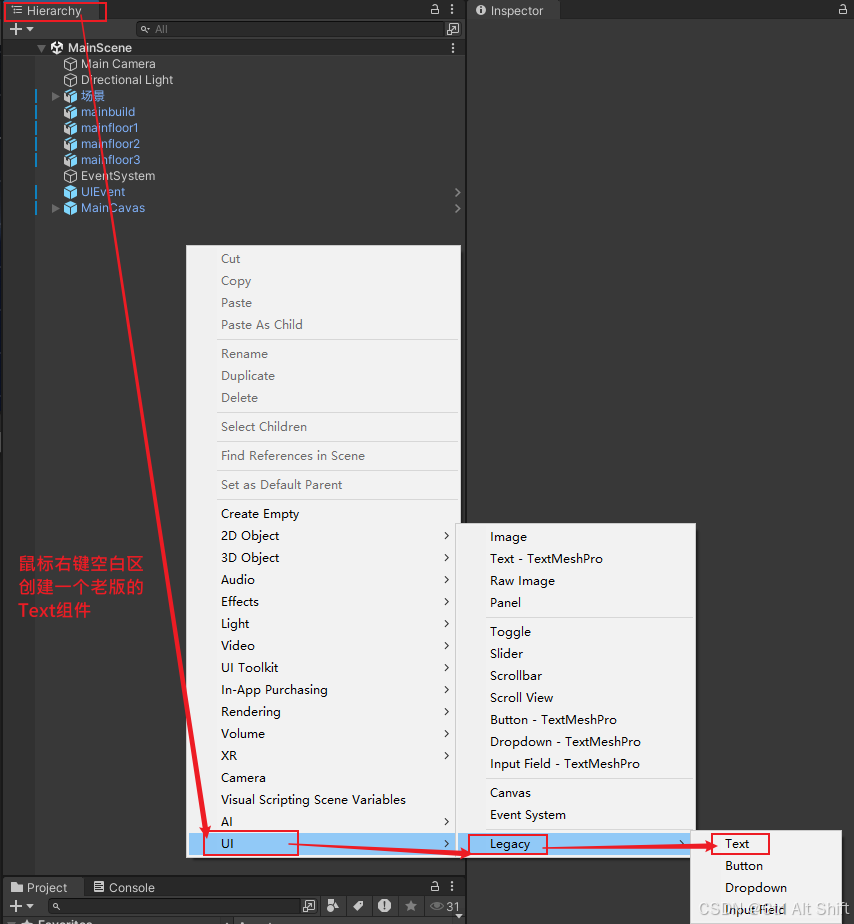
在unity中的Hierarchy工作区中创建一个可回显获取数据的UI对象,这里以Text对象为例;新建button对象同理,并给button对象重命名为modelButton1。
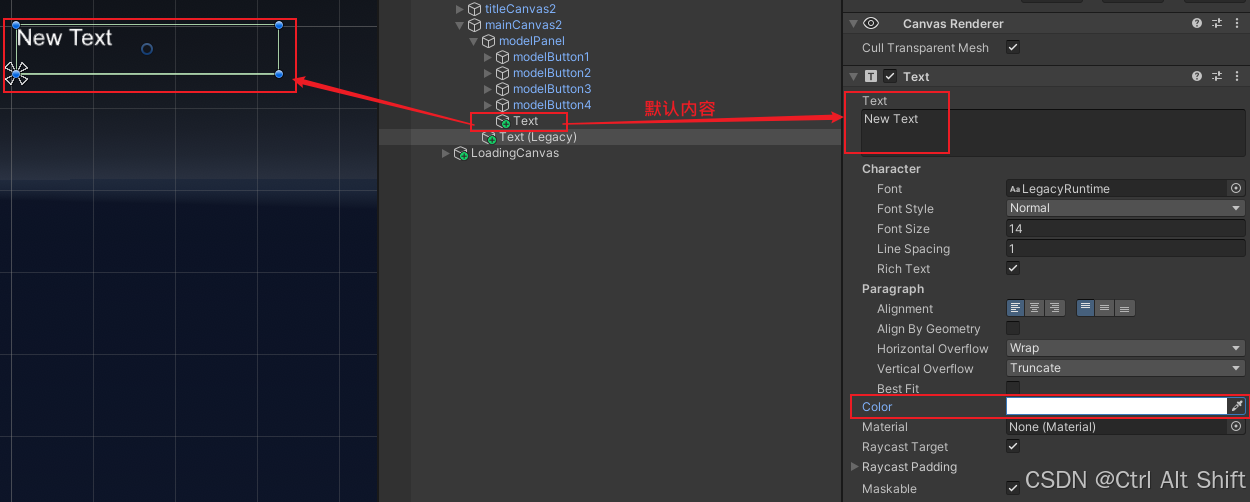
设置Text对象样式为白色,目的是为了显眼些。
4.添加脚本空对象UIEvent
操作步骤
在Hierarchy工作区中鼠标右键 -Create Empty - 重命名GameObject为UIEvent - 将JsTalker.cs 拖拽移入至UIEvent对象里。给modelButton1添加按钮onClick点击事件,为后面点击按钮传参做准备;并添加JsTalker.cs脚本。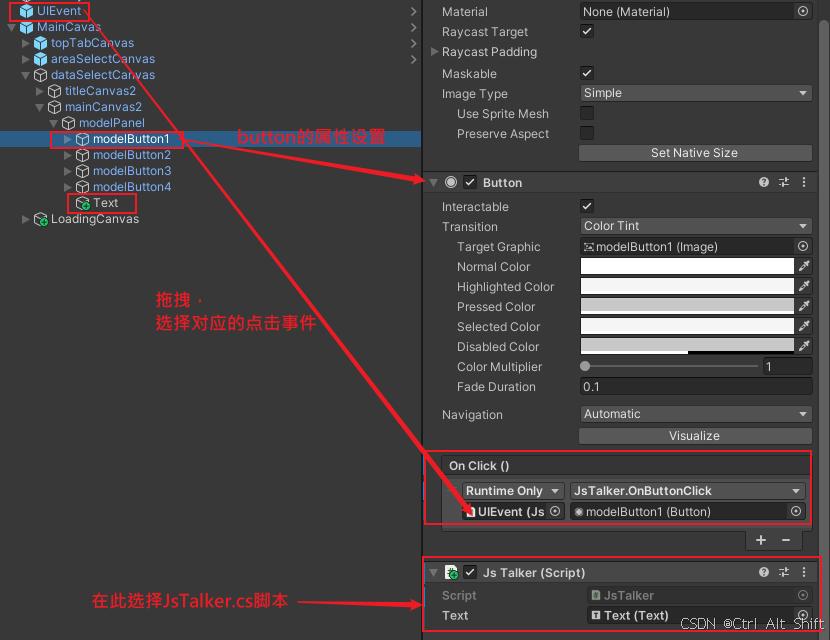
5.导出unity为webgl
操作步骤
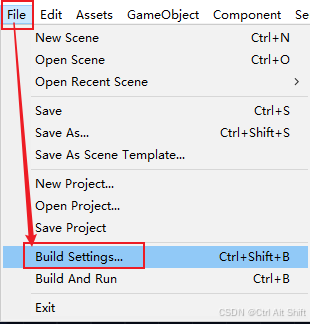
1. 打开构建设置
2.选择平台
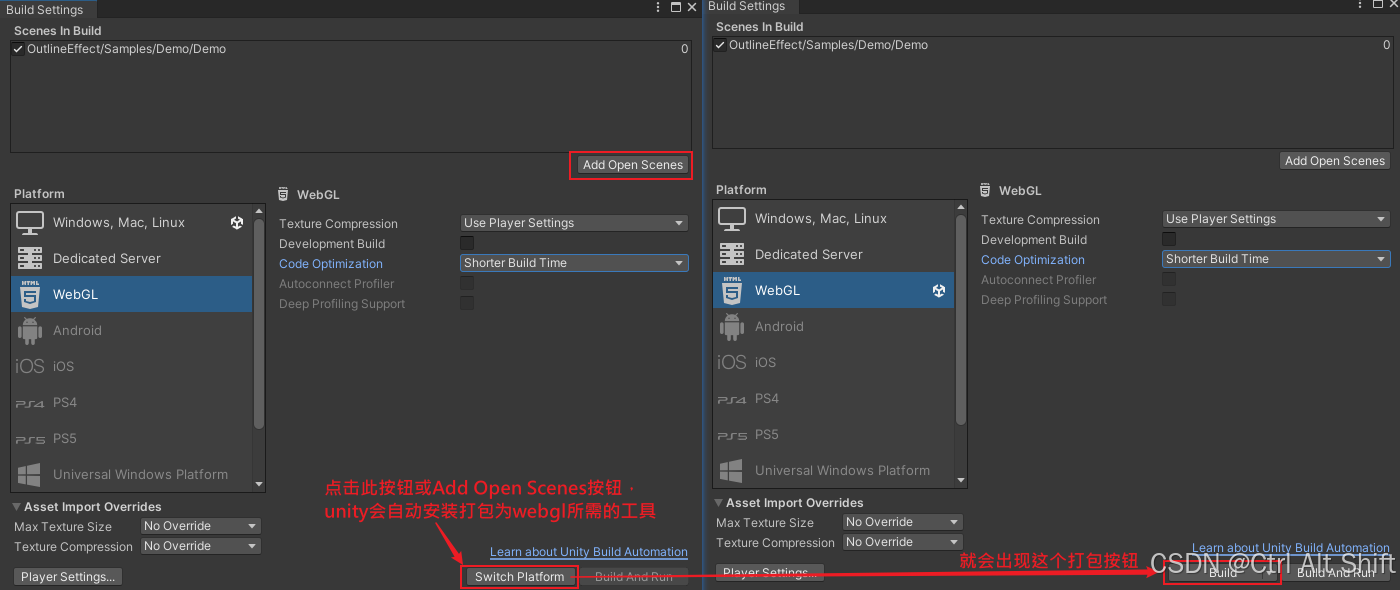
3. 设置 Player 设置在 Build Settings 窗口中,点击 Player Settings 按钮。这会打开 Inspector 面板中的 Player 设置。在 Player Settings 面板中,我们可以配置 WebGL 特有的设置,如分辨率、质量、图标等。 Resolution and Presentation:设置 WebGL 输出的分辨率和全屏模式。Other Settings:配置 WebGL 的各种参数,例如内存大小、脚本运行时等。Publishing Settings:设置压缩和加密选项,以便优化构建的大小和性能。

4. 设置构建目标 - 之后每次修改unity内容都要做此打包操作
确保在 Build Settings 窗口中选择了 WebGL 作为目标平台。点击 Build 按钮,选择一个保存位置,然后 Unity 会开始构建过程。构建过程
Unity 会将我们的项目打包为一个 WebGL 兼容的格式,并生成一个包含 HTML、JavaScript 和数据文件的文件夹。构建过程可能需要一些时间,具体取决于项目的复杂性和你的计算机性能。生成的文件如下:
6.vue项目中引入unity打包的文件
操作步骤
在 Vue 项目根目录的public文件夹 或 static文件夹下创建 unity 文件夹。将unity刚刚打包的文件复制到public/unity 文件夹或 static/unity 文件夹下。之后每次修改unity内容打包后都要做此复制操作
public 文件夹
用途:用于存放不会被 Webpack 处理的静态资源,如 HTML 文件、favicon、直接引用的图像等。
路径:文件在 public 文件夹中的路径将直接映射到构建后的根目录。例如,public/favicon.ico 在构建后的项目中会变成 /favicon.ico。
处理:这些文件不会经过 Webpack 处理,因此在开发和生产环境中都保持不变。
static文件夹(通常在 Vue CLI 3.x 及更早版本中使用)
用途:主要用于存放静态资源,Webpack 会将这些资源复制到构建输出目录中。
路径:static 文件夹中的资源将被 Webpack 处理并优化。在构建过程中,这些文件会被移动到构建输出目录的 static 子目录中,路径会自动处理文件名的哈希值以便缓存优化。
处理:这些文件会经过 Webpack 的处理,比如版本控制和优化。
二、从unity脚本调用js函数(vue发起,unity接收):
(全部代码在后面可直接粘贴使用,这里针对主要模块)
核心代码
编辑JsTalker.cs脚本
//public TextMeshProUGUI uiText;//这个是新版的Text组件对象,用这个就要确保引用了 TextMeshPro 的命名空间using TMPro;public Text text;//这个是旧版的Text对象public void SetToken(string token){ Debug.Log("token"+ token); text.text = token;//改变Text对象的文本内容 // 强制更新 UI Canvas.ForceUpdateCanvases();}编辑打包后的index.html文件
// unity调用函数 // vue发起 unity接收 window.ReportReady = () => { send({ id: 1, value: 2 }) } function send(obj) { unityInstance.SendMessage('modelButton1', 'SetToken', JSON.stringify(obj)) }SendMessage方法
SendMessage(objectName, methodName, value);
其中,objectName 是场景中的对象名称;methodName 是当前附加到该对象的脚本中的方法名称;value 可以是字符串、数字,也可为空。
三、从js调用unity脚本函数(unity发起,vue接收):
(全部代码在后面可直接粘贴使用,这里针对主要模块)
核心代码
unity中的.jslib定义方法GetButtonNameReady(string str),使用以下方法跨文档传递,将参数发送到父窗口并定义type;
GetButtonNameReady: function (string) { console.log("Click-buttondata:",string);// 发送消息到父窗口window.parent.postMessage({ type: 'UNITY_BUTTON_NAME', data: UTF8ToString(string) }, '*');}window.parent.postMessage(message, targetOrigin, [transfer]);
message: 要发送的消息,可以是字符串、对象或其他支持的数据类型。需要注意的是,发送的消息将会被序列化为 JSON 格式。
targetOrigin: 表示你希望消息发送到的目标窗口的来源。这是一个安全机制,用于确保消息不会发送到不受信任的窗口。你可以指定特定的域(如 “https://example.com”)或者使用 “*” 作为通配符,表示允许所有来源。
transfer (可选): 一个可选的 Transferable 对象数组,用于将某些对象的所有权从当前窗口转移到目标窗口。例如,MessagePort 对象可以用来在多个窗口之间传递消息。
JsTalker.cs组件,脚本中添加点击按钮后传按钮名称参数;using System.Runtime.InteropServices;[DllImport("__Internal")]private static extern void GetButtonNameReady(string str);public void OnButtonClick(Button clickedButton){ // 获取被点击按钮的名称 string buttonName = clickedButton.gameObject.name; Debug.Log("被点击的按钮名称是: " + buttonName); GetButtonNameReady(buttonName);//为什么在页面console里返回的是 48730928 ?}modelButton1,设置其onClick添加UIEvent事件,并选择GetButtonNameReady方法 vue页面中使用监听message获取按钮名称
'UNITY_BUTTON_NAME'是在.jslib文件中自定义的。export default { mounted() { window.addEventListener('message', this.handleMessage, false); }, methods: { handleMessage(event) { // 检查消息类型 if (event.data.type === 'UNITY_BUTTON_NAME') { console.log('Received button name from Unity:', event.data.data); // 在此处理按钮名称 } } }, beforeDestroy() { window.removeEventListener('message', this.handleMessage, false); }}四、结果展示
在vue页面的控制台中能获得如下信息:

五、全部代码
JsTalker.cs
using System.Collections;using System.Collections.Generic;using UnityEngine;using UnityEngine.UI;using System.Runtime.InteropServices;public class JsTalker : MonoBehaviour{ [DllImport("__Internal")] private static extern void SayHello(); [DllImport("__Internal")] private static extern string ReportReady(); [DllImport("__Internal")] private static extern void GetButtonNameReady(string str); //public TextMeshProUGUI uiText; public Text text; // Start is called before the first frame update void Start() { ReportReady(); } // Update is called once per frame void Update() { if (Input.GetKeyUp(KeyCode.H)) { SayHello(); } } public void SetToken(string token) { Debug.Log("token"+ token); text.text = token; // 强制更新 UI Canvas.ForceUpdateCanvases(); } // 这个方法会在按钮点击时被调用 public void OnButtonClick(Button clickedButton) { // 获取被点击按钮的名称 string buttonName = clickedButton.gameObject.name; Debug.Log("被点击的按钮名称是: " + buttonName); GetButtonNameReady(buttonName);//为什么在页面console里返回的是 48730928 ? }}communication.jslib
mergeInto(LibraryManager.library, { SayHello: function () { window.alert("hello vue"); }, ReportReady: function() { window.ReportReady(); },GetButtonNameReady: function (string) { console.log("Click-buttondata:",string);// 发送消息到父窗口window.parent.postMessage({ type: 'UNITY_BUTTON_NAME', data: UTF8ToString(string) }, '*');}})打包后的index.html
<!DOCTYPE html><html lang="en-us"><head> <meta charset="utf-8"> <meta http-equiv="Content-Type" content="text/html; charset=utf-8"> <title>Unity WebGL Player</title> <link rel="shortcut icon" href="TemplateData/favicon.ico"> <link rel="stylesheet" href="TemplateData/style.css"></head><body> <div id="unity-container" class="unity-desktop" style="width:100%;height: 100%;"> <canvas id="unity-canvas" width=auto height=auto tabindex="-1"></canvas> <div id="unity-loading-bar"> <div id="unity-logo"></div> <div id="unity-progress-bar-empty"> <div id="unity-progress-bar-full"></div> </div> </div> <div id="unity-warning"> </div> <div id="unity-footer"> <div id="unity-webgl-logo"></div> <div id="unity-fullscreen-button"></div> <div id="unity-build-title">HzevtSystem</div> </div> </div> <script> // var UnityToJs = { // /// <summary> // /// JS的监听方法, // /// 点击 xxxx 时,回传默认值。 // JS_OnReceiveView: function (fovMin, fovMax, angleMin, angleMax) { // // console.log(fovMin, fovMax, angleMin, angleMax); // window.top.dispatchEvent(new CustomEvent('getFovDef', { detail: { 'fovMin': fovMin, 'fovMax': fovMax, 'angleMin': angleMin, 'angleMax': angleMax } }))//自定义事件,然后获取相应的数据 // } // } var container = document.querySelector("#unity-container"); var canvas = document.querySelector("#unity-canvas"); var loadingBar = document.querySelector("#unity-loading-bar"); var progressBarFull = document.querySelector("#unity-progress-bar-full"); var fullscreenButton = document.querySelector("#unity-fullscreen-button"); var warningBanner = document.querySelector("#unity-warning"); // Shows a temporary message banner/ribbon for a few seconds, or // a permanent error message on top of the canvas if type=='error'. // If type=='warning', a yellow highlight color is used. // Modify or remove this function to customize the visually presented // way that non-critical warnings and error messages are presented to the // user. function unityShowBanner(msg, type) { function updateBannerVisibility() { warningBanner.style.display = warningBanner.children.length ? 'block' : 'none'; } var div = document.createElement('div'); div.innerHTML = msg; warningBanner.appendChild(div); if (type == 'error') div.style = 'background: red; padding: 10px;'; else { if (type == 'warning') div.style = 'background: yellow; padding: 10px;'; setTimeout(function () { warningBanner.removeChild(div); updateBannerVisibility(); }, 5000); } updateBannerVisibility(); } var buildUrl = "Build"; var loaderUrl = buildUrl + "/unityweb.loader.js"; var config = { dataUrl: buildUrl + "/unityweb.data", frameworkUrl: buildUrl + "/unityweb.framework.js", codeUrl: buildUrl + "/unityweb.wasm", streamingAssetsUrl: "StreamingAssets", companyName: "DefaultCompany", productName: "HzevtSystem", productVersion: "1.0", showBanner: unityShowBanner, }; // By default, Unity keeps WebGL canvas render target size matched with // the DOM size of the canvas element (scaled by window.devicePixelRatio) // Set this to false if you want to decouple this synchronization from // happening inside the engine, and you would instead like to size up // the canvas DOM size and WebGL render target sizes yourself. // config.matchWebGLToCanvasSize = false; if (/iPhone|iPad|iPod|Android/i.test(navigator.userAgent)) { // Mobile device style: fill the whole browser client area with the game canvas: var meta = document.createElement('meta'); meta.name = 'viewport'; meta.content = 'width=device-width, height=device-height, initial-scale=1.0, user-scalable=no, shrink-to-fit=yes'; document.getElementsByTagName('head')[0].appendChild(meta); container.className = "unity-mobile"; canvas.className = "unity-mobile"; // To lower canvas resolution on mobile devices to gain some // performance, uncomment the following line: // config.devicePixelRatio = 1; canvas.style.width = window.innerWidth + 'px'; canvas.style.height = window.innerHeight + 'px'; unityShowBanner('暂不支持移动端'); } else { // Desktop style: Render the game canvas in a window that can be maximized to fullscreen: canvas.style.width = "100%"; canvas.style.height = "100%"; } loadingBar.style.display = "block"; var script = document.createElement("script"); script.src = loaderUrl; script.onload = () => { createUnityInstance(canvas, config, (progress) => { progressBarFull.style.width = 100 * progress + "%"; }).then((unityInstance) => { console.log('unityInstance', unityInstance); console.log('window', window); // 绑定unityInstance window.unityInstance = unityInstance; console.log('window.unityInstance', window.unityInstance); loadingBar.style.display = "none"; fullscreenButton.onclick = () => { unityInstance.SetFullscreen(1); }; }).catch((message) => { alert(message); }); }; document.body.appendChild(script); // unity调用函数 // vue发起 unity接收 window.ReportReady = () => { // window.top.dispatchEvent(new CustomEvent()) send({ id: 1, value: 2 }) } function send(obj) { unityInstance.SendMessage('modelButton1', 'SetToken', JSON.stringify(obj)) } </script></body></html>vue页面
<template> <div style="width: 100%; height: 100%"> <div @click="send">给unity发送数据</div> <iframe ref="iframe" width="100%" height="100%" scrolling="no" src="/static/Unitys/web/index.html" frameborder="0"></iframe> </div></template><script>export default { name: "testUnityAScene", data() { return { nodeList: [ { id: 11, name: "node1" }, { id: 22, name: "node2" }, { id: 33, name: "node3" }, ], }; }, mounted() { console.log('this.$refs.iframe.contentWindow', this.$refs.iframe.contentWindow); // this.$refs.iframe.contentWindow.unityInstance.SendMessage('WebInvoker', 'Unity_InsertNaviPoint', this.nodeList.length); window.addEventListener('message', this.handleMessage, false); }, methods: { send() { // 发送数据 this.$refs.iframe.contentWindow.send({ id: 111, value: 222 }) }, handleMessage(event) { console.log('event11111111111:',event); // 检查消息类型 if (event.data.type === 'UNITY_BUTTON_NAME') { console.log('Received button name from Unity:', event.data.data); // 在此处理按钮名称 } } }, beforeDestroy() { window.removeEventListener('message', this.handleMessage, false); },};</script><style></style>