文章目录
@[toc]1、概述2、静态编译安装Qt1.1 安装依赖1.2 静态编译1.3 报错1.4 添加环境变量1.5 下载安装QtCreator 3、配置linuxdeployqt环境1.1 在线安装依赖1.2 使用linuxdeployqt提供的程序1.3 编译安装linuxdeployqt 4、使用linuxdeployqt打包依赖1.1 linuxdeployqt使用选项1.2 patchelf修改动态库搜索路径1.3 验证1.4 修改linuxdeployqt源码 5、使用appimagetool打包生成AppImage程序特点工作原理1.1 安装appimagetool1.2 appimagetool选项1.3 打包AppImage工程 6、错误记录7、参考1.1 Qt1.2 linuxdeployqt1.3 appimage 8、视频
| 更多精彩内容 |
|---|
| ?内容导航 ? |
| ?Qt开发经验 ? |
1、概述
linux下打包部署Qt编译的程序主要有3种方法:
方法1:安装Qt时编译生成静态库,这样编译生成的程序就不会依赖于Qt库了,如果用到第三方动态库另说;方法2:使用linuxdeployqt打包程序的依赖库;方法3:使用linuxdeploy打包程序。注意:
最好在低版本的LTS(长期支持)系统编译打包程序,这样打包的程序可以支持在低版本和高版本的系统运行,如果在高版本的系统编译打包,在低版本的系统可能不兼容。测试环境
| 环境 | 版本 |
|---|---|
| 系统 | ubuntu22.04 |
| Qt | Qt5.14.2 |
| linuxdeployqt | 2024-9-8版本 |
| appimagetool | 3.10.5 |
2、静态编译安装Qt
如果已经通过Qt官方提供的安装包进行安装了动态版本的可以选择跳过这一节。
官方说明:
从Git构建Qt 5 - Qt Wiki
从Git构建Qt 6 - Qt Wiki
1.1 安装依赖
qt5.14.2
sudo apt-get install build-essential perl python3 git# Libxcb 的 sudo apt-get install '^libxcb.*-dev' libx11-xcb-dev libglu1-mesa-dev libxrender-dev libxi-dev libxkbcommon-dev libxkbcommon-x11-dev# Qt WebKit(Qt WebKit)sudo apt-get install flex bison gperf libicu-dev libxslt-dev ruby# Qt Web引擎sudo apt-get install libxcursor-dev libxcomposite-dev libxdamage-dev libxrandr-dev libxtst-dev libxss-dev libdbus-1-dev libevent-dev libfontconfig1-dev libcap-dev libpulse-dev libudev-dev libpci-dev libnss3-dev libasound2-dev libegl1-mesa-dev gperf bison nodejs#Qt多媒体sudo apt-get install libasound2-dev libgstreamer1.0-dev libgstreamer-plugins-base1.0-dev libgstreamer-plugins-good1.0-dev libgstreamer-plugins-bad1.0-devQt6
sudo apt install libxcb-image0-dev libxcb-shm0-dev libxcb-icccm4-dev libxcb-sync-dev libxcb-xfixes0-dev libxcb-shape0-dev libxcb-randr0-dev libxcb-render-util0-dev libxcb-util-dev libxcb-xinerama0-dev libxcb-xkb-dev libxkbcommon-dev libxkbcommon-x11-dev libfontconfig1-dev libfreetype-dev libx11-dev libx11-xcb-dev libxext-dev libxfixes-dev libxi-dev libxrender-dev libxcb1-dev libxcb-cursor-dev libxcb-glx0-dev libxcb-keysyms1-dev git cmake g++ gcc perl python libclang-dev libgl-dev libegl-dev libfontconfig1-dev libinput-dev1.2 静态编译
Qt5
cd qtbasemkdir buildcd build# 编译静态库../configure -developer-build -opensource -nomake examples -nomake tests --prefix=/opt/qt5.14.2/ -static -releasemake -j8make installQt6
mkdir build cd build ../configure -developer-build -opensource -nomake examples -nomake tests --prefix=/opt/qt6.2.9/ -static -releasecmake --build . --parallel 8cmake --install .1.3 报错
错误class numeric_limits<QT_PREPEND_NAMESPACE(qfloat16)> : public numeric_limits<float>5.14.2/qtbase/include/QtCore/../../src/corelib/global/qfloat16.h:295:7: error: ‘numeric_limits’ is not a class template295 | class numeric_limits<QT_PREPEND_NAMESPACE(qfloat16)> : public numeric_limits<float>| ^~~~~~~~~~~~~~qtbase/src/corelib/global/qglobal.h,添加#include <limits>; #ifdef __cplusplus# include <type_traits># include <cstddef># include <utility># include <limits>#endif1.4 添加环境变量
export PATH=/opt/qt5/bin:$PATH # 可执行程序环境变量export LD_LIBRARY_PATH=/opt/qt5/lib:$LD_LIBRARY_PATH # 链接库环境变量1.5 下载安装QtCreator
下载最新版本的Qt Creator安装包,也可以下载源码编译;
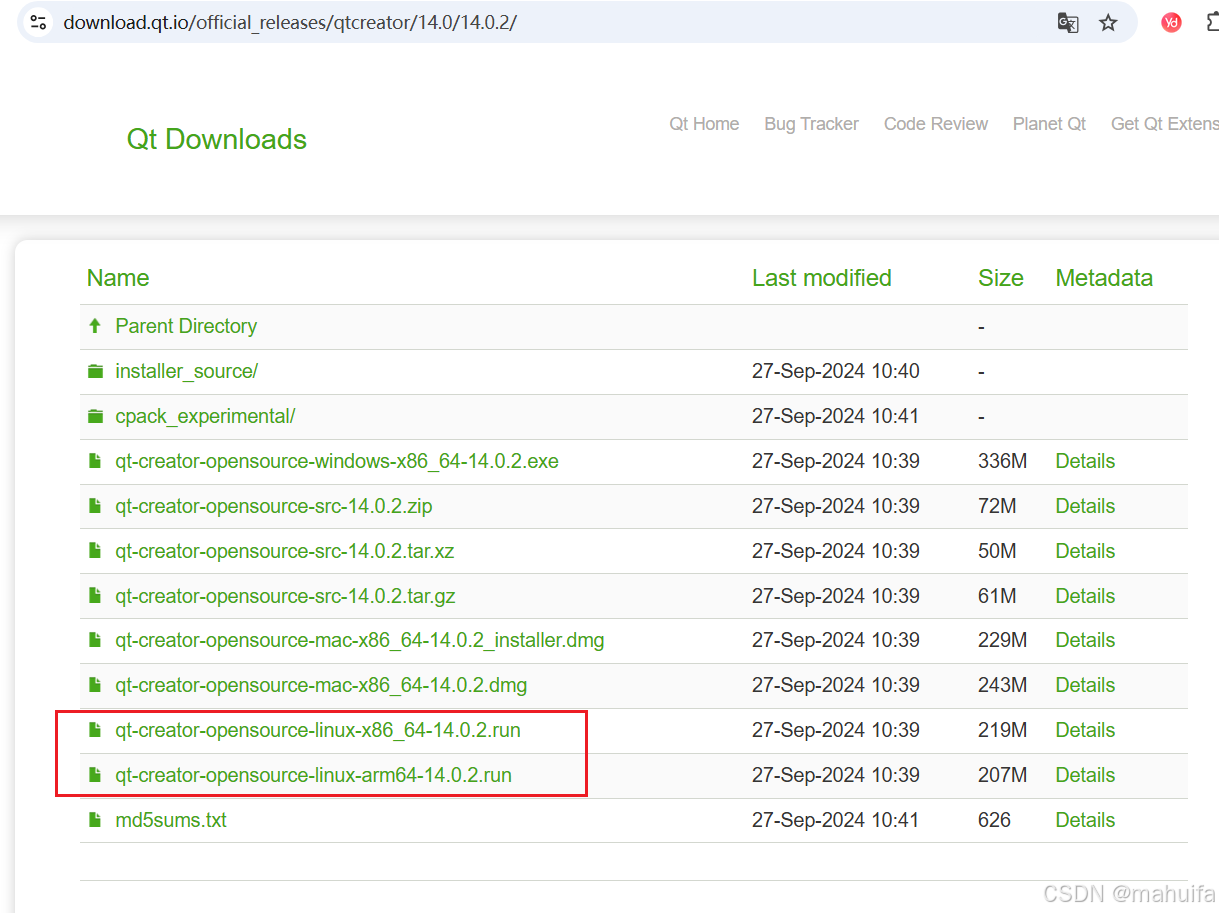
下载后使用sudo chmod 777 ./qt-creator*.run设置文件权限,然后使用sudo ./qt-creator-opensource-linux-x86_64-14.0.2.run命令运行安装。
安装完成后配置编译器;
点击【工具】->【外部】->【配置】,打开【首选项】;
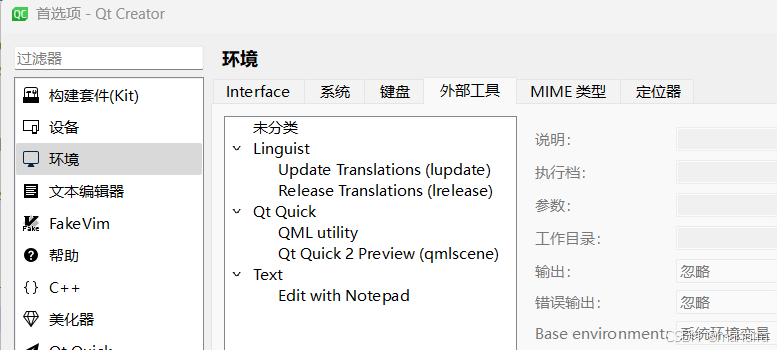
点击【Kit】->【Qt版本】->【添加】,找到自己编译安装的Qt安装路径下编译器中的QMake;
/opt/qt5/bin/qmake; 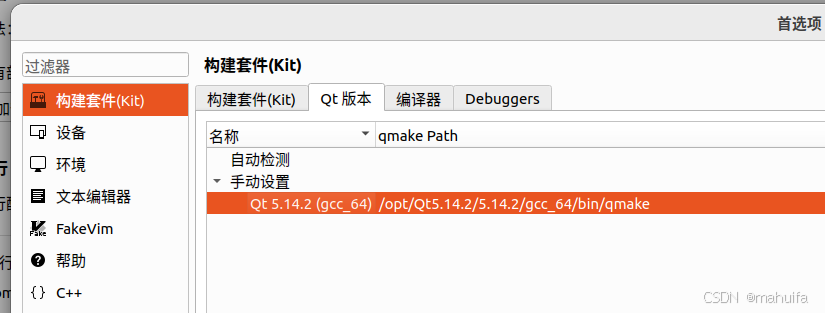
然后选择【构建套件Kit】,点击【添加】;
编译器选择gcc/g++,调试器选择GDB,Qt版本选择刚才添加的qmake名称;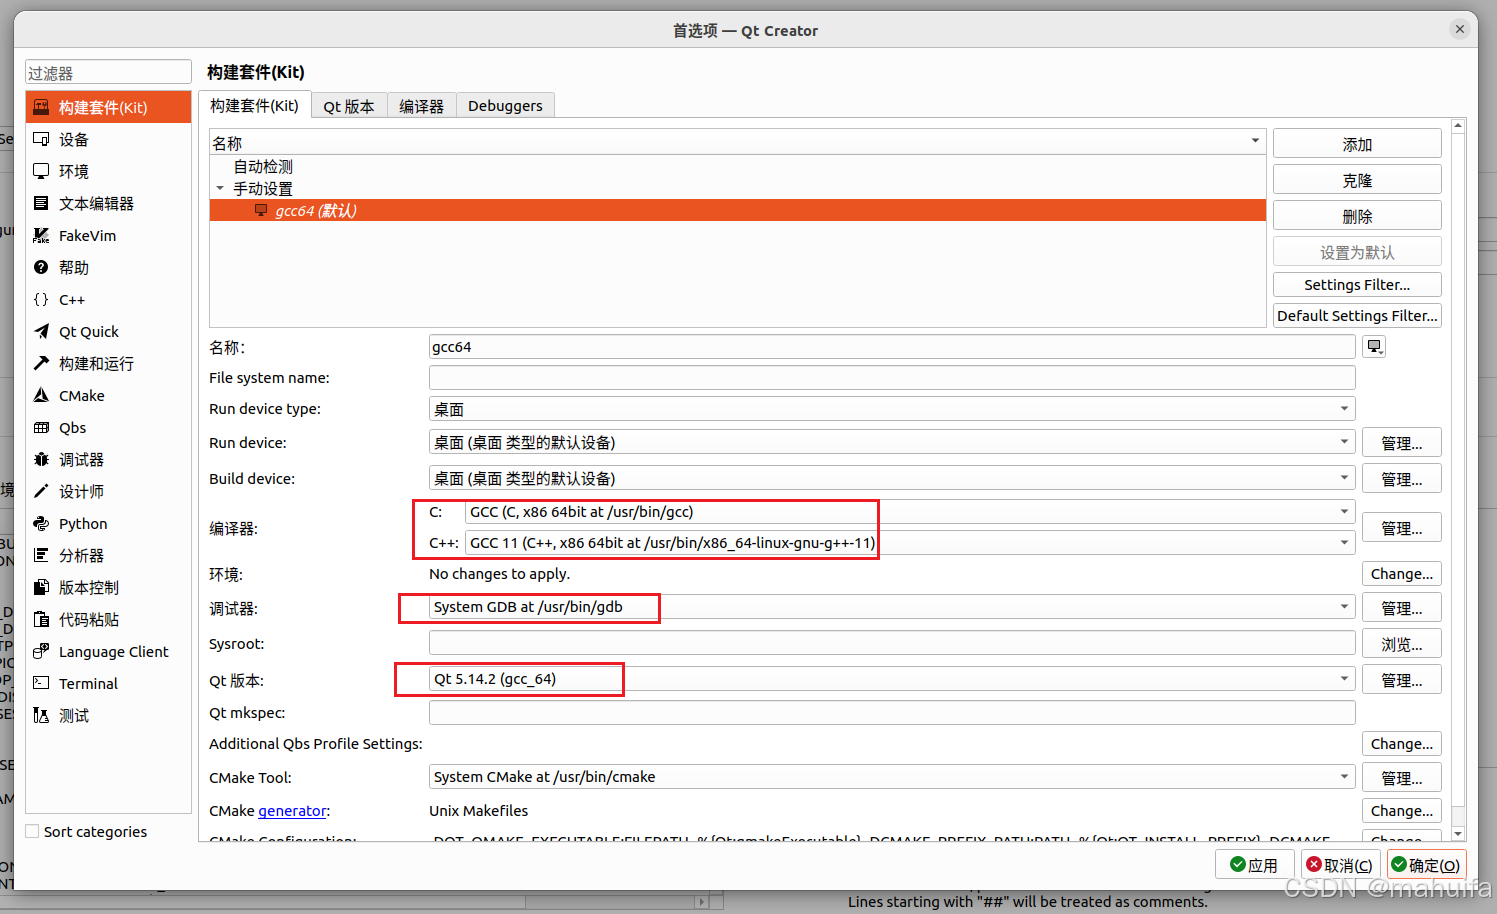
配置完成后创建一个工程,选择QMake,刚才添加的编译器就可以编译代码了。
3、配置linuxdeployqt环境
1.1 在线安装依赖
sudo apt install patchelf libfuse2patchelf用于修改现有的ELF可执行文件和库(修改可执行程序去寻找动态库的路径,默认是从环境变量找);
libfuse2 Linux FUSE(用户空间中的文件系统)接口的参考实现。(可以不安装,如果linuxdeployqt运行提示缺失再安装)
1.2 使用linuxdeployqt提供的程序
下载linuxdeployqt可执行程序linuxdeployqt-continuous-x86_64.AppImage或者下载修改版本使用sudo chmod 777 linuxdeployqt-continuous-x86_64.AppImage设置文件权限;然后使用linuxdeployqt-continuous-x86_64.AppImage -version 命令检查程序是否可以运行,在高版本的ubuntu或者不支持的系统需要自己编译源码;注意: linux只提供了x86-64架构的可执行程序。如果显示找不到Qt库则需要将Qt库的lib路径添加环境变量。 1.3 编译安装linuxdeployqt
下载linuxdeployqt源码;解压后使用qt creator打开linuxdeployqt.pro文件; 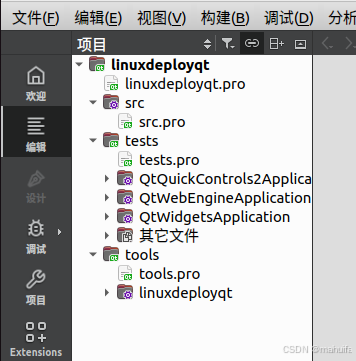
if (strverscmp (glcv, "2.32") >= 0) 判断功能注释掉; 
注意: linuxdeployqt中调用appimagetool打包程序需要联网,appimagetool打包程序时会依赖于type2-runtime程序,如果没有安装runtime则使用linuxdeployqt每次运行都会从github下载runtime,速度慢,并且需要联网,如果没有联网或者无法访问github则打包第三步会失败,后续给出解决办法。
直接开始编译,然后在编译生成的build文件夹中的bin文件夹内找到linuxdeployqt;

sudo cp linuxdeployqt /usr/local/bin/将linuxdeployqt添加到环境变量可以找到的路径下;使用linuxdeployqt -version命令验证是否安装成功; 
gedit ~/.bashrc打开文件..bashrc文件;添加Qt环境变量;export LD_LIBRARY_PATH=/opt/Qt5.14.2/5.14.2/gcc_64/lib:$LD_LIBRARY_PATH;然后保存关闭文件,使用source .bashrc使配置生效。 linuxdeployqt: error while loading shared libraries: libQt5Core.so.5: cannot open shared object file: No such file or directory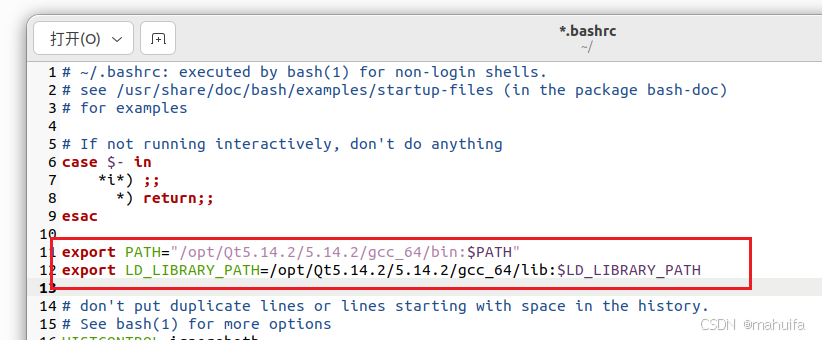
4、使用linuxdeployqt打包依赖
linuxdeployqt工作流程:
将依赖库文件打包到当前路径下;使用patchelf修改可执行程序查找动态库的路径;使用appimagetool将打包好的可执行程序和依赖库制作为AppImage程序。 这三个步骤可以一步全部执行,也可以单独执行;
如果使用-appimage全部执行可能会报错,导致步骤中断;
如果执行第一步失败,则打包的依赖库不全,无法使用;
如果第一步执行完成,第二步失败,则依赖库打包完成,但是拷贝到其它电脑上后还是无法找到动态库,因为这时可执行程序是从系统环境变量去找动态库,可以单独使用patchelf命令修改查找路径;
如果前两步执行完成,就可以将整个文件夹复制到其它电脑上使用了;
第三步是将整个文件夹制作为一个单独可以运行的AppImage程序。
1.1 linuxdeployqt使用选项
| 选项 | 说明 |
|---|---|
| -always-overwrite | 复制文件,即使目标文件存在。 |
| -appimage | 创建一个AppImage(默认包含-bundle-non-qt-lib) |
| -bundle-non-qt-libs | 打包非Qt库 |
| -exclude-libs= ⟨ \langle ⟨ list ⟩ \rangle ⟩ | 应排除的库列表,以逗号分隔。 |
| -ignore-glob= | 在搜索库时忽略相对于appdir的glob模式。 |
| -executable= | 让给定的可执行文件也使用部署的库 |
| -executable-dir= | 让文件夹中的所有可执行文件(递归)也使用部署的库 |
| -extra-plugins= | 需要部署的额外插件列表,以逗号分隔。 |
| -no-copy-copyright-files | 不部署版权文件。 |
| -no-plugins | 跳过插件部署。 |
| -no-strip | 不要在二进制文件上运行‘strip’。 |
| -no-translations | 跳过翻译的部署。 |
| -qmake= | 要使用的qmake可执行文件。 |
| -qmldir= | 扫描指定路径中的QML导入。 |
| -qmlimport= | 添加给定的路径到QML模块搜索位置。 |
| -show-exclude-libs | 打印排除库列表。 |
| -verbose=<0-3> | 0 =无输出,1 =错误/警告(默认),2 =正常,3 =调试。 |
| -updateinformation= | 嵌入更新信息string;如果安装了zsyncmake,生成zsync文件 |
| -version | 打印版本语句并退出。 |
示例:
linuxdeployqt 可执行程序 -appimage1.2 patchelf修改动态库搜索路径
如果打包第二步执行失败,则可以手动使用patchelf修改动态库搜索路径。
patchelf基本用法:
$ORIGIN是一个特殊的占位符,它表示当前可执行文件所在的目录 RPATH 是一个嵌入到 ELF 文件中的路径列表,用于告诉动态链接器在运行时去哪里查找共享库。 patchelf --set-rpath '$ORIGIN/lib/' ./RadarServer # 设置程序动态库链接路径patchelf --print-rpath ./RadarServer # 打印链接路径1.3 验证
打包完成后需要验证依赖库是否打包完整,可执行程序是否能从当前路径下找到动态库。
使用下列命令临时清除动态库环境变量:export LD_LIBRARY_PATH=""ldd ./可执行程序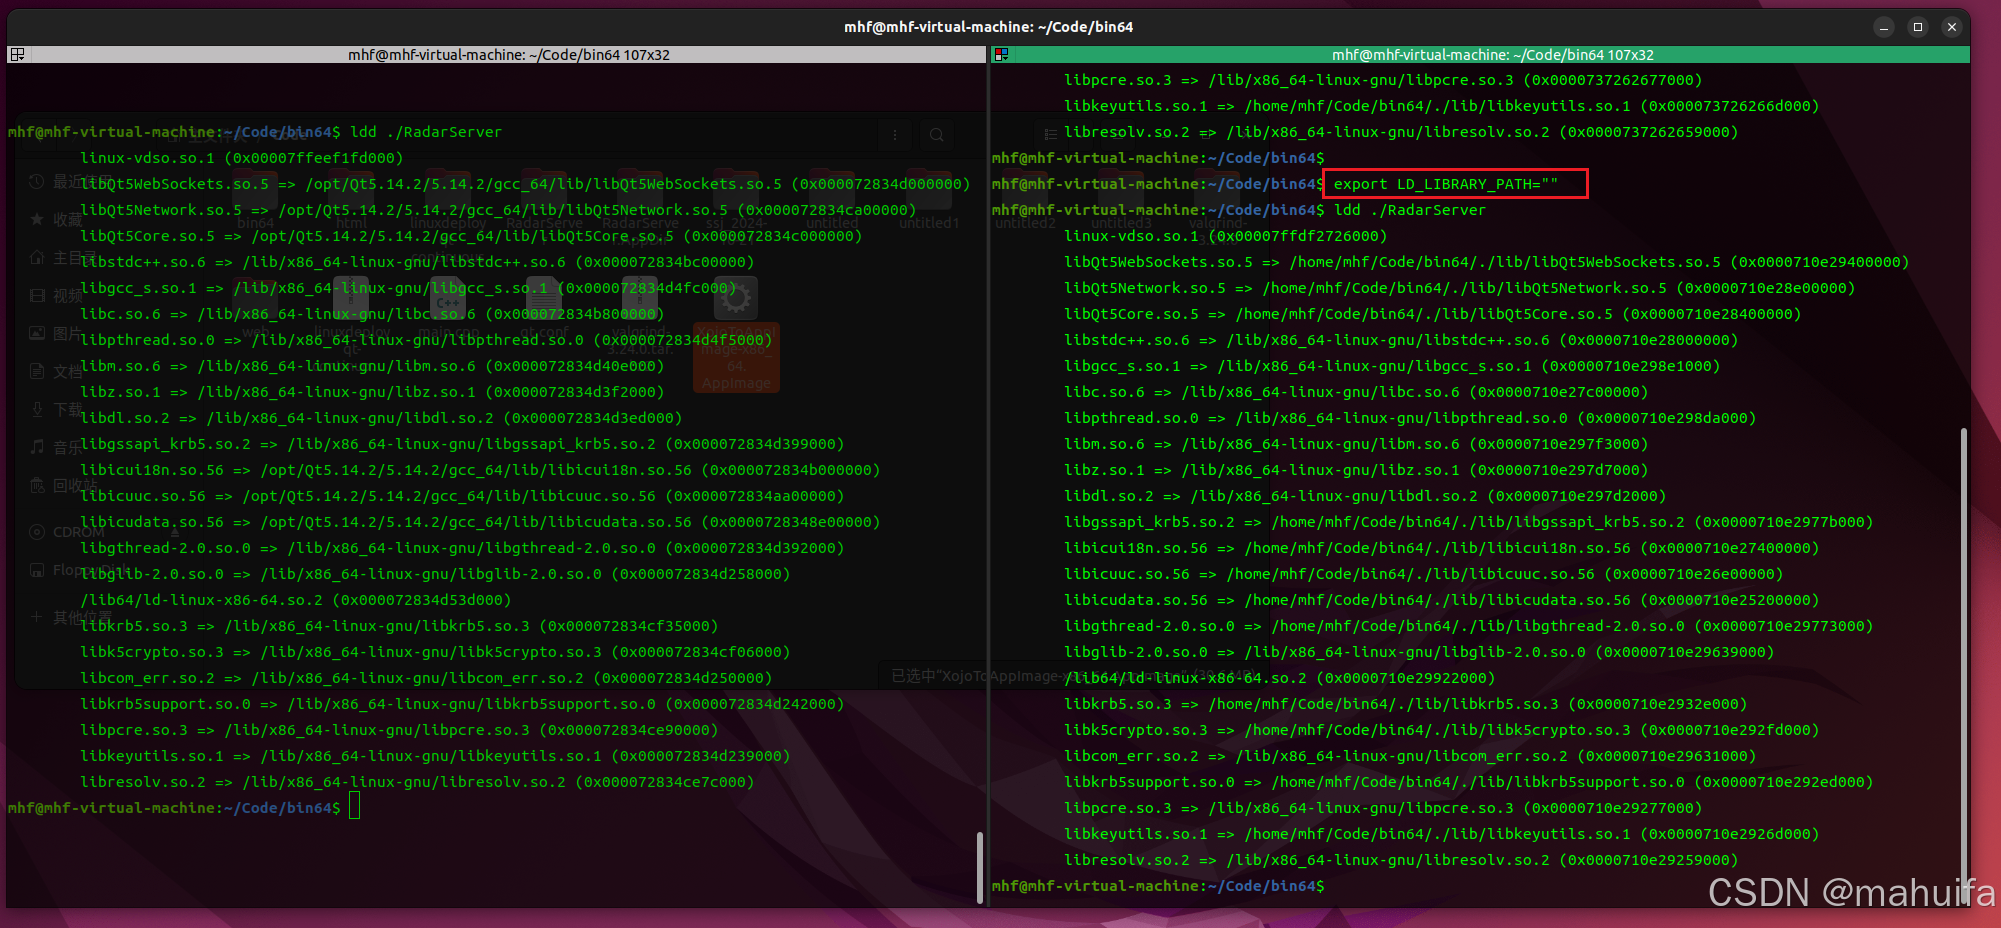
1.4 修改linuxdeployqt源码
注意: 如果离线想通过linuxdeployqt直接生成appimage包,就需要修改源码,否则可用跳过。
由于linuxdeployqt调用appimagetool命令没有指定运行时,所以名称使用-appimage打包时都会从github下载runtime,离线环境或者网络差的环境无法使用;需要离线使用linuxdeployqt指定运行时就需要修改linuxdeployqt源码。 下载安装runtime,放到/usr/local/bin路径下;打开linuxdeployqt源码,找到shared.cpp文件,搜索appimagetool;在下图中位置添加指定运行时runtime的路径;然后编译生成linuxdeployqt就可以使用了。 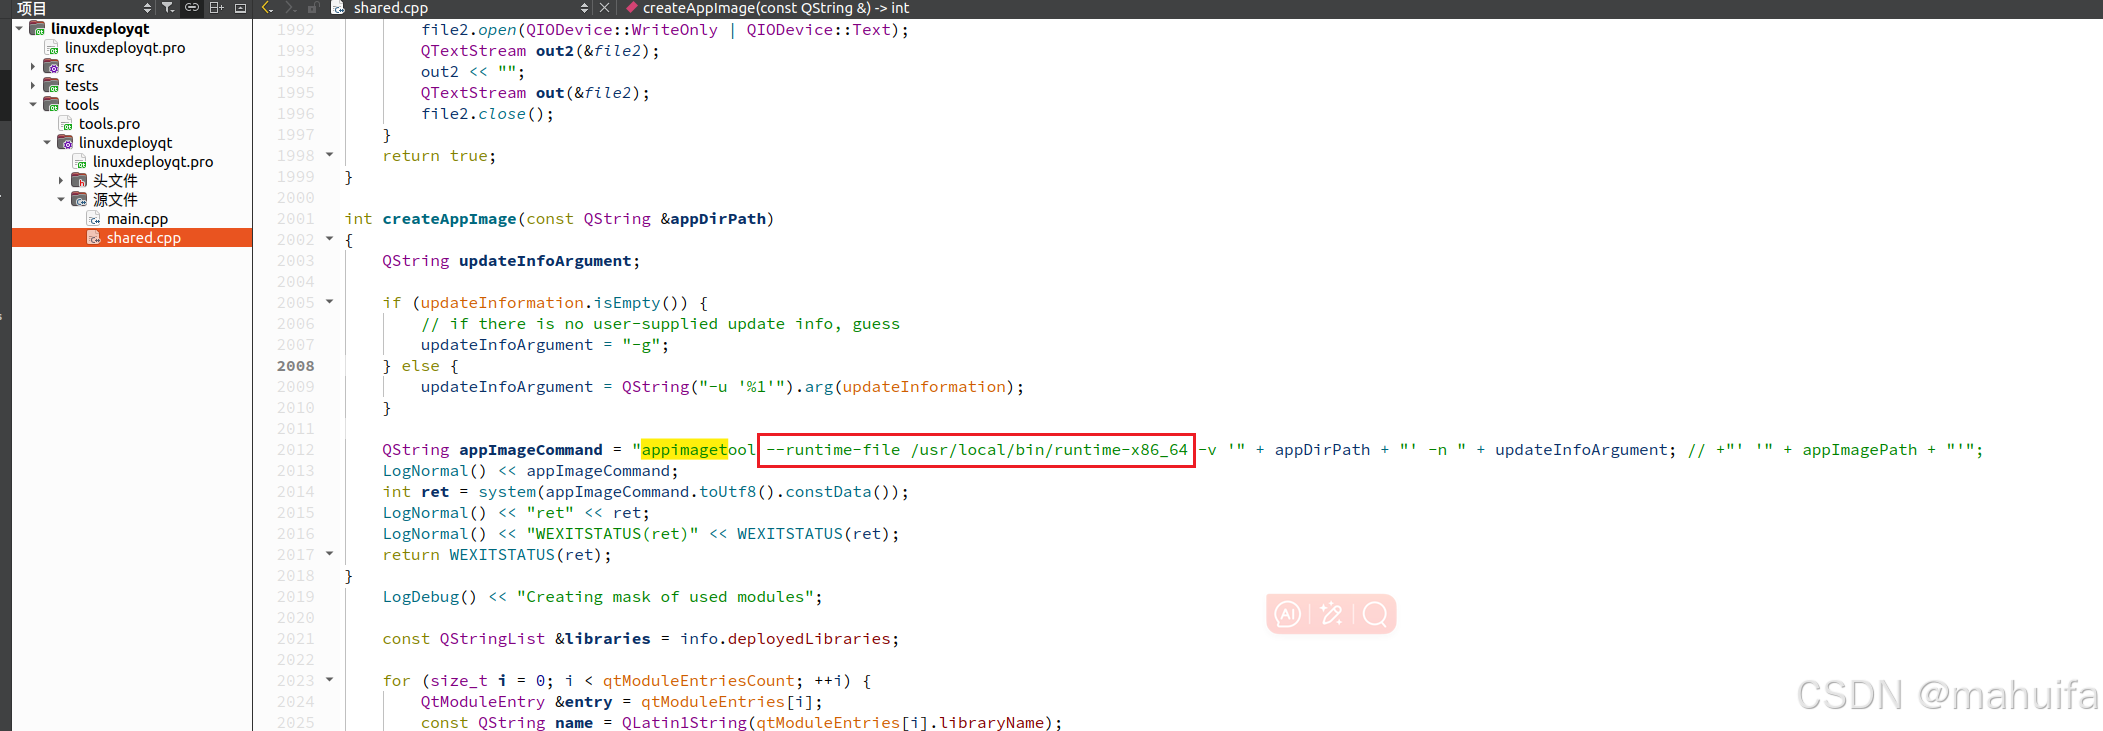
5、使用appimagetool打包生成AppImage程序
AppImage是一种将应用程序及其所有依赖项打包成一个单一可执行文件的格式。这种格式使得分发和运行应用程序变得非常简单,因为用户无需担心安装过程中可能出现的各种问题,如权限不足、缺少依赖库等。以下是关于AppImage程序的一些详细说明:
特点
独立性:AppImage包含应用程序的所有依赖项,因此可以在任何支持的Linux发行版上运行,而不需要额外的安装步骤。便携性:AppImage是一个单一的可执行文件,可以方便地复制、移动和分享。安全性:由于AppImage是自包含的,它不会对系统进行任何更改,因此减少了潜在的安全风险。更新简便:用户可以简单地下载新版本的AppImage并替换旧版本,而无需卸载或重新安装。工作原理
打包:开发者使用工具(如appimagetool)将应用程序及其所有依赖项打包成一个AppImage文件。运行:用户下载AppImage文件后,只需赋予其执行权限(例如通过命令chmod +x your-app.AppImage),然后直接运行即可。集成桌面环境:AppImage通常会自动集成到用户的桌面环境中,使其在应用菜单中可见。 https://doc.appimage.cn/docs/home/
https://appimage.org/
https://specifications.freedesktop.org/menu-spec/latest/category-registry.html
1.1 安装appimagetool
下载runtime可执行程序;runtime-x86_64下载appimagetool可执行程序appimagetool-x86_64.AppImage;https://appimage.github.io/appimagetool/使用下面命令安装sudo chmod 777 runtime-x86_64 appimagetool-x86_64.AppImage # 设置权限sudo cp runtime /usr/local/bin/runtimesudo cp appimagetool-x86_64.AppImage /usr/local/bin/appimagetool1.2 appimagetool选项
appimagetool [选项… ] 可执行程序文件夹 [生成文件名]
[]中是可选
例如:
appimagetool ./untitled4.App --runtime-file /usr/local/bin/runtime-x86_64
将untitled4.App文件夹打包
指定运行时文件路径--runtime-file /usr/local/bin/runtime-x86_64。
| 选项 | 说明 |
|---|---|
| -h | 帮助 |
| -l, --list | 列出SOURCE AppImage中的文件 |
| -u, --updateinformation | 嵌入更新信息字符串;如果安装了zsyncmake,生成zsync文件 |
| -g, --guess | 基于常用CI系统(GitHub actions, GitLab CI)设置的环境变量猜测更新信息 |
| –version | 显示版本号 |
| -v, --verbose | 输出详细信息 |
| -s, --sign | 用gpg[2]签名 |
| –comp | 压缩 |
| -n, --no-appstream | 不检查AppStream元数据 |
| –exclude-file | 除了.appimageignore之外,还使用指定文件作为mksquash的排除文件。 |
| –runtime-file | 指定runtime文件路径 |
| –sign-key | 用于gpg[2]签名的密钥ID |
| –sign-args | 使用gpg[2]签名时使用的额外参数 |
1.3 打包AppImage工程
创建AppImage
文件夹结构规范
不按照文件夹规范也可以,最简单的是创建一个文件夹,文件夹中包含可执行程序、可执行程序.desktop、可执行程序.png三个文件;然后使用linuxdeployqt打包依赖库,如果没有desktop和图标,则在使用linuxdeployqt打包时会生成默认的文件,但是需要修改文件内容;使用appimagetool打包成appimage程序;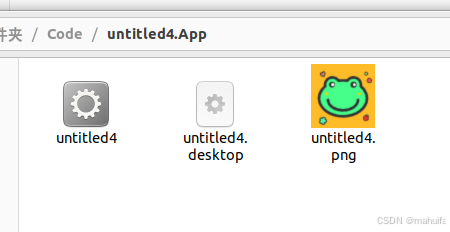
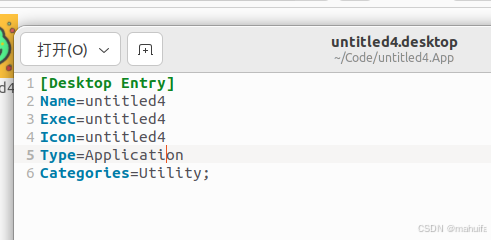
desktop规范
.desktop基本文件格式
可用的键值对
[Desktop Entry]
Name=应用程序的具体名称
Exec=可执行程序路径
Icon=图片名称(不包含后缀)
Type=Application # 类型, Application (类型1); Link (类型2) Directory (3型)
Categories=Utilities # 注册类别,必须项
注册类别主要分类
| 主要类别 | 描述 | Notes |
|---|---|---|
| AudioVideo | 用于呈现、创建或处理多媒体(音频/视频)的应用程序 | |
| Audio | 音频应用程序 | Desktop entry must include AudioVideo as well |
| Video | 视频应用 | Desktop entry must include AudioVideo as well |
| Development | 开发应用程序 | |
| Education | 教学软件 | |
| Game | 游戏 | |
| Graphics | 用于查看、创建或处理图形的应用程序 | |
| Network | 网络应用程序,如web浏览器 | |
| Office | 办公室类型的应用程序 | |
| Science | 科学软件 | |
| Settings | 设置应用程序 | 条目可以出现在单独的菜单中,也可以作为“控制中心”的一部分。 |
| System | 系统应用程序,“系统工具”,例如日志查看器或网络监视器 | |
| Utility | 小型公用事业应用,“辅助程序” |
示例:
6、错误记录
执行linuxdeployqt时报错,需要安装sudo apt install libfuse2https://github.com/AppImage/AppImageKit/wiki/FUSE dlopen(): error loading libfuse.so.2AppImages require FUSE to run. You might still be able to extract the contents of this AppImage if you run it with the --appimage-extract option. See https://github.com/AppImage/AppImageKit/wiki/FUSE for more informationlinuxdeployqt (commit b00a83d), build 70 built on 2024-09-08 11:56:56 UTCERROR: The host system is too new.Please run on a system with a glibc version no newer than what comes with the oldestcurrently supported mainstream distribution (Ubuntu Focal Fossa), which is glibc 2.31.This is so that the resulting bundle will work on most still-supported Linux distributions.For more information, please seehttps://github.com/probonopd/linuxdeployqt/issues/340.bashrc中添加export LD_LIBRARY_PATH=/opt/Qt5.14.2/5.14.2/gcc_64/lib:$LD_LIBRARY_PATH ./linuxdeployqt: error while loading shared libraries: libQt5Core.so.5: cannot open shared object file: No such file or directory.bashrc中添加export PATH=/opt/Qt5.14.2/5.14.2/gcc_64/bin:$PATH ERROR: Desktop file missing, creating a default one (you will probably want to edit it)ERROR: Icon file missing, creating a default one (you will probably want to edit it)qmakePath 3= ""ERROR: qmake not found on the $PATHsudo apt install patchelf relativeBinPath: "untitled"Keeping existing AppRunqmakePath 3= ""ERROR: Could not start patchelf.ERROR: Make sure it is installed on your $PATH.ERROR: Error reading rpath with patchelf "libQt5Widgets.so" : ""ERROR: Error reading rpath with patchelf "libQt5Widgets.so" : ""appimagetool,打包的依赖库已经可以使用了,如果需要打包成appimage程序,就可以下载安装appimagetool和runtime; relativeBinPath: "untitled"Keeping existing AppRunqmakePath 3= ""sh: 1: appimagetool: not founddefault.desktop文件内缺少必须项Categories; WARNING: "/home/mhf/Code/test/qt.conf" already exists, will not overwrite.fusermount3 version: 3.10.5appimagetool, continuous build (git version feac857), build 185 built on 2024-11-24 19:31:44 UTCWARNING: zsyncmake command is missing, please install it if you want to use binary delta updatesDesktop file: /home/mhf/Code/test/default.desktopCategories entry not found in desktop file.desktop file is missing a Categories= keydefault.desktop中Categories设置的值错误,必须是给出的固定值; /home/mhf/Code/test/default.desktop: error: value "Utilities" for key "Categories" in group "Desktop Entry" contains an unregistered value "Utilities"; values extending the format should start with "X-"Using app name extracted from desktop file: Application/home/mhf/Code/test should be packaged as Application-x86_64.AppImageDeleting pre-existing .DirIconCreating .DirIcon symlink based on information from desktop fileGenerating squashfs...Downloading runtime file from https://github.com/AppImage/type2-runtime/releases/download/continuous/runtime-x86_64libcurl's default CA certificate bundle file /etc/ssl/certs/ca-certificates.crt was found on this systemlibcurl's default CA certificate bundle directory /etc/ssl/certs was found on this system* Host github.com:443 was resolved.* IPv6: (none)* IPv4: 20.205.243.166* Trying 20.205.243.166:443...* Connected to github.com (20.205.243.166) port 443* ALPN: curl offers h2,http/1.1* CAfile: /etc/ssl/certs/ca-certificates.crt* CApath: /etc/ssl/certs* SSL connection using TLSv1.3 / TLS_AES_128_GCM_SHA256 / X25519 / id-ecPublicKey* ALPN: server accepted h2* Server certificate:* subject: CN=github.com* start date: Mar 7 00:00:00 2024 GMT* expire date: Mar 7 23:59:59 2025 GMT* subjectAltName: host "github.com" matched cert's "github.com"* issuer: C=GB; ST=Greater Manchester; L=Salford; O=Sectigo Limited; CN=Sectigo ECC Domain Validation Secure Server CA* SSL certificate verify ok.* Certificate level 0: Public key type EC/prime256v1 (256/128 Bits/secBits), signed using ecdsa-with-SHA256* Certificate level 1: Public key type EC/prime256v1 (256/128 Bits/secBits), signed using ecdsa-with-SHA384* Certificate level 2: Public key type EC/secp384r1 (384/192 Bits/secBits), signed using ecdsa-with-SHA384* using HTTP/2* [HTTP/2] [1] OPENED stream for https://github.com/AppImage/type2-runtime/releases/download/continuous/runtime-x86_64* [HTTP/2] [1] [:method: GET]* [HTTP/2] [1] [:scheme: https]* [HTTP/2] [1] [:authority: github.com]* [HTTP/2] [1] [:path: /AppImage/type2-runtime/releases/download/continuous/runtime-x86_64]* [HTTP/2] [1] [accept: */*]> GET /AppImage/type2-runtime/releases/download/continuous/runtime-x86_64 HTTP/2Host: github.comAccept: */*sudo apt install zsync WARNING: "/home/mhf/Code/RadarServer.AppDir/qt.conf" already exists, will not overwrite.fusermount3 version: 3.10.5appimagetool, continuous build (git version feac857), build 185 built on 2024-11-24 19:31:44 UTCWARNING: zsyncmake command is missing, please install it if you want to use binary delta updatesfatal: 不是 git 仓库(或者任何父目录):.gitFailed to run 'git rev-parse --short HEAD: Child process exited with code 128 (code 128)Desktop file: /home/mhf/Code/RadarServer.AppDir/default.desktop/home/mhf/Code/RadarServer.AppDir/default.desktop: error: value "Network" for boolean key "Terminal" in group "Desktop Entry" contains invalid characters, boolean values must be "false" or "true"ERROR: Desktop file contains errors. Please fix them. Please see https://standards.freedesktop.org/desktop-entry-spec/1.0/n for more information.7、参考
1.1 Qt
从Git构建Qt 5 - Qt Wiki从Git构建Qt 6 - Qt WikiQt Creator安装包1.2 linuxdeployqt
patchelf
libfuse2
linuxdeployqt
linuxdeploy
Linuxdeploy用户指南
1.3 appimage
runtime下载appimagetool下载AppImageappimage英文文档appimage中文文档AppImage-CNappimagetool下载地址appimagetool源码及下载地址desktop规范desktop可用键值对8、视频
linux下QT程序打包
linux下使用linuxdeployqt工具打包Qt程序