【OpenCV】 ⚠️实战⚠️ 女子深夜久久不能入眠,300行写出全能扫描王! ☢️建议手收藏☢️
- 概述
- 图像透视
- 获取透视矩阵
- 透视变换
- 预处理
- 其他函数
- 主函数
- 输出结果
- 最终转换结果
概述
今天带大家使用我们之前学会的知识来实现一个简易版的全能扫描王. 代码分为 3 个部分: 主函程序, 预处理, 其他程序.

图像透视
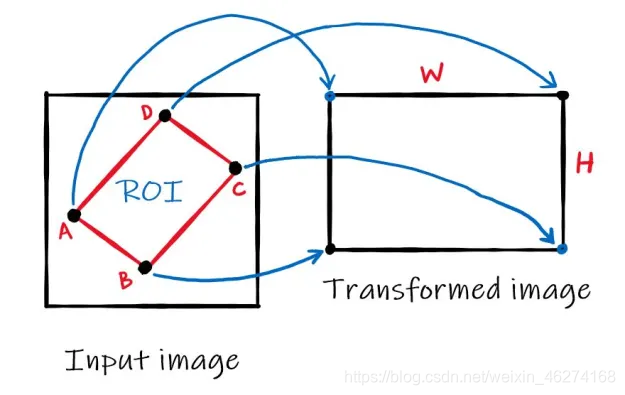
透视变换 (Perspective Transformation) 是将成像投影到一个新的视平面 (Viewing Plane). 通过改变图像或视屏的透视图, 我们可以更好的了解所需信息. 如图:

获取透视矩阵

格式:
M = cv2.getPerspectiveTransform(src, dst, solveMethod=None)
参数:
src: 源图像中四边形顶点的坐标
dst: 目标图像中相应四边形顶点的坐标
返回值:
- M: 透视变换矩阵
矩阵例子:
[[ 8.75046884e+00 -9.23660638e+00  0.00000000e+00]
 [ 4.43412734e-01 -6.70045886e+00  2.19700000e+03]
 [ 2.51096074e-03 -3.35871928e-03  1.00000000e+00]]
透视变换
格式:
cv2.warpPerspective(src, M, dsize, dst=None, flags=None, borderMode=None, borderValue=None)
参数:
- src: 输入图片
- M: 透视变换矩阵
- dsize: 输出图片的大小
返回值:
- 透视变换后的图片
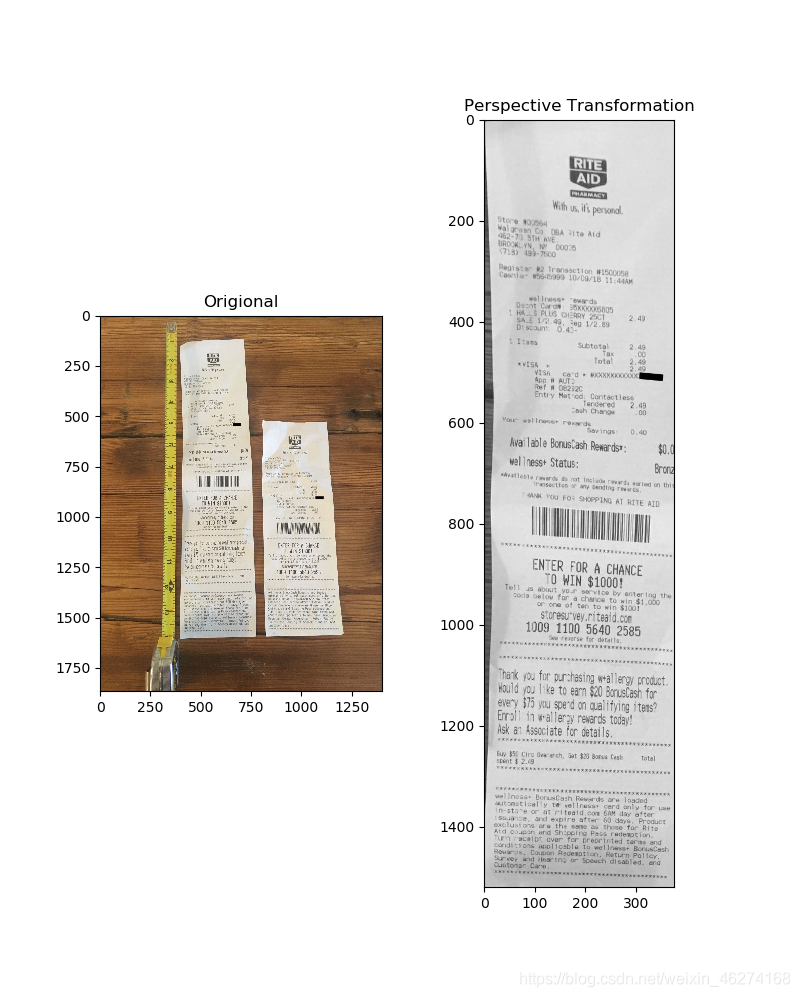
例子:

预处理
通过图片伸缩, 灰度转换, 高斯滤波, 边缘检测等方法, 实现图片预处理
代码:
import cv2
from matplotlib import pyplot as plt
from my_functions import resize
from my_functions import four_point_transform


def read_image(image_path, visualize=False):
    """
    读取图片
    :param image_path: 图片路径
    :param visualize: 可视化, 默认为False
    :return: 返回原始图片, 裁剪后的图片, 边缘, 图片伸缩比例
    """

    # 读取图片
    image = cv2.imread(image_path)

    # 计算伸缩比例
    ratio = image.shape[0] / 500.0

    # 深拷贝
    image_copy = image.copy()

    # 缩放大小
    image_resize = resize(image_copy, height=500)

    # 转换成灰度图
    image_gray = cv2.cvtColor(image_resize, cv2.COLOR_BGR2GRAY)

    # 高斯滤波
    image_gaussian = cv2.GaussianBlur(image_gray, (5, 5), 0)

    # Canny边缘检测
    edge = cv2.Canny(image_gaussian, 75, 200)

    if visualize:
        """图片展示"""

        # 绘制子图
        f, ax = plt.subplots(2, 2, figsize=(8, 10))
        ax[0, 0].imshow(cv2.cvtColor(image_resize, cv2.COLOR_BGR2RGB))
        ax[0, 1].imshow(image_gray, "gray")
        ax[1, 0].imshow(image_gaussian, "gray")
        ax[1, 1].imshow(edge, "gray")

        # 去除x, y坐标
        ax[0, 0].set_xticks([])
        ax[0, 0].set_yticks([])
        ax[0, 1].set_xticks([])
        ax[0, 1].set_yticks([])
        ax[1, 0].set_xticks([])
        ax[1, 0].set_yticks([])
        ax[1, 1].set_xticks([])
        ax[1, 1].set_yticks([])

        # 标题
        ax[0, 0].set_title("original")
        ax[0, 1].set_title("image gray")
        ax[1, 0].set_title("image gaussian blur")
        ax[1, 1].set_title("image edge")

        plt.show()

    # 返回
    return image, image_resize, edge, ratio


def image_calculate_contours(image_resize, edge, visualize=False):
    """
    计算轮廓
    :param image_resize: 裁剪后的图片
    :param edge: 边缘
    :param visualize: 可视化, 默认为False
    :return: 外接长方形数组
    """

    # 轮廓检测
    contours, hierarchy = cv2.findContours(edge.copy(), cv2.RETR_LIST, cv2.CHAIN_APPROX_SIMPLE)

    # 轮廓排序
    contours = sorted(contours, key=cv2.contourArea, reverse=True)

    # 取最大的5个
    contours_5 = contours[:5]

    # 长方形数字
    approx_array = []

    # 遍历轮廓
    for c in contours_5:

        # 计算轮廓周长
        length = cv2.arcLength(c, True)

        # 计算大约轮廓
        approx = cv2.approxPolyDP(c, 0.02 * length, True)

        # 如果是四边形, 取出
        if len(approx) == 4:
            approx_array.append(approx)

    if visualize:
        """图片展示"""

        # 绘制轮廓1
        draw_img_1 = cv2.drawContours(image_resize.copy(), contours, 0, (0, 255, 255), 2)

        # 绘制轮廓2
        draw_img_2 = cv2.drawContours(image_resize.copy(), contours_5, 0, (0, 255, 255), 2)

        # 绘制轮廓3
        draw_img_3 = cv2.drawContours(image_resize.copy(), approx_array, 0, (0, 255, 255), 2)

        # 绘制子图
        f, ax = plt.subplots(2, 2, figsize=(8, 10))
        ax[0, 0].imshow(cv2.cvtColor(image_resize, cv2.COLOR_BGR2RGB))
        ax[0, 1].imshow(cv2.cvtColor(draw_img_1, cv2.COLOR_BGR2RGB))
        ax[1, 0].imshow(cv2.cvtColor(draw_img_2, cv2.COLOR_BGR2RGB))
        ax[1, 1].imshow(cv2.cvtColor(draw_img_3, cv2.COLOR_BGR2RGB))

        # 去除x, y坐标
        ax[0, 0].set_xticks([])
        ax[0, 0].set_yticks([])
        ax[0, 1].set_xticks([])
        ax[0, 1].set_yticks([])
        ax[1, 0].set_xticks([])
        ax[1, 0].set_yticks([])
        ax[1, 1].set_xticks([])
        ax[1, 1].set_yticks([])

        # 标题
        ax[0, 0].set_title("original")
        ax[0, 1].set_title("contours")
        ax[1, 0].set_title("contours biggest 5")
        ax[1, 1].set_title("contours approx")

        plt.show()

    # 返回
    return approx_array


def image_transform(image, approx_array, ratio, visualize=False):
    """
    图片转换
    :param image: 原始图像
    :param approx_array: 外接长方形坐标数组
    :param ratio: 图片拉伸比例
    :param visualize: 可视化, 默认为False
    :return: 返回最终结果
    """

    # 透视变换
    warped = four_point_transform(image, approx_array[0].reshape(4, 2) * ratio)

    # 转换为灰度图
    warped_gray = cv2.cvtColor(warped, cv2.COLOR_BGR2GRAY)

    # 二值化
    ret, thresh = cv2.threshold(warped_gray, 100, 255, cv2.THRESH_BINARY)

    if visualize:
        """图片展示"""

        # 绘制子图
        f, ax = plt.subplots(2, 2, figsize=(8, 10))
        ax[0, 0].imshow(cv2.cvtColor(image, cv2.COLOR_BGR2RGB))
        ax[0, 1].imshow(cv2.cvtColor(warped, cv2.COLOR_BGR2RGB))
        ax[1, 0].imshow(warped_gray, "gray")
        ax[1, 1].imshow(thresh, "gray")

        # 去除x, y坐标
        ax[0, 0].set_xticks([])
        ax[0, 0].set_yticks([])
        ax[0, 1].set_xticks([])
        ax[0, 1].set_yticks([])
        ax[1, 0].set_xticks([])
        ax[1, 0].set_yticks([])
        ax[1, 1].set_xticks([])
        ax[1, 1].set_yticks([])

        # 标题
        ax[0, 0].set_title("original")
        ax[0, 1].set_title("warped")
        ax[1, 0].set_title("warped gray")
        ax[1, 1].set_title("thresh")

        plt.show()

    # 返回
    return warped_gray
其他函数
import numpy as np
import cv2


def order_points(points):
    """
    坐标点排序
    :param points: 轮廓坐标
    :return: 返回排序完的坐标
    """

    # 一共4个坐标点, 左上, 右上, 右下, 左下
    rect = np.zeros((4, 2), dtype=np.float32)

    # 计算左上, 右下
    s = points.sum(axis=1)
    rect[0] = points[np.argmin(s)]  # 和最小的是左上
    rect[2] = points[np.argmax(s)]  # 和最大的是右下

    # 计算右上, 左下
    diff = np.diff(points, axis=1)
    rect[1] = points[np.argmin(diff)]  # 差最小的是右上
    rect[3] = points[np.argmax(diff)]  # 差最小的是左下

    # 返回
    return rect


def four_point_transform(image, pts):
    """
    透视变换 (拉伸为长方形)
    :param image: 原始图像
    :param pts: 坐标点
    :return: 透视变换后的图
    """

    # 获取输入坐标点
    rect = order_points(pts)
    (top_left, top_right, bottom_left, bottom_right) = rect

    # 计算最大的w (勾股定理w = (Δx^2 + Δy^2)^1/2)
    widthA = np.sqrt(((bottom_right[0] - bottom_left[0]) ** 2) + ((bottom_right[1] - bottom_left[1]) ** 2))
    widthB = np.sqrt(((top_right[0] - top_left[0]) ** 2) + ((top_right[1] - top_left[1]) ** 2))
    maxWidth = max(int(widthA), int(widthB))

    # 计算最大的y (勾股定理y = (Δx^2 + Δy^2)^1/2)
    heightA = np.sqrt(((top_right[0] - bottom_right[0]) ** 2) + ((top_right[1] - bottom_right[1]) ** 2))
    heightB = np.sqrt(((top_left[0] - bottom_left[0]) ** 2) + ((top_right[1] - top_left[1]) ** 2))
    maxHeight = max(int(heightA), int(heightB))

    # 变换后对应坐标位置
    dst = np.array(
        [[0, 0],
         [maxWidth - 1, 0],
         [maxWidth - 1, maxHeight - 1],
         [0, maxHeight - 1]],
        dtype=np.float32
    )

    # 计算变换矩阵
    M = cv2.getPerspectiveTransform(rect, dst)
    print("变换矩阵:\n", M)  # 调试输出

    # 透视变换
    wraped = cv2.warpPerspective(image, M, (maxWidth, maxHeight))

    # 返回
    return wraped


def resize(image, width=None, height=None, inter=cv2.INTER_AREA):
    """
    修改图片大小
    :param image: 原图
    :param width: 宽
    :param height: 高
    :param inter: 模式
    :return: 修改好的图片
    """

    dim = None
    (h, w) = image.shape[:2]
    if width is None and height is None:
        return image
    if width is None:
        r = height / float(h)
        dim = (int(w * r), height)
    else:
        r = width / float(w)
        dim = (width, int(h * r))
    resized = cv2.resize(image, dim, interpolation=inter)

	# 返回
    return resized
主函数
import argparse
import cv2
from pre_process import read_image
from pre_process import image_calculate_contours
from pre_process import image_transform


def parse_opt():
    """设置参数"""

    parser = argparse.ArgumentParser()
    parser.add_argument("--image_path", type=str, default="images/receipt2.jpg", help="图片路径")
    args = parser.parse_args()

    return args


def main():
    """主函数"""

    args = parse_opt()

    # 读取图片
    image, image_resize, edge, ratio = read_image(image_path=args.image_path, visualize=True)

    # 计算轮廓
    approx_array = image_calculate_contours(image_resize, edge, visualize=True)

    # 图片转换
    final_result = image_transform(image=image, approx_array=approx_array, ratio=ratio, visualize=True)

    # 保存最终结果
    cv2.imwrite("final_result.jpg", final_result)

if __name__ == "__main__":
    main()
输出结果


最终转换结果
原图:

最终结果:
