harbor高可用简介
harbor目前有两种主流的高可用方案:
- 双主复制,harbor自带的镜像复制功能
- 多harbor实例共享后端存储

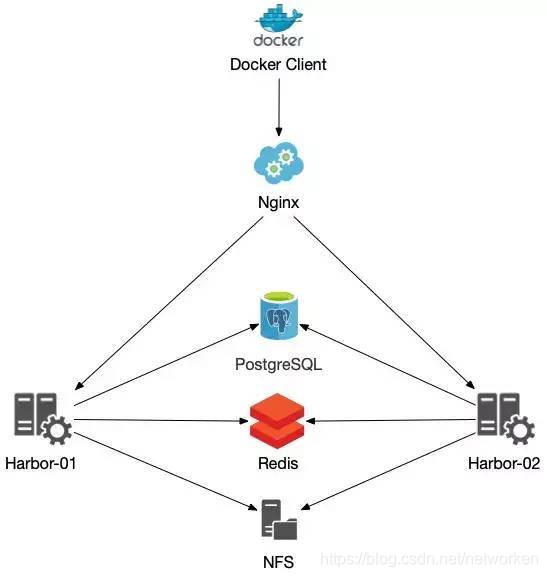
双主复制架构在遇到大镜像时有同步延迟,并且一个实例故障后需要手动重新开启复制策略才能再次同步,下面以阿里云环境为例,使用两台ECS实例+NFS后端共享存储方式部署高可用harbor,整体架构图如下:

该方案需要注意以下几点:
- 共享存储的选取,Harbor的后端存储目前支持本地文件系统、NFS、CephFS、azure、gcs、AWS s3,、swift 以及阿里云oss。
- Session在不同的实例上共享,在最新的harbor中,默认session会存放在redis中,只需要将redis独立出来即可,可以通过
redis sentinel或者redis cluster等方式来保证redis的可用性。 - 由于PostgreSQL多个实例无法共享一份数据文件,需要将harbor中的数据库拆出来独立部署,让多实例共用一个外部数据库,并将Harbor中默认创建在PostgreSQL的所有表的结构、初始数据等导入进单独部署的PostgreSQL服务中,PostgreSQL数据的冗余可以使用PostgreSQL的同步策略来实现。
harbor高可用部署
在阿里云申请以下资源:
| 资源类型 | 数量 | 地域 |
|---|---|---|
| ECS实例 | 2 | 华南1(深圳)-可用区D |
| NAS实例 | 1 | 华南1(深圳)-可用区D |
| RDS实例 | 1 | 华南1(深圳)-可用区D |
| Redis实例 | 1 | 华南1(深圳)-可用区D |
| SLB实例 | 1 | 华南1(深圳)-可用区D |
两台ECS实例信息:
| ECS主机名 | 私网IP | 公网IP | OS | 地域 |
|---|---|---|---|---|
| harbor001 | 172.18.8.242 | 120.79.96.163 | CentOS8.4 | 华南1(深圳)-可用区D |
| harbor002 | 172.18.8.243 | 120.79.96.169 | CentOS8.4 | 华南1(深圳)-可用区D |
备注:如果在私有云环境部署,可自建PostgreSQL集群、Redis集群、NFS server,并使用nginx/haproxy/lvs+keepalived代替公网SLB负载均衡,如果使用对象存储作为后端,可选用minio代替s3。
配置SLB实例
创建1个SLB实例(代替上图nginx)及两组监听,用于四层转发,访问443端口转发到后端两台harbor ECS实例的443端口,访问80端口harbor默认会重定向到443端口,未启动后端harbor时当前监听应该处于异常状态:

自行准备域名,解析到SLB实例的公网IP:
registry.cloudcele.com ---> 120.25.165.246
以阿里云域名为例:

配置RDS实例
创建PostgreSQL类型RDS实例,创建一个数据库用户,以超级管理员postgres为例:

然后手动创建三个空数据库,绑定到postgres用户下:
参考:https://goharbor.io/docs/master/install-config/harbor-ha-helm
notaryserver
notarysigner
registry
阿里云示例:

配置NAS实例
创建NAS实例后,在两台ECS实例上都执行挂载,安装NFS客户端:
sudo yum install nfs-utils
执行以下命令,提高同时发起的NFS请求数量:
sudo echo "options sunrpc tcp_slot_table_entries=128" >> /etc/modprobe.d/sunrpc.conf
sudo echo "options sunrpc tcp_max_slot_table_entries=128" >> /etc/modprobe.d/sunrpc.conf
挂载NFS文件系统,这里挂载到/data目录下
cat >> /etc/fstab <<EOF
217d3488b8-mtr10.cn-shenzhen.nas.aliyuncs.com:/ /data nfs vers=4,minorversion=0,rsize=1048576,wsize=1048576,hard,timeo=600,retrans=2,_netdev,noresvport 0 0
EOF

mkdir /data
mount -a
验证挂载是否成功
[root@harbor001 ~]# df -h | grep aliyun
217d3488b8-mtr10.cn-shenzhen.nas.aliyuncs.com:/   10P     0   10P   0% /data
生成域名证书
参考:
https://github.com/acmesh-official/acme.sh
https://goharbor.io/docs/2.3.0/install-config/configure-https/
域名证书可以手动自签证书,但自签发的证书不会被 Chrome 等浏览器信任,这里采用 Let’s Encrypt 生成免费的、可被浏览器信任的证书,常用的 Let’s Encrypt 生成工具主要有 acme.sh 及 certbot 两种,本次使用 acme.sh 自动从 letsencrypt 生成证书。
使用acme.sh时有http及dns两种验证方式,dns验证又分为手动和自动,这里使用阿里云域名解析,支持使用dns方式自动连接到阿里云API申请证书:
curl https://get.acme.sh | sh
yum install -y socat

export Ali_Key=xxxxxxxxxxxxxxx
export Ali_Secret=xxxxxxxxxxxxxxx
acme.sh --issue --dns dns_ali -d registry.cloudcele.com
查看生成的证书
# ls -1 /root/.acme.sh/registry.cloudcele.com/
ca.cer
fullchain.cer
registry.cloudcele.com.cer
registry.cloudcele.com.conf
registry.cloudcele.com.csr
registry.cloudcele.com.csr.conf
registry.cloudcele.com.key
安装证书到harbor目录下
mkdir -p /data/harbor/cert

acme.sh --installcert -d registry.cloudcele.com \
  --key-file /data/harbor/cert/registry.cloudcele.com.key \
  --fullchain-file /data/harbor/cert/registry.cloudcele.com.crt
查看安装到harbor路径下的证书
[root@harbor001 ~]# ls -1 /data/harbor/cert/
registry.cloudcele.com.crt
registry.cloudcele.com.key
acme.sh申请的证书有效期90天,acme.sh安装的时候已经自动添加了一个计划任务每天自动更新证书,更新后重启使用证书的服务。 acme.sh自动添加的计划任务
[root@harbor001 ~]# crontab  -l | grep acme
55 0 * * * "/root/.acme.sh"/acme.sh --cron --home "/root/.acme.sh" > /dev/null
该计划任务也会自动执行证书上一次的安装命令,为确保nginx使用最新的证书,重新执行一次安装证书命令让acme.ch将证书文件安装到正确的位置及重启nginx服务。
acme.sh --installcert -d registry.cloudcele.com \
  --key-file /data/harbor/cert/registry.cloudcele.com.key \
  --fullchain-file /data/harbor/cert/registry.cloudcele.com.crt \
  --reloadcmd "docker restart nginx"
开始安装harbor
前提:两台ECS实例已完成docker及docker-compose安装,以下所有操作在第一个harbor节点执行:
下载harbor
wget https://mirrors.tuna.tsinghua.edu.cn/github-release/goharbor/harbor/v2.3.1/harbor-offline-installer-v2.3.1.tgz
tar -zxvf harbor-offline-installer-v2.3.1.tgz -C /opt --strip=1
切换到harbor安装目录
cd /opt/harbor
cp harbor.yml.tmpl harbor.yml
修改harbor配置文件,注意获取VPC实例内网连接地址、端口及密码信息,有变动的内容如下:
[root@harbor001 harbor]# vim harbor.yml
hostname: registry.cloudcele.com

http:
  port: 80

https:
  port: 443
  certificate: /data/harbor/cert/registry.cloudcele.com.crt
  private_key: /data/harbor/cert/registry.cloudcele.com.key

data_volume: /data/harbor

external_database:
  harbor:
    host: pgm-wz9541r7evq0auo6168200.pg.rds.aliyuncs.com
    port: 1921
    db_name: registry
    username: postgres
    password: Postgres@2021
    ssl_mode: disable
    max_idle_conns: 2
    max_open_conns: 0
  notary_signer:
    host: pgm-wz9541r7evq0auo6168200.pg.rds.aliyuncs.com
    port: 1921
    db_name: notarysigner
    username: postgres
    password: Postgres@2021
    ssl_mode: disable
  notary_server:
    host: pgm-wz9541r7evq0auo6168200.pg.rds.aliyuncs.com
    port: 1921
    db_name: notaryserver
    username: postgres
    password: Postgres@2021
    ssl_mode: disable

external_redis:
  host: r-wz9fpfgjon0p4kci80.redis.rds.aliyuncs.com:6379
  password: Redis123
  registry_db_index: 1
  jobservice_db_index: 2
  chartmuseum_db_index: 3
  trivy_db_index: 5
  idle_timeout_seconds: 30
执行harbor安装
./install.sh
复制harbor安装目录到harbor002节点:
[root@harbor001 ~]# scp -r /opt/harbor/ 172.18.8.243:/opt
同样,连接到harbor002节点直接安装即可,无需其他操作:
[root@harbor002 ~]# cd /opt/harbor/
[root@harbor002 ~]# ./install.sh
访问harbor验证
浏览器访问harbor域名:https://registry.cloudcele.com

停掉第一个节点harbor实例,验证依然能够正常访问:
[root@harbor001 ~]# cd /opt/harbor/
[root@harbor001 harbor]# docker-compose down
harbor上传镜像
首先为docker客户端准备证书,从acme.sh目录下获取证书
[root@harbor001 ~]# cd /root/.acme.sh/registry.cloudcele.com/
复制以下三个文件到docker客户端目录/etc/docker/certs.d/registry.cloudcele.com/下
ca.cer
registry.cloudcele.com.cer
registry.cloudcele.com.key
客户端创建目录,查看复制过来的证书文件:
# mkdir -p /etc/docker/certs.d/registry.cloudcele.com/

# ls -1 /etc/docker/certs.d/registry.cloudcele.com/
ca.crt
registry.cloudcele.com.cert
registry.cloudcele.com.key
重启docker进程
systemctl restart docker
登录harbor仓库
# docker login registry.cloudcele.com
Username: admin
Password:
WARNING! Your password will be stored unencrypted in /root/.docker/config.json.
Configure a credential helper to remove this warning. See
https://docs.docker.com/engine/reference/commandline/login/#credentials-store

Login Succeeded
上传docker镜像
[root@master ~]# docker push registry.cloudcele.com/library/nginx
Using default tag: latest
The push refers to repository [registry.cloudcele.com/library/nginx]
d9eb91d66e2a: Pushed
ae1f545e4c08: Pushed
c20672db3628: Pushed
4cbb728cd302: Pushing [=>                                                 ]  1.609MB/63.74MB
4cbb728cd302: Pushed
9eb82f04c782: Pushed
latest: digest: sha256:1a53eb723d17523512bd25c27299046cfa034cce309f4ed330c943a304513f59 size: 1362
拉取docker镜像
[root@master ~]# docker pull registry.cloudcele.com/library/nginx
Using default tag: latest
latest: Pulling from library/nginx
Digest: sha256:1a53eb723d17523512bd25c27299046cfa034cce309f4ed330c943a304513f59
Status: Image is up to date for registry.cloudcele.com/library/nginx:latest
registry.cloudcele.com/library/nginx:latest
参考:https://cloud.tencent.com/developer/article/1838838