前提条件:Mac系统,并且已经安装xcode,homedrew,Java,如果项目工程中集成了cocoapod,也需要安装cocoapod
Jenkins打包方式分为两种,一种是xcode插件化配置打包,一种是脚本配置化打包,本人更倾向于脚本打包,因此接下来主要介绍iOS脚本打包配置过程
一.通过homebrew安装Jenkins
打开终端,执行命令行
brew install jenkins(注:目前通过这个命令行下载的Jenkins,安装的插件keychain无法正常上传文件)
建议下载更低版本的Jenkins
brew install jenkins-lts
通过homedrew安装后jenkins安装好后所在的位置:
实际安装位置:/usr/local/Cellar/jenkins/
配置文件所在位置:/usr/local/opt/jenkins/
工作空间位置:/Users/用户/.jenkins
进入工作空间位置:cd ~/.jenkins
二.启动Jenkins
打开一个终端,执行命令
brew services start jenkins-lts
重启Jenkins
brew services restart jenkins-lts
关闭Jenkins
brew services stop jenkins-lts
第一次服务开启成功后,在浏览器中输入http://localhost:8080,会出现一个让你输入Jenkins初始密码的页面
获取Jenkins初始密码
重新打开一个终端,执行命令
Ls -a
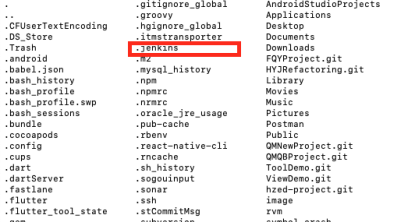
找到.jenkins文件,执行命令
cd .jenkins
ls -a
cd secrets
ls -a
直到获取到initialAdminPassword文件,执行命令
cat initialAdminPassword
至此将获取到的初始密码输入Jenkins,重启Jenkins
brew services restart jenkins
重新在浏览器输入http://localhost:8080,会进入配置界面
,击安装建议的插件,耐心等待插件安装过程(时间较长)
(若过程中有插件安装失败,可暂时忽略,进入Jenkins后可根据错误log,重新下载安装)
插件安装成功后,

按要求将所有项目填写成功后,点击保存就可以正常使用Jenkins了
三.接下来创建项目任务,如图

1.新建任务打开后,由于我们是用Git管理代码的,所以源码管理选择Git
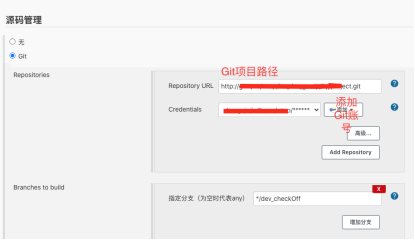
2.点击保存,回到任务操作页面,点击立即构建,如果Git项目地址和账号密码没问题,构建完成后就可以在
/Users/用户/.jenkins/workspace看到要打包的项目
四.脚本自动化打包流程
1.项目创建完成后,开始配置构建参数
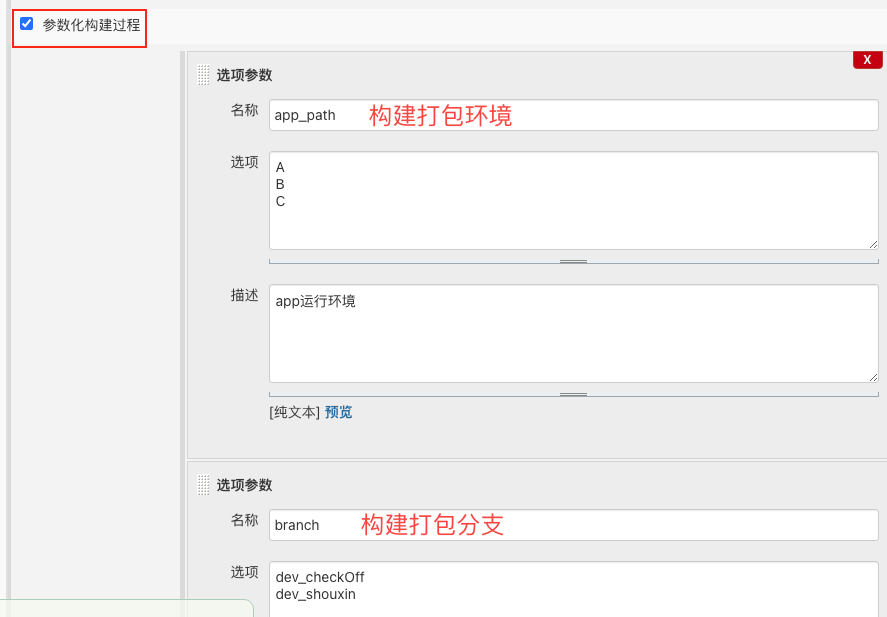
3.增加构建步骤,选择执行shell
 4.以项目为例,脚本命令如下
echo 'start build xxxProject'
pwd
whoami
export LANG=en_US.UTF-8
export LANGUAGE=en_US.UTF-8
export LC_ALL=en_US.UTF-8
pod install --verbose --no-repo-update
workspace_path=.
# 工程名
APP_NAME="xxxProject"
APP_target="xxxProject"
# 证书,如果自动选择证书,设为“iPhone Developer”即可
CODE_SIGN_DEVELOPER="iPhone Developer"
# info.plist路径
project_infoplist_path="./Info_enterprise.plist"
#取版本号
bundleShortVersion=`xcodebuild -showBuildSettings -target $APP_target | grep MARKETING_VERSION | tr -d 'MARKETING_VERSION ='`
#取build值
bundleVersion=$(/usr/libexec/PlistBuddy -c "print CFBundleVersion" "${project_infoplist_path}")
echo "$bundleShortVersion"
DATE="$(date +%Y%m%d)"
IPANAME="xxxProject_${app_path}_V${bundleShortVersion}_${DATE}"
#要上传的ipa文件路径
IPA_PATH="${WORKSPACE}/package/"
echo ${IPA_PATH}
#echo "${IPA_PATH}">> text.txt
#工程环境路径
project_path=$(pwd)
echo "-----> 工程路径:${project_path}"
#工程名称
project_name=$(ls | grep xcodeproj | awk -F.xcodeproj '{print $1}')
#配置测试环境的.m文件
configureFile=$project_path/$project_name/xxx/xxx/xxx.m
echo "$configureFile"
url='^NSString \*const kBaseUrl.*$'
app_url=''
if [ $app_path = "A" ];then
app_url='NSString *const kBaseUrl = @"http:\/\/xxx\/xxx";'
elif [ $app_path = "B" ];then
app_url='NSString *const kBaseUrl = @"http:\/\/xxx\/xxx";'
elif [ $app_path = "C" ];then
app_url='NSString *const kBaseUrl = @"http:\/\/xxx\/xxx";'
";'
else
echo '**************'
fi
sed -i '' "s/$url/$app_url/g" ${configureFile}
sed -i '' "s/$web_url/$app_web_url/g" ${configureFile}
sed -i '' "s/$vip_url/$app_vip_url/g" ${configureFile}
#集成有Cocopods的用法
echo "=================clean================="
xcodebuild -workspace "${APP_NAME}.xcworkspace" -scheme "${APP_target}" -configuration "${build_configuration}" clean
echo "+++++++++++++++++build+++++++++++++++++"
xcodebuild archive -workspace "${APP_NAME}.xcworkspace" -scheme "${APP_target}" -archivePath "${IPA_PATH}${APP_target}.xcarchive" -configuration "${build_configuration}"
xcodebuild -exportArchive -archivePath "${IPA_PATH}${APP_target}.xcarchive" -exportPath "${IPA_PATH}${IPANAME}" -exportOptionsPlist "${IPA_PATH}exportOptions.plist"
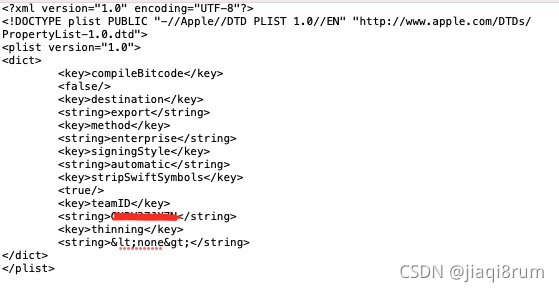
5.需注意,使用exportArchive导出.ipa包时,必须在导出路径内配置exportOptions.plist文件
exportOptions.plist格式如下
6..ipa文件构建成功,如图
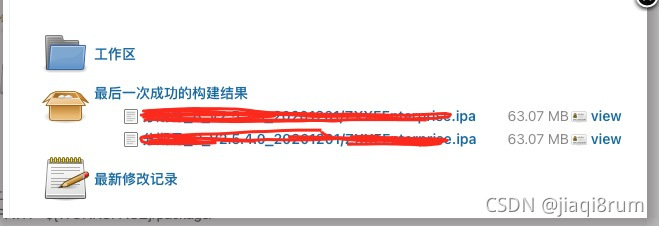
首先,. ipa包导出路径必须放在Jenkins工程项目路径下,例如
#要上传的ipa文件路径
IPA_PATH="${WORKSPACE}/package/"
然后,增加构建后的操作,选择归档成品
用于存档的文件选择ipa包路径,如图

注意
1.项目构建时,报错pod: command not found
解决方案:前提是已经安装了cocoapods
第一步:打开Jenkins,然后在Jenkins左侧的菜单中找到 系统管理--->系统设置--->全局属性,然后找到Environment variables(中文:环境变量)并且勾选。
第二步:打开你的终端,在终端中输入echo $PATH,终端会打印出一串字符串,几个路径,复制该路径,返回到Jenkins中
第三步:会让填写一个键值对,键默认填写PATH,值填写你从终端复制的那个字符串,点击保存,完成,构建该项目。

2.项目打包成功,但是报错 Step ‘Archive the artifacts’ failed: No artifacts found that match the file pattern
解决方案:
第一步. ipa包导出路径必须放在Jenkins工程项目路径下,例如
#要上传的ipa文件路径
IPA_PATH="${WORKSPACE}/package/"
第二步.增加构建后的操作,选择归档成品
用于存档的文件选择ipa包路径,如图

3.打包报错 ARCHIVE FAILED
error: No profiles for 'com.ts.hjwealth' were found: Xcode couldn't find any iOS App Development provisioning profiles matching 'com.ts.hjwealth'. Automatic signing is disabled and unable to generate a profile. To enable automatic signing, pass -allowProvisioningUpdates to xcodebuild. (in target 'HJInvestment' from project 'HJInvestment')
解决方案:
一般这个报错原因是描述文件和工程bundleID不匹配,检查配置的描述文件,重新配置相对应的profile