文章目录
- 一,SpringMVC框架
- --1,概述
- --2,入门案例
- 项目结构
- 创建启动类
- 创建CarController类
- 测试
- 二,springmvc框架解析请求参数
- --1,get方式
- 解析复杂的参数
- 创建Car类
- --2,restful方式
- 在IDEA里创建后端代码UserController 类
- 在HB里创建前端html代码
- 测试
- 练习:
- 需求
- 修改前端页面
- 修改后端代码,创建类
- --3,post方式
- 准备表单
- 准备类,解析请求数据
- 扩展:入库
一,SpringMVC框架
–1,概述
主要作用: 接受请求 + 做出响应
使用步骤:
1, 导入jar包 (核心: spring-webmvc.jar),被springboot简化了
2, 创建启动类,启动服务器
3, 准备服务器里的资源,可以被浏览器访问
–2,入门案例
项目结构

创建启动类
package cn.tedu.hello;
import org.springframework.boot.SpringApplication;
import org.springframework.boot.autoconfigure.SpringBootApplication;
@SpringBootApplication//springboot提供的,表示自己是一个启动类,用来启动服务器
public class RunApp {
    public static void main(String[] args) {
        //SpringApplication是springboot提供的,启动指定类
        SpringApplication.run(RunApp.class);
    }
}
创建CarController类
package cn.tedu.hello;
import org.springframework.web.bind.annotation.RequestMapping;
import org.springframework.web.bind.annotation.RestController;
//需求: http://localhost:8080/car/get
@RestController//是springmvc提供的,可以被浏览器访问
@RequestMapping("car")//是springmvc提供的,规定了浏览器访问这个类的方式
public class CarController {
    //访问方式:http://localhost:8080/car/get
    @RequestMapping("get")
    public void get(){
        System.out.println("浏览器访问成功!");
    }
}
测试
打开浏览器访问: http://localhost:8080/car/get
二,springmvc框架解析请求参数
–1,get方式
把数据用?拼接在地址栏中,多数据之间用& 连接 :
http://localhost:8080/car/add?id=10
解析复杂的参数
package cn.tedu.hello;
import org.springframework.web.bind.annotation.RequestMapping;
import org.springframework.web.bind.annotation.RestController;
//需求: http://localhost:8080/car/get
/*
总结:
1, SpringMVC可以接受请求,并解析请求参数
只要在方法的参数列表中声明就可以:public void add(int id,String name)
2, 为了避免400或者500的异常,最好把参数列表的参数类型改成引用类型
    改后:public void add(Integer id,String name)
3, 参数列表可以提供一个对象,框架可以解析参数,并且可以把参数直接给对象的属性赋值
    public void save2(Car c)
 */
@RestController//是springmvc提供的,可以被浏览器访问
@RequestMapping("car")//是springmvc提供的,规定了浏览器访问这个类的方式
public class CarController {
    @RequestMapping("get")
    public void get(){
        System.out.println("浏览器访问成功!");
    }
    //springmvc解析get方式的请求参数
    //练习1: http://localhost:8080/car/add?id=10
    @RequestMapping("add")
    public void add(Integer id){
    //参数列表的写法:1,参数类型必须和请求的参数类型一致 2,参数名称必须和请求的参数名称一致
        System.out.println("浏览器访问成功add!"+id);
    }
    //练习2: http://localhost:8080/car/add2?id=10&name=jack
    @RequestMapping("add2")
    public void add(Integer id,String name){
        System.out.println("浏览器访问成功add!"+id+name);
    }
    //练习3: http://localhost:8080/car/save?id=1&color=red&price=100
    //HandlerMapping:处理器映射器,拿着地址栏的访问方式找到哪个类哪个方法
    //Map<String,Object> {"/car/save", new CarController().save()}
    @RequestMapping("save")
    public void save(Integer id,String color,Double price){
        //基本类型的参数,访问时必须传参否则400 500异常,
        //引用类型不传入参数也行,就会用默认值null
        //优化1:推荐使用引用类型,因为规避了异常的发生!!!
        System.out.println(id+color+price);
    }
//练习4:http://localhost:8080/car/save2?id=1&color=red&price=100&pinpai=BMW&type=X7
    //框架的作用:1,解析了请求参数  2,把解析到的参数调用c.setXxx()设置值
    @RequestMapping("save2")
    public void save2(Car c){
        System.out.println(c);
        //Car{id=1, color='red', price=100.0, pinpai='BMW', type='X7'}
    }

}
创建Car类
package cn.tedu.hello;
//http://localhost:8080/car/save2?
//         id=1&color=red&price=100&pinpai=BMW&type=X7
//这个类用来存,springmvc框架解析到的请求参数
public class Car {
    private Integer id;
    private String color;
    private Double price;
    private String pinpai;
    private String type ;
    //set get tostring --右键-generate
    public Integer getId() {
        return id;
    }
    public void setId(Integer id) {
        this.id = id;
    }
    public String getColor() {
        return color;
    }
    public void setColor(String color) {
        this.color = color;
    }
    public Double getPrice() {
        return price;
    }
    public void setPrice(Double price) {
        this.price = price;
    }
    public String getPinpai() {
        return pinpai;
    }
    public void setPinpai(String pinpai) {
        this.pinpai = pinpai;
    }
    public String getType() {
        return type;
    }
    public void setType(String type) {
        this.type = type;
    }
    public String toString() {
        return "Car{" +
                "id=" + id +
                ", color='" + color + '\'' +
                ", price=" + price +
                ", pinpai='" + pinpai + '\'' +
                ", type='" + type + '\'' +
                '}';
    }
}
–2,restful方式
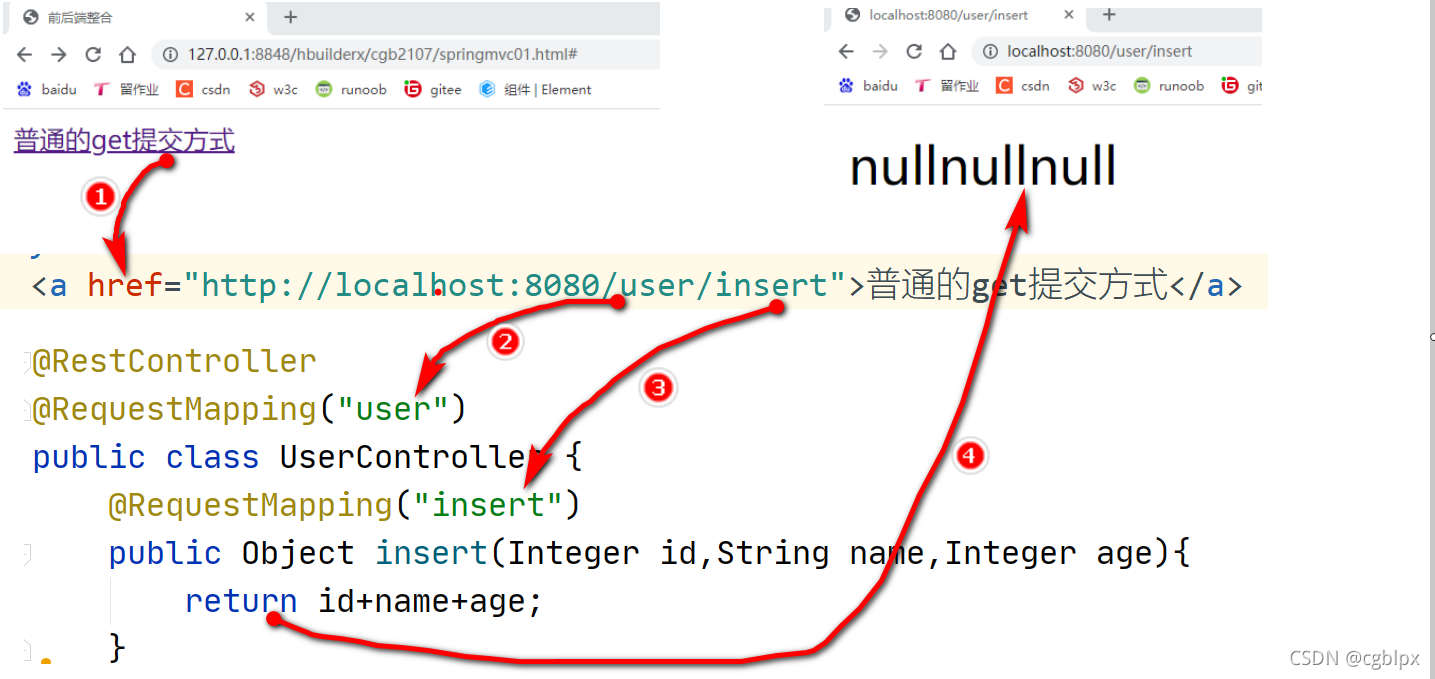
在IDEA里创建后端代码UserController 类
package cn.tedu.hello;

import org.springframework.web.bind.annotation.PathVariable;
import org.springframework.web.bind.annotation.RequestMapping;
import org.springframework.web.bind.annotation.RestController;

//需求:解析restful风格提交的数据,简化了get提交数据的写法
//普通get方式:http://localhost:8080/user/insert?id=1&name=张三&age=18
//restful方式:http://localhost:8080/user/insert/1/张三/18
@RestController
@RequestMapping("user")
public class UserController {
//解析get数据:http://localhost:8080/user/insert?id=1&name=张三&age=18
    @RequestMapping("insert")
    public Object insert(Integer id,String name,Integer age){
        return id+name+age;
    }
//解析restful数据:http://localhost:8080/user/insert2/1/张三/18
    //步骤:1,利用{}获取地址栏中的参数,个数和顺序要和地址栏里的参数匹配
        //2,利用@PathVariable注解,获取花括号中间的变量的值
    @RequestMapping("insert2/{id}/{name}/{age}")
    public void insert2(@PathVariable Integer id,
                        @PathVariable String name,
                        @PathVariable Integer age){
        System.out.println(id+name+age);
    }

}
在HB里创建前端html代码
<!DOCTYPE html>
<html>
	<head>
		<meta charset="utf-8">
		<title>前后端整合</title>
	</head>
	<body>
		<a href="http://localhost:8080/user/insert">普通访问</a>
		<a href="http://localhost:8080/user/insert?id=10&name=rose&age=20">普通的get提交方式</a>
		<a href="http://localhost:8080/user/insert2/10/rose/20">restful方式</a>
	</body>
</html>
测试

练习:
需求
练习:
http://localhost:8080/car/save2?id=1&color=red&price=100&pinpai=BMW&type=X7
1,解析浏览器发来的请求参数
2,给浏览器返回数据
修改前端页面
<!DOCTYPE html>
<html>
	<head>
		<meta charset="utf-8">
		<title>前后端整合</title>
	</head>
	<body>
		<a href="http://localhost:8080/user/insert">普通访问</a>
		<a href="http://localhost:8080/user/insert?id=10&name=rose&age=20">普通的get提交方式</a>
		<a href="http://localhost:8080/user/insert2/10/rose/20">restful方式</a>

		<a href="http://localhost:8080/car/save3?id=1&color=red&price=100&pinpai=BMW&type=X7">点我获取汽车数据</a>

	</body>
</html>
修改后端代码,创建类
package cn.tedu.hello;
import org.springframework.web.bind.annotation.RequestMapping;
import org.springframework.web.bind.annotation.RestController;
@RestController
@RequestMapping("car")
public class CarController2 {
    //1,解析浏览器发来的请求参数
    //http://localhost:8080/car/save3?id=1&color=red&price=100&pinpai=BMW&type=X7
    @RequestMapping("save3")
    public Object save3(Car c){
       //TODO 把解析到的请求参数 getXxx()入库--jdbc
        //pom里加jdbc的坐标
        //在数据库里创建car表(提供id,color,price,pinpai,type字段)
        //注册驱动 获取数据库连接 获取传输器 执行SQL 解析结果集 释放资源

        //{"id":1,"color":"red","price":100.0,"pinpai":"BMW","type":"X7"}
        return c;
    }
}
–3,post方式
准备表单
