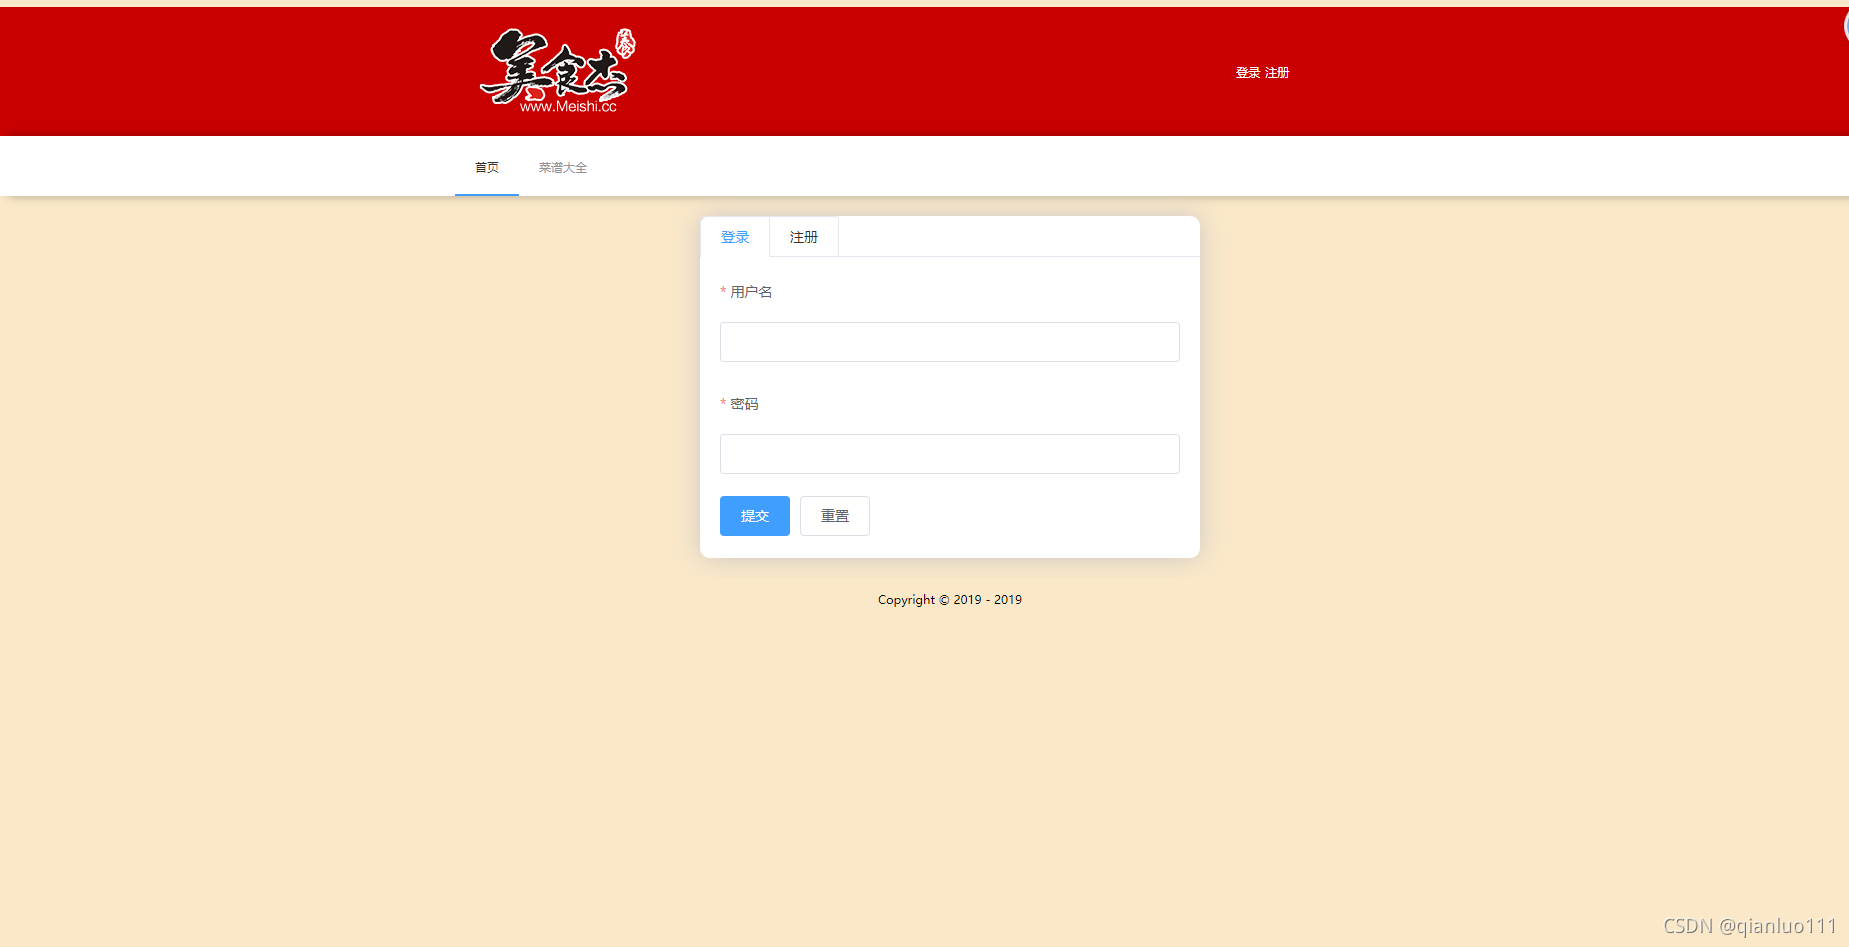
一.说明:美食街点击登录
当我们面临制作登录和注册功能的实现时,我们需要先设计登录界面的布局和注册界面的布局,做到有完整的思路时才开始实现其功能效果会更好。
我们需要做个标题栏,登陆界面,实现登陆界面的功能代码块,注册界面,实现测试界面的功能模块即可完成。
要用到的主要技术栈如下:
- vue-cli脚手架
- vue-router路由
- element组件库
- vuex库
- vscode编辑器
二.过程:登录注册过程
登录,注册界面布局:
我们需要设计想好美化登录,注册界面。
在登陆界面和注册界面:当我们在网页中点击登录时,跳转到登录注册界面,用户名,可以在前面加一下图片或者图标,在设置一下输入字符的长度,可以用正则或者elelment.ui官网中的组件中去查找。密码,可以去用正则去设置同时注意隐藏密码的字符。最后通过注册的信息去提交或者重置。
1.编写登录界面:
- 模拟验证码生成
- 填写用户名、密码、进行登录
- 实现"记住我"功能

index.js
<template>
  <div class="login-page">
    <el-tabs v-model="activeName" type="card">
      <el-tab-pane label="登录" name="login">
        <login></login>
      </el-tab-pane>
      <el-tab-pane label="注册" name="second">
        <Register></Register>
      </el-tab-pane>
    </el-tabs>
  </div>
</template>
<script>
import Login from './login'
import Register from './register'
export default {
  components: {Login, Register},
  data(){
    return {
      activeName: 'login',
    }
  }
}
</script>
<style lang="stylus">
.login-page
  width 500px
  background-color #fff
  margin 0 auto
  box-shadow: 0 0 25px #cac6c6;
  border-radius: 10px;
</style>
login.vue
<template>
  <div class="login-section">
    <!-- :rules="rules" -->
    <el-form
      label-position="top"
      label-width="100px" class="demo-ruleForm"
      :rules="rules"
      :model="rulesForm"
      status-icon
      ref="ruleForm"
    >
      <el-form-item label="用户名" prop="name">
        <el-input type="text" v-model="rulesForm.name"></el-input>
      </el-form-item>
      <el-form-item label="密码" prop="password">
        <el-input type="password" v-model="rulesForm.password"></el-input>
      </el-form-item>
      <el-form-item>            //会出方法能拿到表单里的所有东西
        <el-button type="primary" @click="submitForm('ruleForm')">提交</el-button>
        <el-button>重置</el-button>
      </el-form-item>
    </el-form>
  </div>
</template>
<script>
import {login} from '@/service/api';
//后端获取登录数据
export default {
  data() {
    return {
      //存数数据的对象
      rulesForm:{
        name: '',
        password: '',
      },
      rules:{
        name:[
          {required: true,message: '请输入用户名',trigger:'blur'},
          {min:1,max:5,message:"最小为3最大为5",trigger:'blur'}
        ],
        password:[
          {required: true,message: '请输入用户名',trigger:'blur'},
          {min:3,max:5,message:"最小为3最大为5",trigger:'blur'}//设置字符长度,失去焦点触发
        ]

      },
    };
  },
  methods: {
    submitForm(formName){
        this.$refs[formName].validate((valid)=>{
          if (valid) {
            //如果校检通过,在这里向后端发送用户名和密码
            login({
              name:this.rulesForm.name,
              password:this.rulesForm.password,
            }).then((data)=>{
                console.log(data);
                //看后端给的数据是判断1和0
                if (data.code === 0) {//登录成功
                localStorage.setItem('token',data.data.token);//用本地存储设置数据获取到的数据
                  window.location.href='/';
                }
                if (data.code === 1) {
                  this.$message.error(data.mes)
                }
            })
          }else{
            console.log("error submit!!");
            return false;
          }
        })
    }
  }
}
</script>

<style lang="stylus">
.login-section
  padding 0px 20px
</style>
2.编写注册页面组件
- 需要实现多步骤表单填写
- 需要实现表单字段校验
- 模拟验证码发送及注册成功后跳转登录
register.vue
<template>
  <div class="login-section">
    <!-- :rules="rules" -->
    <el-form
      label-position="top"
      label-width="100px"
      class="demo-ruleForm"
      :rules="rules"
      :model="rulesForm"
      status-icon
      ref="ruleForm"
    >
      <el-form-item label="用户名" prop="name">
        <el-input type="text" v-model="rulesForm.name"></el-input>
      </el-form-item>
      <el-form-item label="密码" prop="password">
        <el-input type="password" v-model="rulesForm.password"></el-input>
      </el-form-item>
      <el-form-item>
        <el-button type="primary" @click="submitForm('ruleForm')">提交</el-button>
        <el-button>重置</el-button>
      </el-form-item>
    </el-form>
  </div>
</template>
<script>
import {register} from '@/service/api';
export default {
  data() {
    return {
        //存数数据的对象
        rulesForm:{
          name: '',
          password: '',
        },
         rules:{//判断检验字符串长度,失去焦点时触发事件
          name:[
            {required: true,message: '请输入用户名',trigger:'blur'},
            {min:1,max:5,message:"最小为3最大为5",trigger:'blur'}
          ],
          password:[
            {required: true,message: '请输入用户名',trigger:'blur'},
            {min:3,max:5,message:"最小为3最大为5",trigger:'blur'}
          ]

        },
    };
  },
  methods: {
      submitForm(formName){
        this.$refs[formName].validate((valid)=>{
          if (valid) {
            //如果校检通过,在这里向后端发送用户名和密码
            register({
              name:this.rulesForm.name,
              password:this.rulesForm.password,
            }).then((data)=>{
                console.log(data);
                //根据后端数据判断1和0
                if (data.code === 0) {//注册成功
                localStorage.setItem('token',data.data.token);
                  window.location.href='/';
                }
                if (data.code === 1) {
                  this.$message.error(data.mes)
                }
            })
          }else{
            console.log("error submit!!");
            return false;
          }
        })
    }
  }

}
</script>

<style lang="stylus">
.login-section
  padding 0px 20px
</style>
3、路由设置
import Vue from 'vue'
import Router from 'vue-router'
Vue.use(Router)
import {userInfo}from '@/service/api.js'
import Home from '@/views/home/Home.vue'
import Store  from '@/store'
const Login=()=>import('@/views/user-login/index');
const router = new Router({
    mode:"history",
    routes:[
    {
        path:'/',
        name:"Home",
        title:"首页",
        component:Home
    },
    {
        path:'/login',
        name:"login",
        title:"登录页",
        component:Login,
        meta:{
            login: true
        },
    },
    // ...viewsRoute,
    {
        path:"*",
        name:"noFound",
        title:"未找到",
        redirect:{
            name:"home"

        }
    },
]
});
//路由守卫
router.beforeEach(async (to,from,next)=>{
    //验证登录
    /*
    有些路由是需要登录的,判断状态
    1.没有登录:跳转到登录页
    2.登录:直接进入
    3.有些路由不需要登录,那就直接进入;
    ps:是否需要登录 --meta
    */
    const token=localStorage.getItem('token');//获取login里的数据
    const isLogin=!!token;//两个感叹号转布尔值
    //进入路由的时候,向后端发送token,验证是否合法
     const data =await userInfo();
     Store.commit('chageUserInfo',data.data);
   //判断是否需要登录:如果meta中的为true那么需要登录
    if (to.matched.some(item=>item.meta.login)) {//需要登录
        console.log("需要登录")

        if (isLogin) {//已经登录但已经登陆就直接通过
            if (data.error === 400) {
                next({name:'login'});
                localStorage.removeItem('token');//移除本地存储
                return;
            }
            if (to.name=== 'login') {
                next({name:'home'})
            }else{
                next();
            }
            next();
            return;
        }
        if(!isLogin && to.name==='login') {//没有登陆,仍需要去登录页
            next();
        }
        if(!isLogin && to.name !=='login') {//没有登陆,去的也不是登录页
            next({name:"login"});
        }
    } else{
        next();
    }
})

export default router;
4.vuex数据库
import Vue from 'vue';
import Vuex from 'vuex';

Vue.use(Vuex);

const store = new Vuex.Store({
  state:{
    userInfo: {}
  },
  getters:{
    isLogin(state){
      return !!Object.keys(state.userInfo).length;
    }
  },
  mutations:{
    chageUserInfo(state, data){
      state.userInfo = data;
    }
  },
  actions:{}
})

export default store;5.npm安装elementUI
npm install element-ui -S #安装element-ui模块

在入口文件中引入:
import ElementUI from 'element-ui' //新添加1
import 'element-ui/lib/theme-chalk/index.css' //新添加2,避免后期打包样式不同,要放在import App from './App';之前
Vue.use(ElementUI) //新添加3
三.注意事项
1.axios请求是使用post请求还是使用get请求
axios是vue2提倡使用的轻量版的ajax。它是基于promise的HTTP库。它会从浏览器中创建XMLHttpRequests,与Vue配合使用非常好。
GET提交:注意数据是保存到json对象的params属性
post提交:注意数据是直接保存到json对象
2.axios.get提交没有问题,axios.post提交后台接收不到数据
因为POST提交的参数的格式是Request Payload,这样后台取不到数据的
四.总结
- 本文讲了美食杰制作登录和注册功能的实现,界面的布局介绍,如果您还有更好地理解,欢迎沟通
- 定位:分享 &知识点,有兴趣可以继续关注 vue.js html