引言
借用修仙小说体写的标题,主要目的就是吸引你点进来🤭,客官来都来了,看完再走呗~
其实实现一个智能的聊天机器人🤖还是有一定难度的。博主就和大家一起尽可能实现一个智能的聊天机器人。
计划一周🧭更新一次,如果觉得更新慢的话,就在留言里催更吧,很有可能会响应你们的催更哦。本系列文章📓会基于Pytorch实现一个Seq2Seq 带Attention机制的聊天机器人,在本系列文章中,大家会了解到实现聊天机器人的所有知识,欢迎关注哦。
上篇文章中我们直接加载哈工大的预训练模型得到了句子表示,但是在计算余弦相似度时发现效果一般。因此,本文来针对句子相似问题进行微调。
主要想法是将句子相似看成一个分类问题,结果就是:相似(1)/不相似(0)。
本文一步一步介绍如何微调这个分类问题,并对我们上篇文章中的句子进行测试。
使用🤗的Transformers包
pip install transformers datasets
本文需要的包通过上面的指令安装即可。
数据集
本文使用的数据集为中文句子对数据集,期望有两个句子,并且带有是否相似的标签。
博主在HuggingFace的官方数据集中没有找到满足要求的,因此从网上下载了一个数据集,但是过分相信该数据集,导致直接加载各种报错。因此花费了几个小时处理了一下数据集,使它是可用的。
数据集包含了两个文件:train.csv和dev.csv,其中训练集有9万句子对;开发集有1万句子对。
该数据集下载地址:点这里
加载数据集到datasets中
🤗提供的datasets模块导入数据集用起来很方便,因此如果能将我们自己的数据集也通过该工具加载岂不是美滋滋。
下面一起来实现吧:
from datasets import load_dataset
# 加载本地数据集,指定本地路径即可
raw_datasets = load_dataset('csv', data_files={'train': './data/train.csv','dev': './data/dev.csv'})
由于🤗引入了进度条工具,加载这些数据集的时候还会有一个进度条,等起来就不觉得久了。
尤其是在jupyter上看起来更舒服。

加载完成后,我们看下它的结构:
print(raw_datasets)
DatasetDict({
    train: Dataset({
        features: ['sentence1', 'sentence2', 'label'],
        num_rows: 88975
    })
    dev: Dataset({
        features: ['sentence1', 'sentence2', 'label'],
        num_rows: 10000
    })
})
现在我们已经加载好了原始的数据集,接下来需要对数据集中的每个句子进行分词、转换为ID、增加特殊标记等操作。好在🤗已经帮我们把这些封装到了分词器Tokenizer里面了,不用每次做一些重复工作。
下载并加载Tokenizer
与上篇文章一样,我们还是采用哈工大的BERT数据集,这里介绍一种比较简单的方式,可以不需要自己手动下载,不过可能你需要有网络?
from transformers import AutoTokenizer
tokenizer = AutoTokenizer.from_pretrained("hfl/chinese-bert-wwm-ext")
这里我们使用🤗transformers中的AutoTokenizer模块,它会根据我们传入的路径自动帮我们分析需要创建什么分词器,每个模型的分词器是不同的。还有一个好处时,我们可以把路径封装成一个变量,如果需要不同的预训练模型,只要改变该变量的内容即可,主要代码可以不变。
这里的hfl/chinese-bert-wwm-ext代表https://huggingface.co/hfl/chinese-bert-wwm-ext
并不是随意输入的,像我们的代码可以传到github一样,我们使用🤗做的模型也可以上传到他们提供的模型hub。hfl是哈工大的用户名,后面就是哈工大上传的模型名称。
等待片刻,下载好了之后,我们先看一下我们数据,并使用该分词进行预处理。
dataset_train = raw_datasets['train']
dataset_train[6]
{'label': 0, 'sentence1': '为什么我每次都提前还款了最后却不给我贷款了', 'sentence2': '30号我一次性还清可以不'}
可以通过datasets的feature属性查看有哪些字段:
dataset_train.features
{'label': Value(dtype='int64', id=None),
 'sentence1': Value(dtype='string', id=None),
 'sentence2': Value(dtype='string', id=None)}
然后我们使用加载的分词器对这两个句子进行处理。
inputs = tokenizer(dataset_train[6]['sentence1'],dataset_train[6]['sentence2'])
inputs
{
'input_ids': [101, 711, 784, 720, 2769, 3680, 3613, 6963, 2990, 1184, 6820, 3621, 749, 3297, 1400, 1316, 679, 5314, 2769, 6587, 3621, 749, 102, 8114, 1384, 2769, 671, 3613, 2595, 6820, 3926, 1377, 809, 679, 102],
 'token_type_ids': [0, 0, 0, 0, 0, 0, 0, 0, 0, 0, 0, 0, 0, 0, 0, 0, 0, 0, 0, 0, 0, 0, 0, 1, 1, 1, 1, 1, 1, 1, 1, 1, 1, 1, 1],
 'attention_mask': [1, 1, 1, 1, 1, 1, 1, 1, 1, 1, 1, 1, 1, 1, 1, 1, 1, 1, 1, 1, 1, 1, 1, 1, 1, 1, 1, 1, 1, 1, 1, 1, 1, 1, 1]
}
可以看到,已经帮我们把句子分词并转换为ID,同时返回了标记类型ID和注意力掩码。
我们也可以把input_ids转换回文字:
tokenizer.convert_ids_to_tokens(inputs["input_ids"])
['[CLS]',
 '为',
 '什',
 '么',
 '我',
 '每',
 '次',
 '都',
 '提',
 '前',
 '还',
 '款',
 '了',
 '最',
 '后',
 '却',
 '不',
 '给',
 '我',
 '贷',
 '款',
 '了',
 '[SEP]',
 '30',
 '号',
 '我',
 '一',
 '次',
 '性',
 '还',
 '清',
 '可',
 '以',
 '不',
 '[SEP]']
嗯,增加了特殊标记。
处理数据集
下面我们来看下如何处理我们的数据集,如果想一次性处理整个数据集并加载到内存的话,不是土豪就是天真。
官方提供的datasets.map 可以分批加载数据,而不是一次加载整个数据集。
首先需要定义一个分词函数:
def tokenize_function(example):
    '''
    example可以是一个样本,也是一个一批样本

    注意根据指定的最大长度填充是非常低效的,最好的方法是按照该批次内最大长度进行填充。
    '''
	return tokenizer(example['sentence1'], example['sentence2'],truncation=True)
我们可以在上面的例子中实验这个函数:
tokenize_function(dataset_train[6])
{'input_ids': [101, 711, 784, 720, 2769, 3680, 3613, 6963, 2990, 1184, 6820, 3621, 749, 3297, 1400, 1316, 679, 5314, 2769, 6587, 3621, 749, 102, 8114, 1384, 2769, 671, 3613, 2595, 6820, 3926, 1377, 809, 679, 102], 'token_type_ids': [0, 0, 0, 0, 0, 0, 0, 0, 0, 0, 0, 0, 0, 0, 0, 0, 0, 0, 0, 0, 0, 0, 0, 1, 1, 1, 1, 1, 1, 1, 1, 1, 1, 1, 1], 'attention_mask': [1, 1, 1, 1, 1, 1, 1, 1, 1, 1, 1, 1, 1, 1, 1, 1, 1, 1, 1, 1, 1, 1, 1, 1, 1, 1, 1, 1, 1, 1, 1, 1, 1, 1, 1]}
下面就可以利用map方法传入该函数来处理整个数据集了:
# batched=True一次可以处理一批数据
tokenized_datasets = raw_datasets.map(tokenize_function, batched=True)

我们来看一下返回的数据集:
print(tokenized_datasets)
DatasetDict({
    train: Dataset({
        features: ['attention_mask', 'input_ids', 'label', 'sentence1', 'sentence2', 'token_type_ids'],
        num_rows: 88975
    })
    dev: Dataset({
        features: ['attention_mask', 'input_ids', 'label', 'sentence1', 'sentence2', 'token_type_ids'],
        num_rows: 10000
    })
})
注意由于句子已经标记化了,因此里面的原始字符串不再需要了,我们可以删除它们(什么?你说我过河拆桥?)。
tokenized_datasets = tokenized_datasets.remove_columns(
	["sentence1", "sentence2"]
)
下面我们需要创建批数据,这里要注意的是,我们根据这批数据内最长的句子长度进行填充,而不是默认的最大长度512。
数据批量化
剩下的工作是根据批数据内最大长度,动态填充批内数据。
在PyTorch中,负责将批内的样本放在一起的函数称为整理函数(collate function)
Transformers帮我们实现了这样的一个函数。
from transformers import DataCollatorWithPadding
data_collator = DataCollatorWithPadding(tokenizer=tokenizer)
我们取一些样本,来测试这个函数。
samples = tokenized_datasets["train"][:8]
samples = {
    k: v for k, v in samples.items()
}
# 查看该批次内每个样本的长度
print([len(x) for x in samples["input_ids"]])
[27, 16, 39, 38, 25, 35, 35, 37]
现在我们就使用data_collator来创建一个批数据,并根据该批数据内最大长度(39)进行填充
batch = data_collator(samples)
{k: v.shape for k, v in batch.items()}
{'attention_mask': torch.Size([8, 39]),
 'input_ids': torch.Size([8, 39]),
 'labels': torch.Size([8]),
 'token_type_ids': torch.Size([8, 39])}
可以看到,第二个维度都是39。
定义训练器
训练🤗的模型最简单的方法是使用他们提供的训练器(Trainer)。
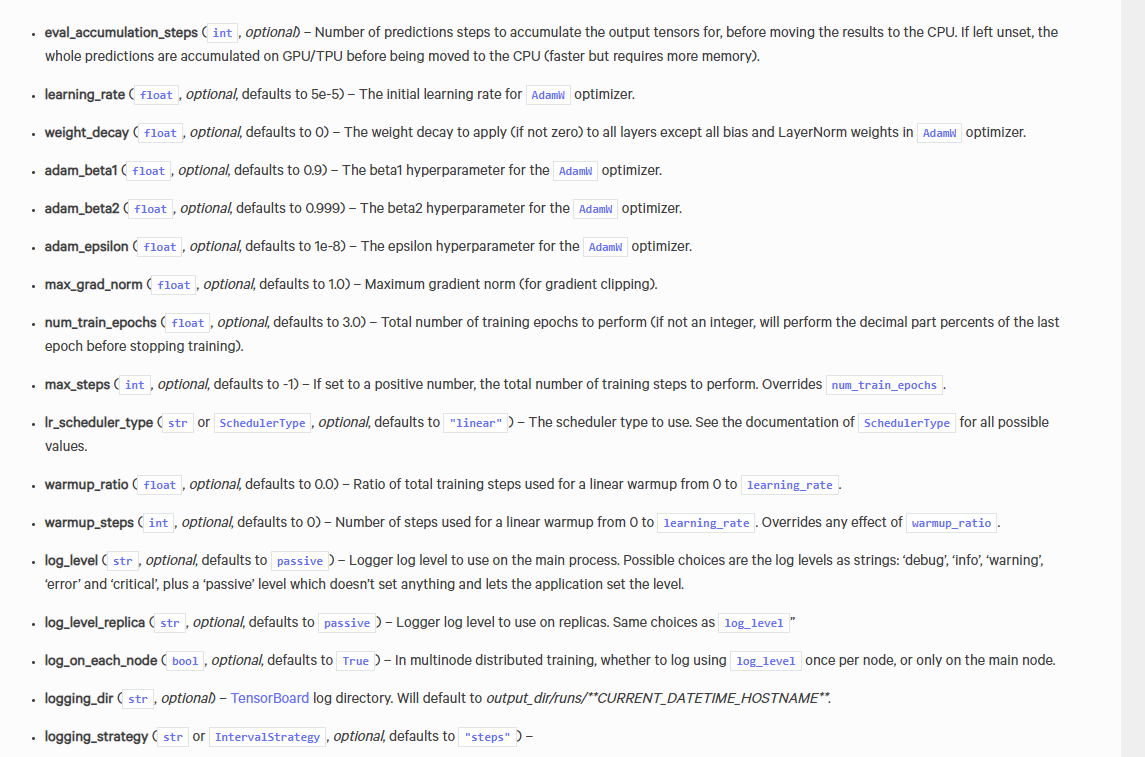
它主要是通过TrainingArguments来控制训练器的参数。
from transformers import TrainingArguments
# 指定训练过程中模型参数保存的路径以及批大小
training_args = TrainingArguments(output_dir="saved",per_device_train_batch_size=8)
里面有很多默认的参数,可以根据自己的需要进行调整,官方文档链接→这里

定义模型
万事具备,只差模型了。我们这里使用的还是哈工大的bert预训练模型。
加载也很简单:
# 定义模型
from transformers import AutoModelForSequenceClassification
# 基于哈工大的bert预训练模型
model = AutoModelForSequenceClassification.from_pretrained("hfl/chinese-bert-wwm-ext", num_labels=2)
Some weights of the model checkpoint at hfl/chinese-bert-wwm-ext were not used when initializing BertForSequenceClassification: ['cls.predictions.decoder.weight', 'cls.seq_relationship.weight', 'cls.predictions.transform.LayerNorm.weight', 'cls.seq_relationship.bias', 'cls.predictions.bias', 'cls.predictions.transform.dense.weight', 'cls.predictions.transform.dense.bias', 'cls.predictions.transform.LayerNorm.bias']
- This IS expected if you are initializing BertForSequenceClassification from the checkpoint of a model trained on another task or with another architecture (e.g. initializing a BertForSequenceClassification model from a BertForPreTraining model).
- This IS NOT expected if you are initializing BertForSequenceClassification from the checkpoint of a model that you expect to be exactly identical (initializing a BertForSequenceClassification model from a BertForSequenceClassification model).
Some weights of BertForSequenceClassification were not initialized from the model checkpoint at hfl/chinese-bert-wwm-ext and are newly initialized: ['classifier.weight', 'classifier.bias']
You should probably TRAIN this model on a down-stream task to be able to use it for predictions and inference.
下载完了之后它会打印一些提示⚠️,由于我们要做分类任务,因此选择AutoModelForSequenceClassification,它相当于在预训练的BERT模型上,加了一个输出头,这个提示或者警告的意思是让我们注意,这个新加的用于句子分类的输出头是随机初始化的,需要你去微调,真是贴心❤️啊。
好了,那下面我们就来微调吧。
定义评估指标
差点忘说了,在进行训练之前,需要先定义评估指标。因为训练比较耗时,定义评估指标应用在开发集上,以便你可以看到一轮迭代完成之后的效果。
from datasets import load_metric

def compute_metrics(eval_preds):
    metric = load_metric("accuracy")
    logits, labels = eval_preds
    predictions = np.argmax(logits, axis=-1)
    return metric.compute(predictions=predictions, references=labels)
这里采用准确率作为评估指标,你也可以替换为f1/recall/precision等。
进行训练
传入要训练的模型实例,配置的training_args和训练数据集、验证数据集等。
# 实例化训练器
from transformers import Trainer
trainer = Trainer(
    model,
    training_args,
    train_dataset=tokenized_datasets['train'],
    data_collator=data_collator,
    eval_dataset=tokenized_datasets["dev"],
    tokenizer=tokenizer,
    compute_metrics=compute_metrics
)
然后执行
trainer.train()
# 别忘记保存模型
trainer.save_model()
就可以开始训练了。
在GeForce RTX 3090上面跑了一个小时才训练完。
训练完了之后,它会输出:
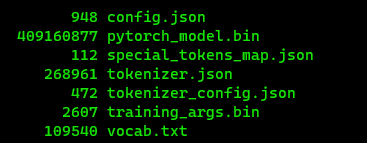
Configuration saved in saved/config.json
Model weights saved in saved/pytorch_model.bin
tokenizer config file saved in saved/tokenizer_config.json
Special tokens file saved in saved/special_tokens_map.json
博主已经上传了训练好的模型,同时基于RoBERTa和BERT进行了微调,本文中微调的是BERT版的。
- BERT
- RoBERTa
加载微调好的模型
最后也是比较重要的一步是,我们要如何加载微调好的模型,不可能每次都训练一次吧。
其实很简单,报我们上面最终保存的文件统一放到一个目录下面,这里放到当前路径的saved文件下,如下所示:

下面编写加载代码:
from transformers import AutoTokenizer, AutoModelForSequenceClassification

tokenizer = AutoTokenizer.from_pretrained("./saved")
model = AutoModelForSequenceClassification.from_pretrained("./saved")
model.eval()
是不是也很简单,注意我们除了要加载未调好的模型,还要加载对应的分词器。
进行测试
还是采用上篇文章的测试句子:
sentences = [
    '今天的月亮又大又圆',
    '十五的月亮十六圆',
    '今天去看电影吧',
]
然后看前两句话的相似度:
def compute_similarity(sentence1, sentence2):
    batch = tokenizer(sentence1, sentence2, truncation=True, return_tensors="pt")

    output = model(**batch)
    softmax = torch.nn.Softmax(dim=1)
    logits = output[0].view(1, -1, 2)
    out = softmax(logits[:, -1])
    result = out[0].detach().cpu().numpy()
    print(f'The similarity of {sentence1} and {sentence2} is: {result[1]:.2f}')

compute_similarity(sentences[0], sentences[1])
compute_similarity(sentences[0], sentences[2])
compute_similarity(sentences[1], sentences[2])
The similarity of 今天的月亮又大又圆 and 十五的月亮十六圆 is: 0.99
The similarity of 今天的月亮又大又圆 and 今天去看电影吧 is: 0.00
The similarity of 十五的月亮十六圆 and 今天去看电影吧 is: 0.00
可以看到,我们随意输入的几个句子,之间的相似度判断还比较准确,当然,更严谨的做法是对测试集使用f1/recall/precision等评估指标进行评估。
参考
- 🤗官方教程