课程介绍
课程介绍和概述
课程目标
- 学习如何编写异构并行计算系统并实现
- 高性能和能效
- 功能性和可维护性
- 跨下一代的可扩展性
- 跨供应商设备的可移植性
- 技术
- 并行编程 API、工具和技术
- 并行算法的原理和模式
- 处理器架构特性和约束
异构并行计算简介
目标
- 了解延迟设备(CPU 内核)和吞吐量设备(GPU 内核)之间的主要区别
- 了解为什么成功的应用程序越来越多地使用这两种类型的设备
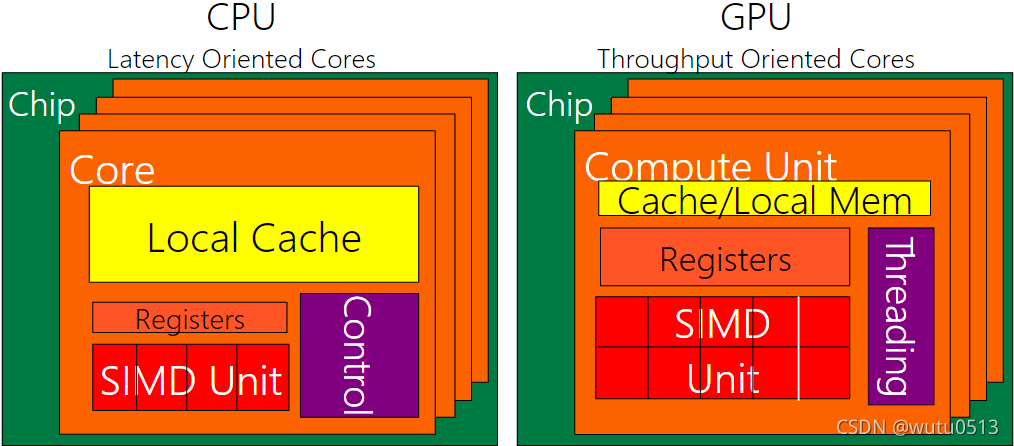
CPU:面向延迟的设计

- 强大的 ALU – 减少操作延迟
- 大缓存 – 将长延迟内存访问转换为短延迟缓存访问
- 复杂的控制
- 分支预测以减少分支延迟
- 数据转发以减少数据延迟
GPU:面向吞吐量的设计

-
小缓存 – 提高内存吞吐量
-
简单控制
- 无分支预测
- 无数据转发
-
节能 ALU – 许多、长延迟但大量流水线以实现高吞吐量
-
需要大量线程来容忍延迟
- 线程逻辑
- 线程状态
CPU 和 GPU 的设计非常不同

好的应用同时使用GPU和CPU
- 对于顺序代码,CPU 可以比 GPU 快 10 倍以上
- 对于并行代码,GPU 可以比 CPU 快 10 倍以上
异构并行计算中的可移植性和可扩展性
目标
理解并行编程中可扩展性和可移植性的重要性和本质
可扩展性
-
相同的应用程序在新一代内核上可以高效运行
-
相同的应用程序在更多相同的内核上可以高效运行
可移植性
- 同一个应用程序在不同类型的内核上可以高效运行
- 相同的应用程序在具有不同组织和接口的系统上可以高效运行
CUDA C介绍
CUDA C vs. Thrust vs. CUDA Libraries
加速应用程序的方法
- Libraries — 易于使用 最高性能
- Compiler Directives — 易于使用的便携式代码
- Programming Languages — 最高性能 最高灵活性
Libraries
- Ease of use :使用库可以实现 GPU 加速,而无需深入了解 GPU 编程
- “Drop-in” :许多 GPU 加速库遵循标准 API,从而以最少的代码更改实现加速
- 质量:库提供了在广泛的应用程序中遇到的功能的高质量实现
Vector Addition in Thrust
thrust::device_vector<float> deviceInput1(inputLength);
thrust::device_vector<float> deviceInput2(inputLength);
thrust::device_vector<float> deviceOutput(inputLength);

thrust::copy(hostInput1, hostInput1 + inputLength, deviceInput1.begin());
thrust::copy(hostInput2, hostInput2 + inputLength, deviceInput2.begin());

thrust::transform(deviceInput1.begin(), deviceInput1.end(), deviceInput2.begin(), deviceOutput.begin(), thrust::plus<float>());
Compiler Directives
- Ease of use:编译器负责并行管理和数据移动的细节
- Portable(便携式的):代码是通用的,不特定于任何类型的硬件,可以部署成多种语言
- Uncertain:代码性能可能因编译器版本而异
OpenACC
- Compiler directives for C, C++, and FORTRAN
#pragma acc parallel loop
copyin(input1[0:inputLength],input2[0:inputLength]),
copyout(output[0:inputLength])
for(i = 0; i < inputLength; ++i) {
	output[i] = input1[i] + input2[i];
}
Programming Languages
- Performance:程序员可以最好地控制并行性和数据移动
- Flexible:计算不需要适合一组有限的库模式或指令类型
- Verbose(冗长的):程序员往往需要表达更多的细节
内存分配和数据移动 API 函数
目标
学习CUDA主机代码中的基本API函数
- 设备内存分配
- 主机设备数据传输
数据并行 - 向量加法示例
vector A A[0] A[1] A[2] … A[N-1]
+ + + +
vector B B[0] B[1] B[2] … B[N-1]
= = = =
vector C C[0] C[1] C[2] … C[N-1]
向量加法 – 传统 C 代码
// Compute vector sum C = A + B
void vecAdd(float *h_A, float *h_B, float *h_C, int n)
{
	int i;
	for (i = 0; i<n; i++)
        h_C[i] = h_A[i] + h_B[i];
}

int main()
{
	// Memory allocation for h_A, h_B, and h_C
	// I/O to read h_A and h_B, N elements
	...
	vecAdd(h_A, h_B, h_C, N);
}
异构计算 vecAdd CUDA Host Code
#include <cuda.h>
void vecAdd(float *h_A, float *h_B, float *h_C, int n)
{
	int size = n* sizeof(float);
    float *d_A, *d_B, *d_C;
    // Part 1
    // Allocate device memory for A, B, and C
    // copy A and B to device memory

    // Part 2
    // Kernel launch code – the device performs the actual vector addition

    // Part 3
    // copy C from the device memory
    // Free device vectors
}
CUDA内存部分概述

设备代码可以:
- R/W 每个线程寄存器
- R/W 全共享全局内存
主机代码可以
- 向/从每个网格全局内存传输数据
CUDA 设备内存管理 API 函数
- cudaMalloc() :在设备全局内存中分配一个对象
- 参数1:指向已分配对象的指针的地址
- 参数2:已分配对象的大小(以字节为单位)
- cudaFree():从设备全局内存中释放对象
- 参数:指向释放对象的指针
- cudaMemcpy():内存数据传输
- 参数1:指向目的地的指针
- 参数2:指向源的指针
- 参数3:复制的字节数
- 参数4:转移类型/方向
Vector Addition Host Code
void vecAdd(float *h_A, float *h_B, float *h_C, int n)
{
    int size = n * sizeof(float); float *d_A, *d_B, *d_C;
    cudaMalloc((void **) &d_A, size);
    cudaMemcpy(d_A, h_A, size, cudaMemcpyHostToDevice);
    cudaMalloc((void **) &d_B, size);
    cudaMemcpy(d_B, h_B, size, cudaMemcpyHostToDevice);
    cudaMalloc((void **) &d_C, size);

    // Kernel invocation code – to be shown later

    cudaMemcpy(h_C, d_C, size, cudaMemcpyDeviceToHost);
    cudaFree(d_A); cudaFree(d_B); cudaFree (d_C);
}
In Practice, Check for API Errors in Host Code
cudaError_t err = cudaMalloc((void **) &d_A, size);
if (err != cudaSuccess)  {
	printf(“%s in %s at line %d\n”, cudaGetErrorString(err), __FILE__, __LINE__);
	exit(EXIT_FAILURE);
}
线程和内核函数
并行线程数组
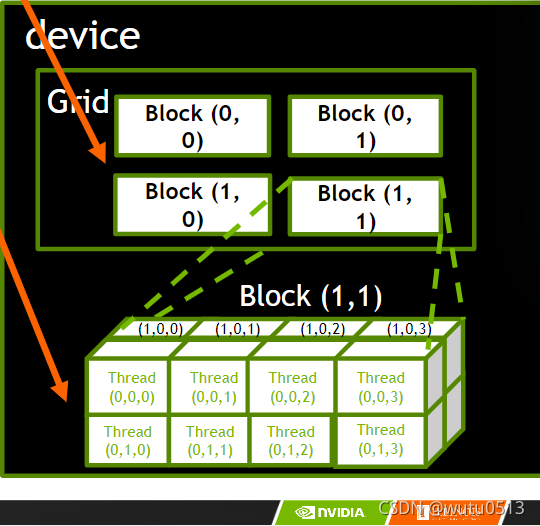
- CUDA 内核由线程网格(数组)执行
- 网格中的所有线程运行相同的内核代码(Single Program Multiple Data)
- 每个线程都有用于计算内存地址和做出控制决策的索引

Thread Blocks(线程块):可扩展的合作
- 将线程数组分成多个块
- 块内的线程通过共享内存、原子操作和屏障同步进行协作
- 不同块中的线程不交互
blockIdx 和 threadIdx

- 每个线程使用索引来决定要处理的数据
- blockIdx: 1D, 2D, or 3D (CUDA 4.0)
- threadIdx: 1D, 2D, or 3D
CUDA 工具包简介
略 哈哈哈
CUDA 并行模型
基于内核的 SPMD 并行编程
示例:向量加法内核
Device Code
// Compute vector sum C = A + B
// Each thread performs one pair-wise addition

__global__
void vecAddKernel(float* A, float* B, float* C, int n)
{
	int i = threadIdx.x + blockDim.x * blockIdx.x;
	if(i < n)
		C[i] = A[i] + B[i];
}
Host Code
void vecAdd(float* h_A, float* h_B, float* h_C, int n)
{
	// d_A, d_B, d_C allocations and copies omitted
	// Run ceil(n/256.0) blocks of 256 threads each
	vecAddKernel<<<ceil(n/256.0),256>>>(d_A, d_B, d_C, n);
}
更多关于内核启动(Host Code)
void vecAdd(float* h_A, float* h_B, float* h_C, int n)
{
	dim3 DimGrid((n - 1)/256 + 1, 1, 1);
	dim3 DimBlock(256, 1, 1);
	vecAddKernel<<<DimGrid,DimBlock>>>(d_A, d_B, d_C, n);
}
更多关于 CUDA 函数声明
| 执行于 | 从哪调用 | |
|---|---|---|
| _device_ | device | device |
| _global_ | device | host |
| _host_ | host | host |
注:__global__函数必须返回 void
多维内核配置
目标
了解多维网格
- 多维块和线程索引
- 将块/线程索引映射到数据索引
一个多维网格示例

使用2D grid 处理图片

PictureKernel的源代码
将每个像素值缩放 2.0
__global__ void PictureKernel(float* d_Pin, float* d_Pout, int height, int width)
{
    // Calculate the row # of the d_Pin and d_Pout element
    int Row = blockIdx.y*blockDim.y + threadIdx.y;

    // Calculate the column # of the d_Pin and d_Pout element
    int Col = blockIdx.x*blockDim.x + threadIdx.x;

    // each thread computes one element of d_Pout if in range
    if ((Row < height) && (Col < width)) {
    	d_Pout[Row*width+Col] = 2.0*d_Pin[Row*width+Col];
    }
}
用于启动 PictureKernel 的Host Code
// assume that the picture is m × n,
// m pixels in y dimension and n pixels in x dimension
// input d_Pin has been allocated on and copied to device
// output d_Pout has been allocated on device
...
dim3 DimGrid((n-1)/16 + 1, (m-1)/16 + 1, 1);
dim3 DimBlock(16, 16, 1);
PictureKernel<<<DimGrid,DimBlock>>>(d_Pin, d_Pout, m, n);
...
彩色到灰度图像处理示例
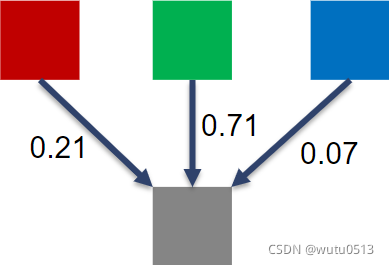
RGB 到灰度转换

颜色计算公式

RGB 到灰度转换代码
#define CHANNELS 3 // we have 3 channels corresponding to RGB
// The input image is encoded as unsigned characters [0, 255]

__global__ void colorConvert(unsigned char * grayImage,
unsigned char * rgbImage,int width, int height) {
	int x = threadIdx.x + blockIdx.x * blockDim.x;
	int y = threadIdx.y + blockIdx.y * blockDim.y;

	if (x < width && y < height) {
		// get 1D coordinate for the grayscale image
		int grayOffset = y*width + x;
		// one can think of the RGB image having
        // CHANNEL times columns than the gray scale image
        int rgbOffset = grayOffset*CHANNELS;
        unsigned char r =  rgbImage[rgbOffset ]; // red value for pixel
        unsigned char g = rgbImage[rgbOffset + 2]; // green value for pixel
        unsigned char b = rgbImage[rgbOffset + 3]; // blue value for pixel
        // perform the rescaling and store it
        // We multiply by floating point constants
        grayImage[grayOffset] = 0.21f*r + 0.71f*g + 0.07f*b;
	}
}
图像模糊示例
模糊框

__global__
void blurKernel(unsigned char * in, unsigned char * out, int w, int h) {
    int Col  = blockIdx.x * blockDim.x + threadIdx.x;
    int Row  = blockIdx.y * blockDim.y + threadIdx.y;

    if (Col < w && Row < h) {
		int pixVal = 0;
        int pixels = 0;

		// Get the average of the surrounding 2xBLUR_SIZE x 2xBLUR_SIZE box
        for(int blurRow = -BLUR_SIZE; blurRow < BLUR_SIZE+1; ++blurRow) {
			for(int blurCol = -BLUR_SIZE; blurCol < BLUR_SIZE+1; ++blurCol) {
                int curRow = Row + blurRow;
                int curCol = Col + blurCol;
                // Verify we have a valid image pixel
                if(curRow > -1 && curRow < h && curCol > -1 && curCol < w) {
                	pixVal += in[curRow * w + curCol];
                	pixels++; // Keep track of number of pixels in the accumulated total
                }
			}
		}

		// Write our new pixel value out
		out[Row * w + Col] = (unsigned char)(pixVal / pixels);
	}
}
线程调度
目标
了解 CUDA 内核如何利用硬件执行资源
- 将线程块分配给执行资源
- 执行资源的容量限制
- 零开销线程调度
warp 示例
如果将 3 个块分配给一个 SM,每个块有 256 个线程,那么一个 SM 中有多少个 Warp?
- 每个 Block 分为 256/32 = 8 Warps
- 有 8 * 3 = 24 Warps
线程调度(续)
SM 实现零开销 warp 调度
- 下一条指令的操作数可供消费的 Warp 有资格执行
- 基于优先调度策略选择符合条件的 Warp 执行
- 一个 warp 中的所有线程在被选中时执行相同的指令
注意事项
对于使用多个块的矩阵乘法,我应该为 Fermi 使用 8X8、16X16 还是 32X32 块?
- 对于 8X8,我们每个块有 64 个线程。由于每个 SM 最多可以占用 1536 个线程,这相当于 24 个块。但是,每个 SM 最多只能占用 8 个 Blocks,每个 SM 只能有 512 个线程!
- 对于 16X16,我们每个块有 256 个线程。由于每个 SM 最多可以占用 1536 个线程,因此它最多可以占用 6 个块并实现满容量,除非其他资源考虑无效。
- 对于 32X32,我们每个块有 1024 个线程。Fermi 的 SM 中只能容纳一个块。仅使用 SM 线程容量的 2/3。
内存和数据局部性
CUDA Memories
目标
学习在并行程序中有效地使用 CUDA 内存类型
- 内存访问效率的重要性
- 寄存器、共享内存、全局内存
- 范围和生命周期
矩阵乘法

一个基本的矩阵乘法
__global__ void MatrixMulKernel(float* M, float* N, float* P, int Width) {
    // Calculate the row index of the P element and M
    int Row = blockIdx.y*blockDim.y+threadIdx.y;
    // Calculate the column index of P and N
    int Col = blockIdx.x*blockDim.x+threadIdx.x;
    if ((Row < Width) && (Col < Width)) {
    	float Pvalue = 0;
    	// each thread computes one element of the block sub-matrix
		for (int k = 0; k < Width; ++k) {
			Pvalue += M[Row*Width+k]*N[k*Width+Col];
		}
		P[Row*Width+Col] = Pvalue;
	}
}
对线程进行分析:

冯诺依曼模型中的存储器和寄存器

CUDA 内存的程序员视图

声明 CUDA 变量
| 变量声明 | Memory | Scope | Lifetime |
|---|---|---|---|
| int LocalVar; | register | thread | thread |
| _device_ _shared_ int SharedVar; | shared | block | block |
| _device_ int GlobalVar; | global | grid | application |
| _device_ _constant_ int ConstantVar; | constant | grid | application |
注:__device__ 在与 _shared_ 或 _constant_ 一起使用时是可选的