Centos7搭建部署Nginx+Haproxy+NFS_shao1498198068的博客
目录:
1.实验环境
2.Nginx搭建部署
3.Haporxy服务器部署
4.NFS服务器部署
5.实验结束
实验环境:
| 主机 | IP | 主要软件 |
| Nginx | 192.168.121.144 | nginx-1.8.1.tar.gz |
| Nginx | 192.168.121.145 | nginx-1.8.1.tar.gz |
| Haproxy | 192.168.121.146 | Haporxy |
| NFS | 192.168.121.143 | NFS |
所有主机关闭防火墙和修改selinux
1. systemctl stop firewalld.service
2.setenforce 0
Nginx安装部署:
1.安装依赖包
yum -y install gcc gcc-c++ autoconf automake libtool make openssl openssl-devel pcre pcre-devel 2.下载Nginx安装包并解压
cd  /usr/local/src/
wget  http://nginx.org/download/nginx-1.8.1.tar.gz
tar -zxvf nginx-1.8.1.tar.gz
3.进入解压目录并编译
cd  nginx-1.8.1
./configure \
--prefix=/usr/local/nginx \
--with-http_ssl_module \
--with-http_flv_module \
--with-http_stub_status_module \
--with-http_gzip_static_module \
--with-pcre
4.安装
make && make install 5. 常用命令
# 进入生成目录
cd  /usr/local/nginx
# 测试
/usr/local/nginx/sbin/nginx -t
# 查看编译模块信息
/usr/local/nginx/sbin/nginx -V
# 启动
/usr/local/nginx/sbin/nginx
# 重新载入配置文件
/usr/local/nginx/sbin/nginx  -s reload
# 重启
/usr/local/nginx/sbin/nginx  -s reopen
# 停止
/usr/local/nginx/sbin/nginx  -s stop
6. 修改html配置文件
vim  /usr/local/nginx/html/index.html
!DOCTYPE html>
<html>
<head>
<title>Welcome to nginx!</title>
<style>
    body {
        width: 35em;
        margin: 0 auto;
        font-family: Tahoma, Verdana, Arial, sans-serif;
    }
</style>
</head>
<body>
<h1>Welcome to nginx!</h1>  #第一台把Welcome to nginx!将改成web1 第二台Nginx改为web2
<p>If you see this page, the nginx web server is successfully installed and
working. Further configuration is required.</p >

<p>For online documentation and support please refer to
< a href=" ">nginx.org</ a>.<br/>
Commercial support is available at
< a href="http://nginx.com/">nginx.com</ a>.</p >

<p><em>Thank you for using nginx.</em></p >
</body>
</html>
7. 另一台nginx服务器配置安装同上
8.用浏览器访问Nginx主机的IP地址
Nginx部署完成
Haporxy服务器部署
1.下载Haporxy安装包
wget https://src.fedoraproject.org/repo/pkgs/haproxy/haproxy-1.7.8.tar.gz/sha512/e1d65c8a4607c01d52628f36f8c7342096267130a0f949474746f571158e4f795281f78765004c214a0527f74ce180760f9cc910d3650d30026776076d721c0c/haproxy-1.7.8.tar.gz2.解压缩Haporxy安装包
tar -zxf haproxy-1.7.8.tar.gz3.编译文件
 cd haproxy-1.7.8/
 make TARGET=linux310 ARCH=x86_64
 #指定的安装路径
 make install PREFIX=/usr/local/haproxy
4.配置Haporxy
cd /usr/local/haproxy/
vim haporxy.cfg
5.修改配置文件
global
  #日志
  log 127.0.0.1 local0 info
  #最大连接数
  maxconn 10240
  daemon

defaults
  #应用全局的日志配置
  log global
  mode http
  #超时配置
  timeout connect 5000
  timeout client 5000
  timeout server 5000
  timeout check 2000

listen http_front #haproxy的客户页面
  bind 192.168.121.146:8888         #HAProxy自己的IP地址
  mode http
  option httplog
  stats uri /haproxy
  stats auth admin:123456          #控制面板账号密码 账号:admin
  stats refresh 5s
  stats enable

listen webcluster
       bind 0.0.0.0:80 #对外提供的虚拟的端口
       option httpchk GET /index.html
       balance roundrobin  # 负载均衡模式轮询
       server inst1 192.168.121.144:80 check inter 2000 fall 3  IP修改成两台Nginx的IP
       server inst2 192.168.121.145:80 check inter 2000 fall 3
6.启动命令
/haproxy-1.7.8/haproxy -f /usr/local/haproxy/haproxy.cfg7.查看服务是否启动成功
[root@localhost local]# lsof -i:8888
COMMAND   PID USER   FD   TYPE DEVICE SIZE/OFF NODE NAME
haproxy 64047 root    3u  IPv4 154463      0t0  TCP localhost.localdomain:ddi-tcp-1 (LISTEN)
haproxy 64358 root    3u  IPv4 159843      0t0  TCP localhost.localdomain:ddi-tcp-1 (LISTEN)
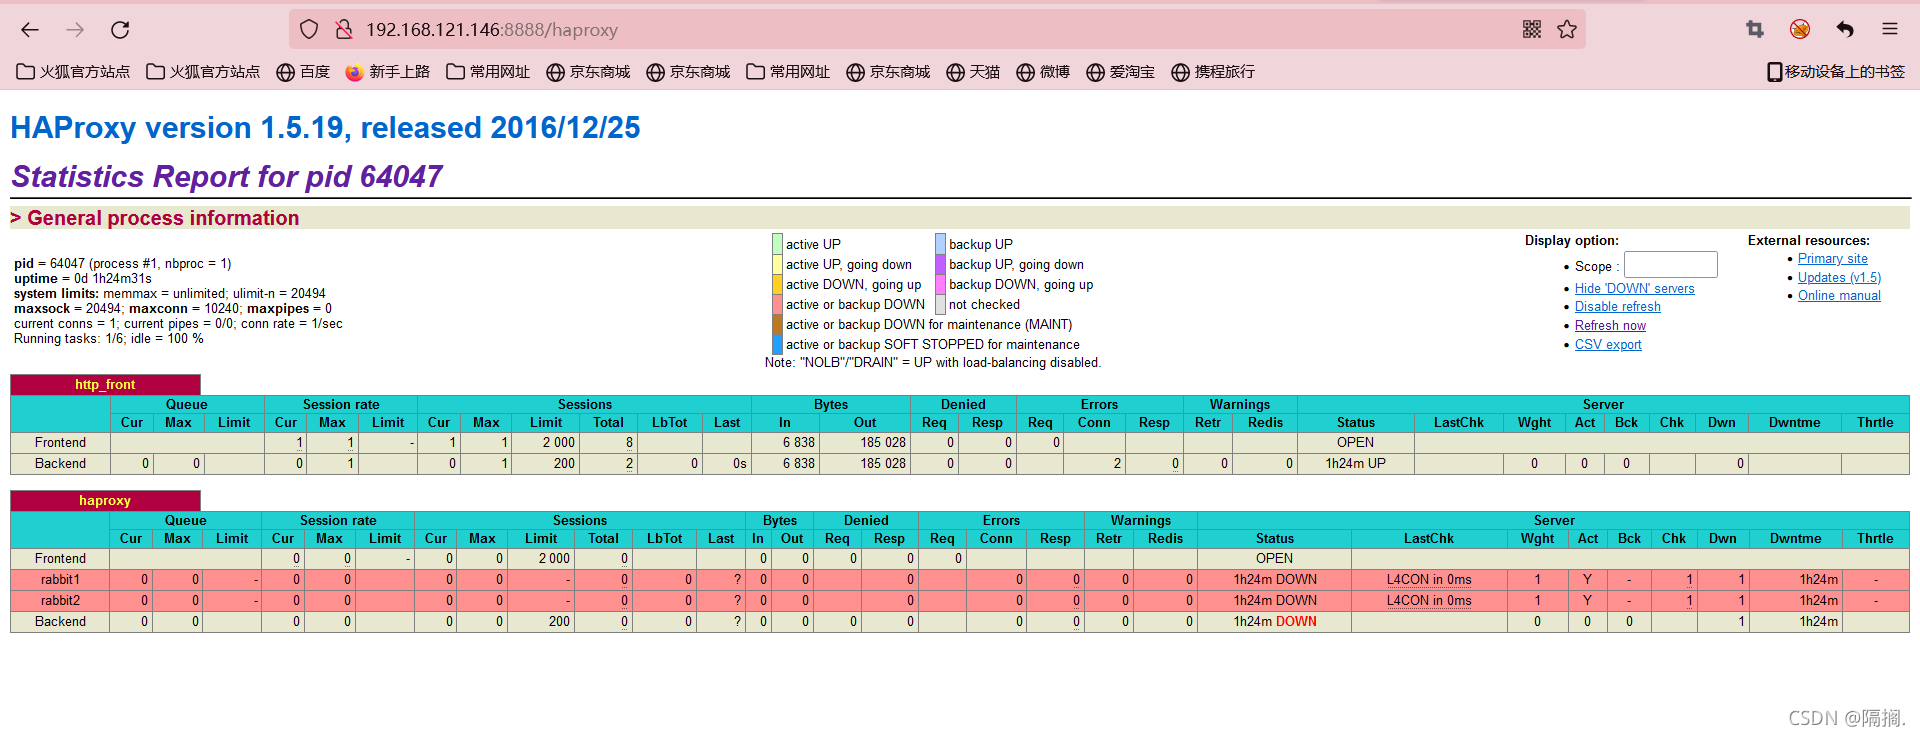
8.浏览器访问http://192.168.121.146/haporxy控制面板
9.验证轮询是否成功
NFS服务器部署:
1.安装NFS
yum -y install nfs-utils2.查看是否安装成功
rpm -qa nfs-utils3.编辑添加内容
vim /etc/exports
/data    192.168.1.0/24(rw,async) #把1改成自己的IP网段
4.启动NFS并查看
[root@node1 ~]# systemctl start nfs
[root@node1 ~]# rpcinfo -p 192.168.121.143
   program vers proto   port  service
    100000    4   tcp    111  portmapper
    100000    3   tcp    111  portmapper
    100000    2   tcp    111  portmapper
    100000    4   udp    111  portmapper
    100000    3   udp    111  portmapper
    100000    2   udp    111  portmapper
    100024    1   udp  45439  status
    100024    1   tcp  53923  status
    100005    1   udp  20048  mountd
    100005    1   tcp  20048  mountd
    100005    2   udp  20048  mountd
    100005    2   tcp  20048  mountd
    100005    3   udp  20048  mountd
    100005    3   tcp  20048  mountd
    100003    3   tcp   2049  nfs
    100003    4   tcp   2049  nfs
    100227    3   tcp   2049  nfs_acl
    100003    3   udp   2049  nfs
    100003    4   udp   2049  nfs
    100227    3   udp   2049  nfs_acl
    100021    1   udp  56239  nlockmgr
    100021    3   udp  56239  nlockmgr
    100021    4   udp  56239  nlockmgr
    100021    1   tcp  41381  nlockmgr
    100021    3   tcp  41381  nlockmgr
    100021    4   tcp  41381  nlockmgr
5.使用showmount -e localhost查看
[root@node1 ~]# showmount -e localhost
Export list for localhost:
/data 192.168.121.0/24
6.创建/data目录添加文件,更改权限
mkdir /data
touch /data/1.txt
echo "hello nfs" >> /data/1.txt
chown -R nfsnobody.nfsnobody /data
7. 开启NFS,rpcbind开机自启动
systemctl enable nfs-server.server

systemctl enable rpcbind #nfs,rpcbind开机自动启动
把两台Nginxdan当做客户端
1.检查rpc是否启动
[root@localhost ~]# ss -tnulp | grep 111
udp    UNCONN     0      0         *:111                   *:*                   users:(("rpcbind",pid=724,fd=6))
udp    UNCONN     0      0      [::]:111                [::]:*                   users:(("rpcbind",pid=724,fd=9))
tcp    LISTEN     0      128       *:111                   *:*                   users:(("rpcbind",pid=724,fd=8))
tcp    LISTEN     0      128    [::]:111                [::]:*                   users:(("rpcbind",pid=724,fd=11))
2.使用showmount -e 192.168.121.143查看
[root@localhost ~]# showmount -e 192.168.121.143
Export list for 192.168.121.143:
/data 192.168.121.0/24
3.挂载至本地/mnt目录
[root@localhost ~]# mount -t nfs 192.168.121.143:/data /mnt
[root@localhost ~]# ls /mnt/
1.txt
[root@localhost ~]# echo "2222" >> /mnt/1.txt   #1.txt可读写,nfs挂载完成。


登录后可发表评论
点击登录