1. 什么是OpenMV
OpenMV 是一个开源,低成本,功能强大的 机器视觉模块。
OpenMV上的机器视觉算法包括 寻找色块、人脸检测、眼球跟踪、边缘检测、标志跟踪 等。
以STM32F427CPU为核心,集成了OV7725摄像头芯片,在小巧的硬件模块上,用C语言高效地实现了核心机器视觉算法,提供Python编程接口。
(这也就意味着,我们可以通过python来对他进行编程,所以我们就需要学习一点基础的python知识)
————————————————
2. 关于OpenMV 和 OpenCV
OpenMV是 开源的机器视觉框架,而 OpenMV 是一种 开源计算机视觉库,两者都是实现视觉应用的工具,不同的是 OpenMV 可以运行在 MCU 上,而OpenCV可以运行在多种框架的 CPU上,OpenMV的优势在于轻量化,但是处理高复杂图形信息和告诉图像能力的时候明显弱于OpenCV
————————————————
3. OpenMV的教程
序言 · OpenMV中文入门教程
以上链接为 星瞳官方 所给我们的上手教程,我们接下来的内容也是对视频内容的笔记
Home - 廖雪峰的官方网站
以上链接为 Python 语法的学习网址,适合对其他语言有一些基础的同学
————————————————
4. OpenMV IDE 界面介绍
上面是我们下载完 IDE 后进入的界面
中间的这一块是我们的代码编辑框,我们可以在这里写代码
右上角是 Frame Buffer,可以用来查看OpenMV的摄像头的头像
右下方是 图像的直方图,可以查看图像不同的颜色阈值

当我们连接OpenMV后,点击连接,就可以看到 图像显示出来了

左上角的菜单栏 File
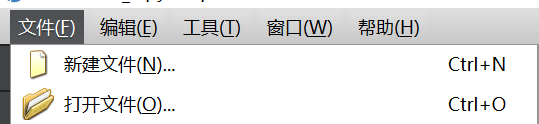
在下面了 示例 里面,有一些官方给的历程
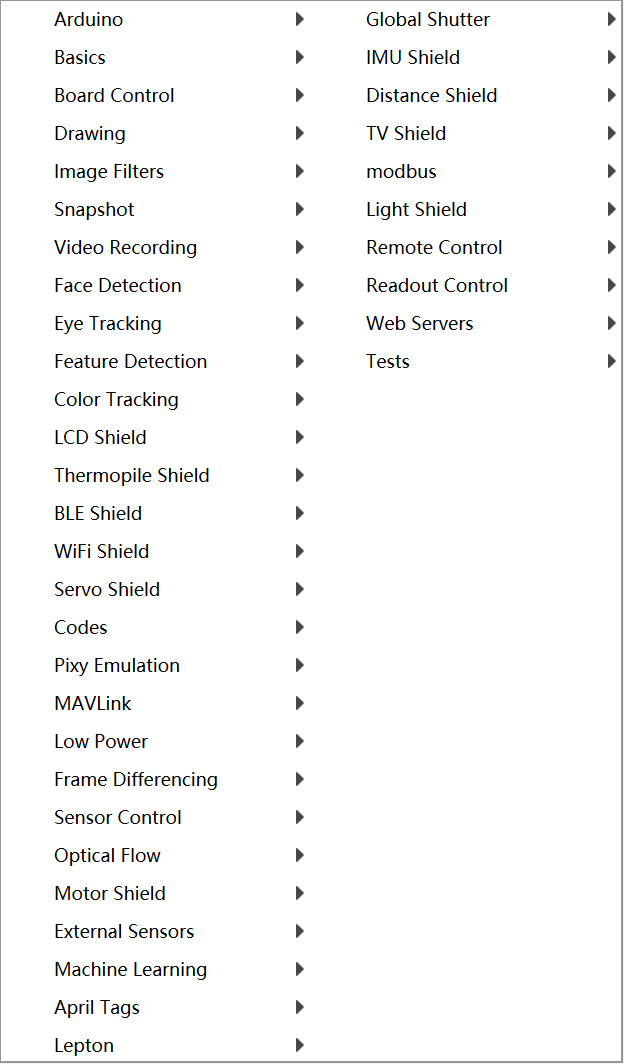
————————————
![]()
控制一些 基本的外设
————————————————

画图,画十字,画线,画框
————————————————
![]()
与图像相关的滤波
————————————————

图像的截图保存等
————————————————

录制视频等
————————————————

人脸识别,人脸追踪
————————————————

这里面有一些特征点匹配:
直线线段 ,圆识别, 边缘检测,模板匹配等等
————————————————

瞳孔识别,人眼识别
————————————————

与颜色识别有关: 自动灰度颜色识别 ,自动彩图颜色识别,红外颜色识别 等等
————————————————

运行LCD程序,当我们外接LCD显示屏的时候使用
————————————————

红外热成像的一个例程
____________________________
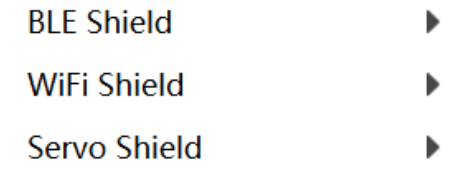
蓝牙 , WIFI ,舵机拓展板 例程
——————————————

条码,二维码相关的扫描识别
____________________________________________________
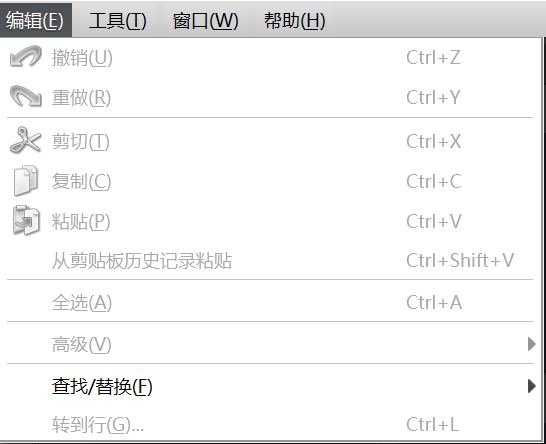
然后 Edit 里面,就是我们最经常使用的复制 黏贴等
———————————————————————————
5. 基础程序的讲解
# Hello World Example## Welcome to the OpenMV IDE! Click on the green run arrow button below to run the script!import sensor, image, timesensor.reset() # Reset and initialize the sensor.sensor.set_pixformat(sensor.RGB565) # Set pixel format to RGB565 (or GRAYSCALE)sensor.set_framesize(sensor.QVGA) # Set frame size to QVGA (320x240)sensor.skip_frames(time = 2000) # Wait for settings take effect.clock = time.clock() # Create a clock object to track the FPS.while(True): clock.tick() # Update the FPS clock. img = sensor.snapshot() # Take a picture and return the image. print(clock.fps()) # Note: OpenMV Cam runs about half as fast when connected # to the IDE. The FPS should increase once disconnected.上面这段代码,也就是我们刚进入 IDE 时,直接给我们的,我们对他先来进行分析
· 首先 import 是导入此代码所依赖的模块,在 hellow world 这个代码中主要依赖
| sensor | 感光元件模块 |
| image | 图像处理相关模块 |
| time | 时钟 |
| sensor.reset() | 重置感光元件 |
| RGB565 | 彩图 |
| sensor.set_pixformat(sensor.RGB565) | 设置感光元件的图像的色彩 |
| sensor.set_framesize(sensor.QVGA) | 设置感光元件的分辨率的大小 |
| sensor.skip_frames(time = 2000) | 使图像跳过几帧 |
| clock = time.clock() | 设置时钟 |
我们进入一个while大循环,在这里 image 在不断的截图保存图像,而截取的图像我们就可以在右上角看到
最后一句 也就是打印的帧率,我们可以在下面的框Terminal看到
——————————————————————————————————
5. 如何进行OpenMV的脱机运行程序
而我们想把我们的代码在我们不连接电脑的时候使用,我们就需要用到脱机运行
把代码保存的 OpenMV内置的 flash 内存 里面(也就是OpenMV连接电脑时,弹出的U盘,我们把文件保存在那里面,我们在那里面存储代码或图片)
我们使用 工具 里的 一键下载
![]()
当写入成功时,我们的灯会亮一下,就代表脱机完成,脱机成功后,我们给OpenMV重新上电(也就是重新启动一下),就可以自动运行里面的代码。我们也可以在 OpenMV的U盘里面看到我们刚刚保存的代码
OpenMV保存的 时候 会把我们的代码默认保存为 main.py,我们也可以在保存之后重新保存为其他的名称 .py
但需要注意的是,我们上电之后,他会自动执行我们 main.py的程序,而不是其他的程序
关于我们如何查看是否正确保存了我们的代码,我们可以将示例代码中闪灯的代码,作为测试,保存到我们的 main.py 里面,然后上电之后看看有没正确闪灯即可
如果我们发现,有时候并没有正确的把代码保存进去,我们就可以把U盘格式化一下,再重新保存
——————————————————————————————————
6. 颜色识别
前面我们知道,OpenMV里面有很多的颜色识别,我们就来看一下 单颜色彩色识别
# Single Color RGB565 Blob Tracking Example## This example shows off single color RGB565 tracking using the OpenMV Cam.import sensor, image, time, maththreshold_index = 0 # 0 for red, 1 for green, 2 for blue# Color Tracking Thresholds (L Min, L Max, A Min, A Max, B Min, B Max)# The below thresholds track in general red/green/blue things. You may wish to tune them...thresholds = [(30, 100, 15, 127, 15, 127), # generic_red_thresholds (30, 100, -64, -8, -32, 32), # generic_green_thresholds (0, 30, 0, 64, -128, 0)] # generic_blue_thresholdssensor.reset()sensor.set_pixformat(sensor.RGB565)sensor.set_framesize(sensor.QVGA)sensor.skip_frames(time = 2000)sensor.set_auto_gain(False) # must be turned off for color trackingsensor.set_auto_whitebal(False) # must be turned off for color trackingclock = time.clock()# Only blobs that with more pixels than "pixel_threshold" and more area than "area_threshold" are# returned by "find_blobs" below. Change "pixels_threshold" and "area_threshold" if you change the# camera resolution. "merge=True" merges all overlapping blobs in the image.while(True): clock.tick() img = sensor.snapshot() for blob in img.find_blobs([thresholds[threshold_index]], pixels_threshold=200, area_threshold=200, merge=True): # These values depend on the blob not being circular - otherwise they will be shaky. if blob.elongation() > 0.5: img.draw_edges(blob.min_corners(), color=(255,0,0)) img.draw_line(blob.major_axis_line(), color=(0,255,0)) img.draw_line(blob.minor_axis_line(), color=(0,0,255)) # These values are stable all the time. img.draw_rectangle(blob.rect()) img.draw_cross(blob.cx(), blob.cy()) # Note - the blob rotation is unique to 0-180 only. img.draw_keypoints([(blob.cx(), blob.cy(), int(math.degrees(blob.rotation())))], size=20) print(clock.fps())最开始也是导入代码所需要的模块
import sensor, image, time, math接下来设置颜色的阈值
threshold_index = 0 # 0 for red, 1 for green, 2 for blue然后 重置感光元件,摄像头。设置颜色格式为RGB565, 图像大小为QVGA,设置帧率
关闭颜色识别中的白平衡和自动增益(打开可能会使颜色的阈值发生改变)
sensor.reset()sensor.set_pixformat(sensor.RGB565)sensor.set_framesize(sensor.QVGA)sensor.skip_frames(time = 2000)sensor.set_auto_gain(False) # must be turned off for color trackingsensor.set_auto_whitebal(False) # must be turned off for color trackingclock = time.clock()在 while 循环里面
首先先截取感光元件的一张图片
for blob in img.find_blobs([thresholds[threshold_index]], pixels_threshold=200, area_threshold=200, merge=True):这是 python的语法,在下面进行判断。
它的意思是 在这个函数中,我们进行颜色识别,find_blobs 这个函数会返回一个列表
roi是“感兴趣区”。left_roi = [0,0,160,240]blobs = img.find_blobs([red],roi=left_roi)x_stride 就是查找的色块的x方向上最小宽度的像素,默认为2,如果你只想查找宽度10个像素以上的色块,那么就设置这个参数为10:blobs = img.find_blobs([red],x_stride=10)y_stride 就是查找的色块的y方向上最小宽度的像素,默认为1,如果你只想查找宽度5个像素以上的色块,那么就设置这个参数为5:blobs = img.find_blobs([red],y_stride=5)invert 反转阈值,把阈值以外的颜色作为阈值进行查找area_threshold 面积阈值,如果色块被框起来的面积小于这个值,会被过滤掉pixels_threshold 像素个数阈值,如果色块像素数量小于这个值,会被过滤掉merge 合并,如果设置为True,那么合并所有重叠的blob为一个。注意:这会合并所有的blob,无论是什么颜色的。如果你想混淆多种颜色的blob,只需要分别调用不同颜色阈值的find_blobs。在这,我们是默认查找红色
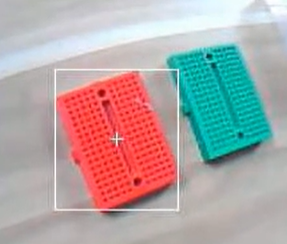
他把红色给我们框出来了
find_blobs对象返回的是多个 blob 的列表。(注意区分blobs和blob,这只是一个名字,用来区分多个色块,和一个色块)。
列表类似与C语言的数组,一个blobs列表里包含很多blob对象,blobs对象就是色块,每个blobs对象包含一个色块的信息
blob有多个方法:blob.rect() 返回这个色块的外框——矩形元组(x, y, w, h),可以直接在image.draw_rectangle中使用。blob.x() 返回色块的外框的x坐标(int),也可以通过blob[0]来获取。blob.y() 返回色块的外框的y坐标(int),也可以通过blob[1]来获取。blob.w() 返回色块的外框的宽度w(int),也可以通过blob[2]来获取。blob.h() 返回色块的外框的高度h(int),也可以通过blob[3]来获取。blob.pixels() 返回色块的像素数量(int),也可以通过blob[4]来获取。blob.cx() 返回色块的外框的中心x坐标(int),也可以通过blob[5]来获取。blob.cy() 返回色块的外框的中心y坐标(int),也可以通过blob[6]来获取。blob.rotation() 返回色块的旋转角度(单位为弧度)(float)。如果色块类似一个铅笔,那么这个值为0~180°。如果色块是一个圆,那么这个值是无用的。如果色块完全没有对称性,那么你会得到0~360°,也可以通过blob[7]来获取。blob.code() 返回一个16bit数字,每一个bit会对应每一个阈值。举个例子:blobs = img.find_blobs([red, blue, yellow], merge=True)如果这个色块是红色,那么它的code就是0001,如果是蓝色,那么它的code就是0010。注意:一个blob可能是合并的,如果是红色和蓝色的blob,那么这个blob就是0011。这个功能可以用于查找颜色代码。也可以通过blob[8]来获取。blob.count() 如果merge=True,那么就会有多个blob被合并到一个blob,这个函数返回的就是这个的数量。如果merge=False,那么返回值总是1。也可以通过blob[9]来获取。blob.area() 返回色块的外框的面积。应该等于(w * h)blob.density() 返回色块的密度。这等于色块的像素数除以外框的区域。如果密度较低,那么说明目标锁定的不是很好。比如,识别一个红色的圆,返回的blob.pixels()是目标圆的像素点数,blob.area()是圆的外接正方形的面积。————————
阈值
red = (minL, maxL, minA, maxA, minB, maxB)以上是一个 颜色阈值的结构
元组里面的数值分别是L A B 的最小值和最大值。
OpenMV 的IDE里加入了阈值选择工具,极大的方便了对于颜色阈值的调试。
![]()
————————————————————————————
7. 视觉小车
控制视觉小车,对于OpenMV / K210 这端来说 最重要的就是识别元素,并且 把元素发送给我们的主控单片机,让主控来控制小车,这才是我们最需要的
所以接下来我主要从识别的区域和发送的区域来重新理解
(接下来的内容 以 2021电赛f题 送药小车为主体,参考了多个up主以博客,在后续我会一一标注上)
1. 关于OpenMV的循迹
#uart = UART(1, 115200) # 串口配置 P1 P0(TX RX)#uart = UART(3, 115200) # P4 P5THRESHOLD = (20, 47, 21, 57, 11, 47)import sensor, image, time,ustructfrom pyb import UART,LEDimport pybsensor.reset()#sensor.set_vflip(True)#sensor.set_hmirror(True)sensor.set_pixformat(sensor.RGB565)sensor.set_framesize(sensor.QQQVGA)#sensor.set_windowing([0,20,80,40])sensor.skip_frames(time = 2000)clock = time.clock()#32通信uart = UART(1,115200) #定义串口3变量uart.init(115200, bits=8, parity=None, stop=1) # init with given parameters#识别区域,绘图区域 左右上区域roi1 = [(0, 17, 15, 25), # 左 x y w h (65,17,15,25), # 右 (30,0,20,15), # 上 (0,0,80,60)] # 停车def send_data_w(x,a,f_x,f_a): global uart; data = ustruct.pack("<bbhhhhb", #格式为俩个字符俩个短整型(2字节) 0x2C, #帧头1 00101100 0x12, #帧头2 00010010 #下面的4个数据存到上面的情况里面,进行一个打包 int(x), # rho 截距 int(a), # theat 角度 int(f_x), # 位置判断信息 int(f_a), # 位置判断信息 0x5B) # 帧尾 01011011 uart.write(data);while(True): clock.tick() img = sensor.snapshot().binary([THRESHOLD]) line = img.get_regression([(100,100)], robust = True) left_flag,right_flag,up_flag=(0,0,0)#三个区域块的值,和下面的判断相关 for rec in roi1: img.draw_rectangle(rec, color=(255,0,0))#绘制出roi区域 if (line): rho_err = abs(line.rho())-img.width()/2 if line.theta()>90: theta_err = line.theta()-180 else: theta_err = line.theta() #直角坐标调整 img.draw_line(line.line(), color = 127) #画出直线 x=int(rho_err) a=int(theta_err) f_x=0 f_a=0 if x<0: x=-x f_x=1 if a<0: a=-a f_a=1 if line.magnitude()>8: outdata=[x,a,f_x,f_a] print(outdata) send_data_w(x,a,f_x,f_a) #outuart发送的就是 x,a,flag,对应的就是截距,角度 if img.find_blobs([(96, 100, -13, 5, -11, 18)],roi=roi1[0]): #left left_flag=1 if img.find_blobs([(96, 100, -13, 5, -11, 18)],roi=roi1[1]): #right right_flag=1 if img.find_blobs([(96, 100, -13, 5, -11, 18)],roi=roi1[2]): #up up_flag=1 if left_flag==1 and right_flag==1: send_data_w(0,0,2,2) time.sleep_ms(100) send_data_w(0,0,2,2) print(0,0,2,2) print('shizi') continue else: pass else: send_data_w(0,0,3,3) print('3') print('stop')在其中最重要的就是我们的 打包函数
def send_data_w(x,a,f_x,f_a): global uart; data = ustruct.pack("<bbhhhhb", #格式为俩个字符俩个短整型(2字节) 0x2C, #帧头1 00101100 0x12, #帧头2 00010010 #下面的4个数据存到上面的情况里面,进行一个打包 int(x), # rho 截距 int(a), # theat 角度 int(f_x), # 位置判断信息 int(f_a), # 位置判断信息 0x5B) # 帧尾 01011011 uart.write(data);我们来解读一下这个函数,在首先,我们需要看一张图
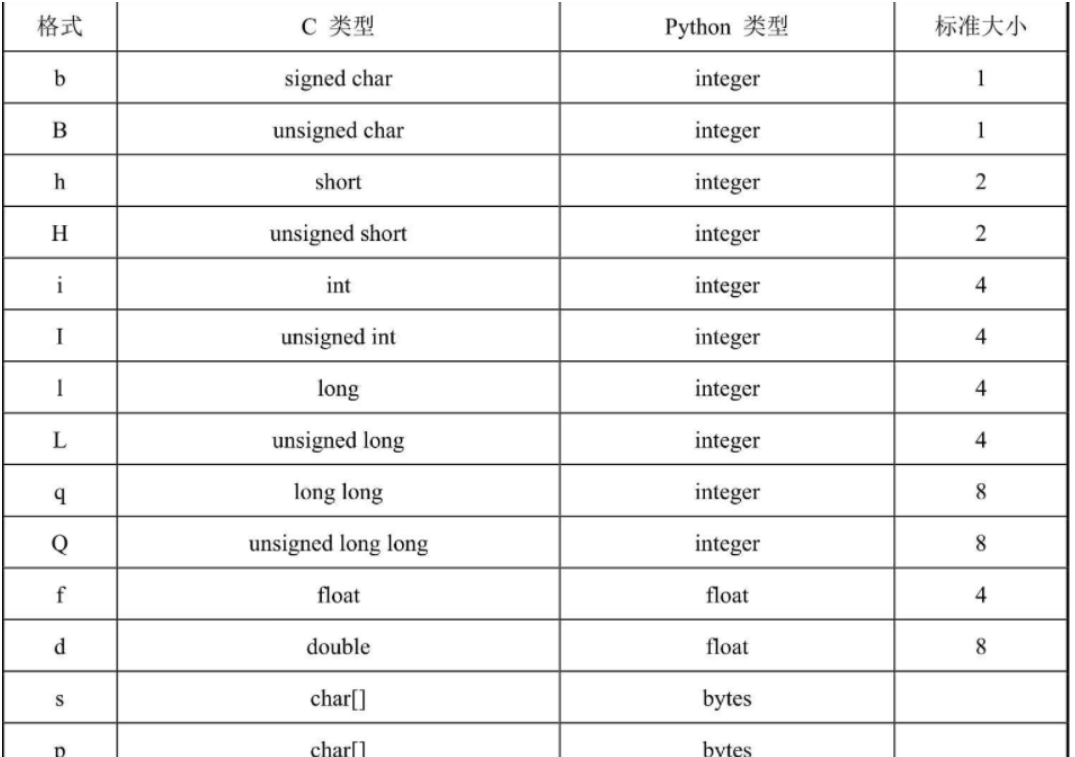
我们定义的打包函数 bbhhhhb 也就是发送 2个字符(1 个 字节,所以我们在STM32上面接收到的前两个就会是 2C 12)
而下面的短整型也会和上面一样被转化(如 1 就会被换为 01 00),所以就需要我们注意一下读取的位数
我们利用感兴趣区来进行标记,以此来判断十字以及停止(同时发送特殊数据,加了延时以保证识别的特殊情况处理的时间)
2. K210的数字识别
import sensor, image, lcd, timeimport KPU as kpuimport gc, sysimport ustructfrom machine import Timerfrom fpioa_manager import fmfrom machine import UARTfm.register(7, fm.fpioa.UART1_TX, force=True)fm.register(6, fm.fpioa.UART1_RX, force=True)uart = UART(UART.UART1, 115200, 8, 1, 0, timeout=1000, read_buf_len=4096)def lcd_show_except(e): import uio err_str = uio.StringIO() sys.print_exception(e, err_str) err_str = err_str.getvalue() img = image.Image(size=(224,224)) img.draw_string(0, 10, err_str, scale=1, color=(0xff,0x00,0x00)) lcd.display(img)def main(anchors, labels = None, model_addr=0x500000, sensor_window=(224, 224), lcd_rotation=0, sensor_hmirror=False, sensor_vflip=False): sensor.reset() sensor.set_pixformat(sensor.RGB565) sensor.set_framesize(sensor.QVGA) sensor.set_windowing(sensor_window) sensor.set_hmirror(sensor_hmirror) sensor.set_vflip(sensor_vflip) sensor.run(1) lcd.init(type=1) lcd.rotation(lcd_rotation) lcd.clear(lcd.WHITE) if not labels: with open('labels.txt','r') as f: exec(f.read()) if not labels: print("no labels.txt") img = image.Image(size=(320, 240)) img.draw_string(90, 110, "no labels.txt", color=(255, 0, 0), scale=2) lcd.display(img) return 1 try: img = image.Image("startup.jpg") lcd.display(img) except Exception: img = image.Image(size=(320, 240)) img.draw_string(90, 110, "loading model...", color=(255, 255, 255), scale=2) lcd.display(img) task = kpu.load(model_addr) kpu.init_yolo2(task, 0.5, 0.3, 5, anchors) # threshold:[0,1], nms_value: [0, 1] try: flag=1 #num=0 while flag: img = sensor.snapshot() t = time.ticks_ms() objects = kpu.run_yolo2(task, img) t = time.ticks_ms() - t if objects: for obj in objects: pos = obj.rect() img.draw_rectangle(pos) img.draw_string(pos[0], pos[1], "%s : %.2f" %(labels[obj.classid()], obj.value()), scale=2, color=(255, 0, 0)) objx = int((obj.x()+obj.w())/2) if labels[obj.classid()] == "1" : uart.write('s') uart.write('z') uart.write('1') uart.write('e') # >95 右转 <95 左转 print(1) if labels[obj.classid()] == "2": uart.write('s') uart.write('z') uart.write('2') uart.write('e') print(2) if labels[obj.classid()] == "3" and objx >= 92 and objx <= 98: # num = 3 uart.write('s') uart.write('z') uart.write('3') uart.write('T') uart.write('e') print('T') print(3) # time.sleep(3) if labels[obj.classid()] == "3" and objx >98: num =0 uart.write('s') uart.write('z') uart.write('3') uart.write('R') uart.write('e') print('R') print(3) if labels[obj.classid()] == "3" and objx <92: uart.write('s') uart.write('z') uart.write('3') uart.write('L') uart.write('e') print('L') print(3) if labels[obj.classid()] == "4" and objx >95: uart.write('s') uart.write('z') uart.write('4') uart.write('R') uart.write('e') print(4) if labels[obj.classid()] == "4" and objx <95: uart.write('s') uart.write('z') uart.write('4') uart.write('L') uart.write('e') print(4) if labels[obj.classid()] == "5" and objx >95: uart.write('s') uart.write('z') uart.write('5') uart.write('R') uart.write('e') print(5) if labels[obj.classid()] == "5" and objx <95: uart.write('s') uart.write('z') uart.write('5') uart.write('L') uart.write('e') print(5) if labels[obj.classid()] == "6" and objx >95: uart.write('s') uart.write('z') uart.write('6') uart.write('R') uart.write('e') print(6) if labels[obj.classid()] == "6" and objx <95: uart.write('s') uart.write('z') uart.write('6') uart.write('L') uart.write('e') print(6) if labels[obj.classid()] == "7" and objx >95: uart.write('s') uart.write('z') uart.write('7') uart.write('R') uart.write('e') print(7) if labels[obj.classid()] == "7" and objx <95: uart.write('s') uart.write('z') uart.write('7') uart.write('L') uart.write('e') print(7) if labels[obj.classid()] == "8" and objx >95: uart.write('s') uart.write('z') uart.write('8') uart.write('R') uart.write('e') print(8) if labels[obj.classid()] == "8" and objx <95: uart.write('s') uart.write('z') uart.write('8') uart.write('L') uart.write('e') print(8) img.draw_string(0, 200, "t:%dms" %(t), scale=2, color=(255, 0, 0)) lcd.display(img) except Exception as e: raise e finally: kpu.deinit(task)if __name__ == "__main__": try: labels = ['1', '2', '3', '4', '5', '6', '7', '8'] anchors = [1.40625, 1.8125000000000002, 5.09375, 5.28125, 3.46875, 3.8124999999999996, 2.0, 2.3125, 2.71875, 2.90625] #main(anchors = anchors, labels=labels, model_addr="/sd/m.kmodel", lcd_rotation=2, sensor_window=(224, 224)) main(anchors = anchors, labels=labels, model_addr=0x500000, lcd_rotation=2, sensor_window=(224, 224)) except Exception as e: sys.print_exception(e) lcd_show_except(e) finally: gc.collect()
2. 由大哥帮忙修改的代码,但是还需要在后续调整
#目前缺点: 第一次识别会直接发送出方向import sensor, image, lcd, timeimport KPU as kpuimport gc, sysimport ustructfrom Maix import GPIOfrom machine import Timerfrom fpioa_manager import fmfrom machine import UARTfm.register(12, fm.fpioa.GPIO0,force=True)fm.register(7, fm.fpioa.UART1_TX, force=True)fm.register(6, fm.fpioa.UART1_RX, force=True)uart = UART(UART.UART1, 115200, 8, 1, 0, timeout=1000, read_buf_len=4096)LED_B = GPIO(GPIO.GPIO0, GPIO.OUT) #构建 LED 对象def lcd_show_except(e): import uio err_str = uio.StringIO() sys.print_exception(e, err_str) err_str = err_str.getvalue() img = image.Image(size=(224,224)) img.draw_string(0, 10, err_str, scale=1, color=(0xff,0x00,0x00)) lcd.display(img)def await_num(num_await,num_input,objx): """ 等待数字 num_await 的出现 # 不需要了:如果出现了 num_await, 则返回 None, 可以接收新的数字输入了(进入recognize_num) 没有出现 num_await,那么就无限循环 """ if num_input == num_await: if objx >110: uart.write('s') uart.write('z') uart.write(num_await) uart.write('R') uart.write('e') print('R') print(num_await) elif objx <80: uart.write('s') uart.write('z') uart.write(num_await) uart.write('L') uart.write('e') print('L') print(num_await) #return None # 下一次不用识别这个数字了 #修改:如果不返回值,这样就不会重新输入新的数字,也就是不会等待新数字,这样就会避免出现程序刷新弄到新的数字 return num_await # 调用函数给下面的主函数,返回出识别的值# 如果想要识别新的数字就可以通过重新上电来执行def recognize_num(num,objx): """ 识别输入的数字 返回值: 接下来需要识别的数 """ # 识别输入的数字 # 不管识别到什么数字,其实操作是类似的,所以可以用一个函数概括这些操作,不用写很多遍 if num == '1' or num == '2': # 这两个的操作类似,所以用一个 if 就可以了; 看代码读到这两个数字的时候,并不需要等待下一次继续出现这个数字? uart.write('s') uart.write('z') uart.write(num) uart.write('G') uart.write('e') # >95 右转 <95 左转 print(num) return None # 不需要等待任何数字 elif objx >= 80 and objx <= 110: uart.write('s') uart.write('z') uart.write(num) uart.write('T') uart.write('e') #time.sleep(1) #time.sleep_ms(500) print(num) print('T') return num # 下一次需要等待的数字def main(anchors, labels = None, model_addr=0x500000, sensor_window=(224, 224), lcd_rotation=0, sensor_hmirror=False, sensor_vflip=False): sensor.reset() sensor.set_pixformat(sensor.RGB565) sensor.set_framesize(sensor.QVGA) sensor.set_windowing(sensor_window) sensor.set_hmirror(sensor_hmirror) sensor.set_vflip(sensor_vflip) sensor.run(1) lcd.init(type=1) lcd.rotation(lcd_rotation) lcd.clear(lcd.WHITE) if not labels: with open('labels.txt','r') as f: exec(f.read()) if not labels: print("no labels.txt") img = image.Image(size=(320, 240)) img.draw_string(90, 110, "no labels.txt", color=(255, 0, 0), scale=2) lcd.display(img) return 1 try: img = image.Image("startup.jpg") lcd.display(img) except Exception: img = image.Image(size=(320, 240)) img.draw_string(90, 110, "loading model...", color=(255, 255, 255), scale=2) lcd.display(img) task = kpu.load(model_addr) kpu.init_yolo2(task, 0.5, 0.3, 5, anchors) # threshold:[0,1], nms_value: [0, 1] try: flag=1 num=None while flag: img = sensor.snapshot() t = time.ticks_ms() objects = kpu.run_yolo2(task, img) t = time.ticks_ms() - t if num != 0: LED_B.value(0) if objects: for obj in objects: pos = obj.rect() img.draw_rectangle(pos) img.draw_string(pos[0], pos[1], "%s : %.2f" %(labels[obj.classid()], obj.value()), scale=2, color=(255, 0, 0)) objx = int((obj.x()+obj.w())/2) # 识别新的数字 if num is None: num = recognize_num(labels[obj.classid()],objx) else: num = await_num(num,labels[obj.classid()],objx) img.draw_string(0, 200, "t:%dms" %(t), scale=2, color=(255, 0, 0)) lcd.display(img) except Exception as e: raise e finally: kpu.deinit(task)if __name__ == "__main__": try: labels = ['1', '2', '3', '4', '5', '6', '7', '8'] anchors = [1.40625, 1.8125000000000002, 5.09375, 5.28125, 3.46875, 3.8124999999999996, 2.0, 2.3125, 2.71875, 2.90625] main(anchors = anchors, labels=labels, model_addr="/sd/m.kmodel", lcd_rotation=2, sensor_window=(224, 224)) # main(anchors = anchors, labels=labels, model_addr=0x500000, lcd_rotation=2, sensor_window=(224, 224)) except Exception as e: sys.print_exception(e) lcd_show_except(e) finally: gc.collect()==========> (To be contnue.......)