人脸活体检测人脸识别:眨眼+张口
一:dlib的shape_predictor_68_face_landmarks模型
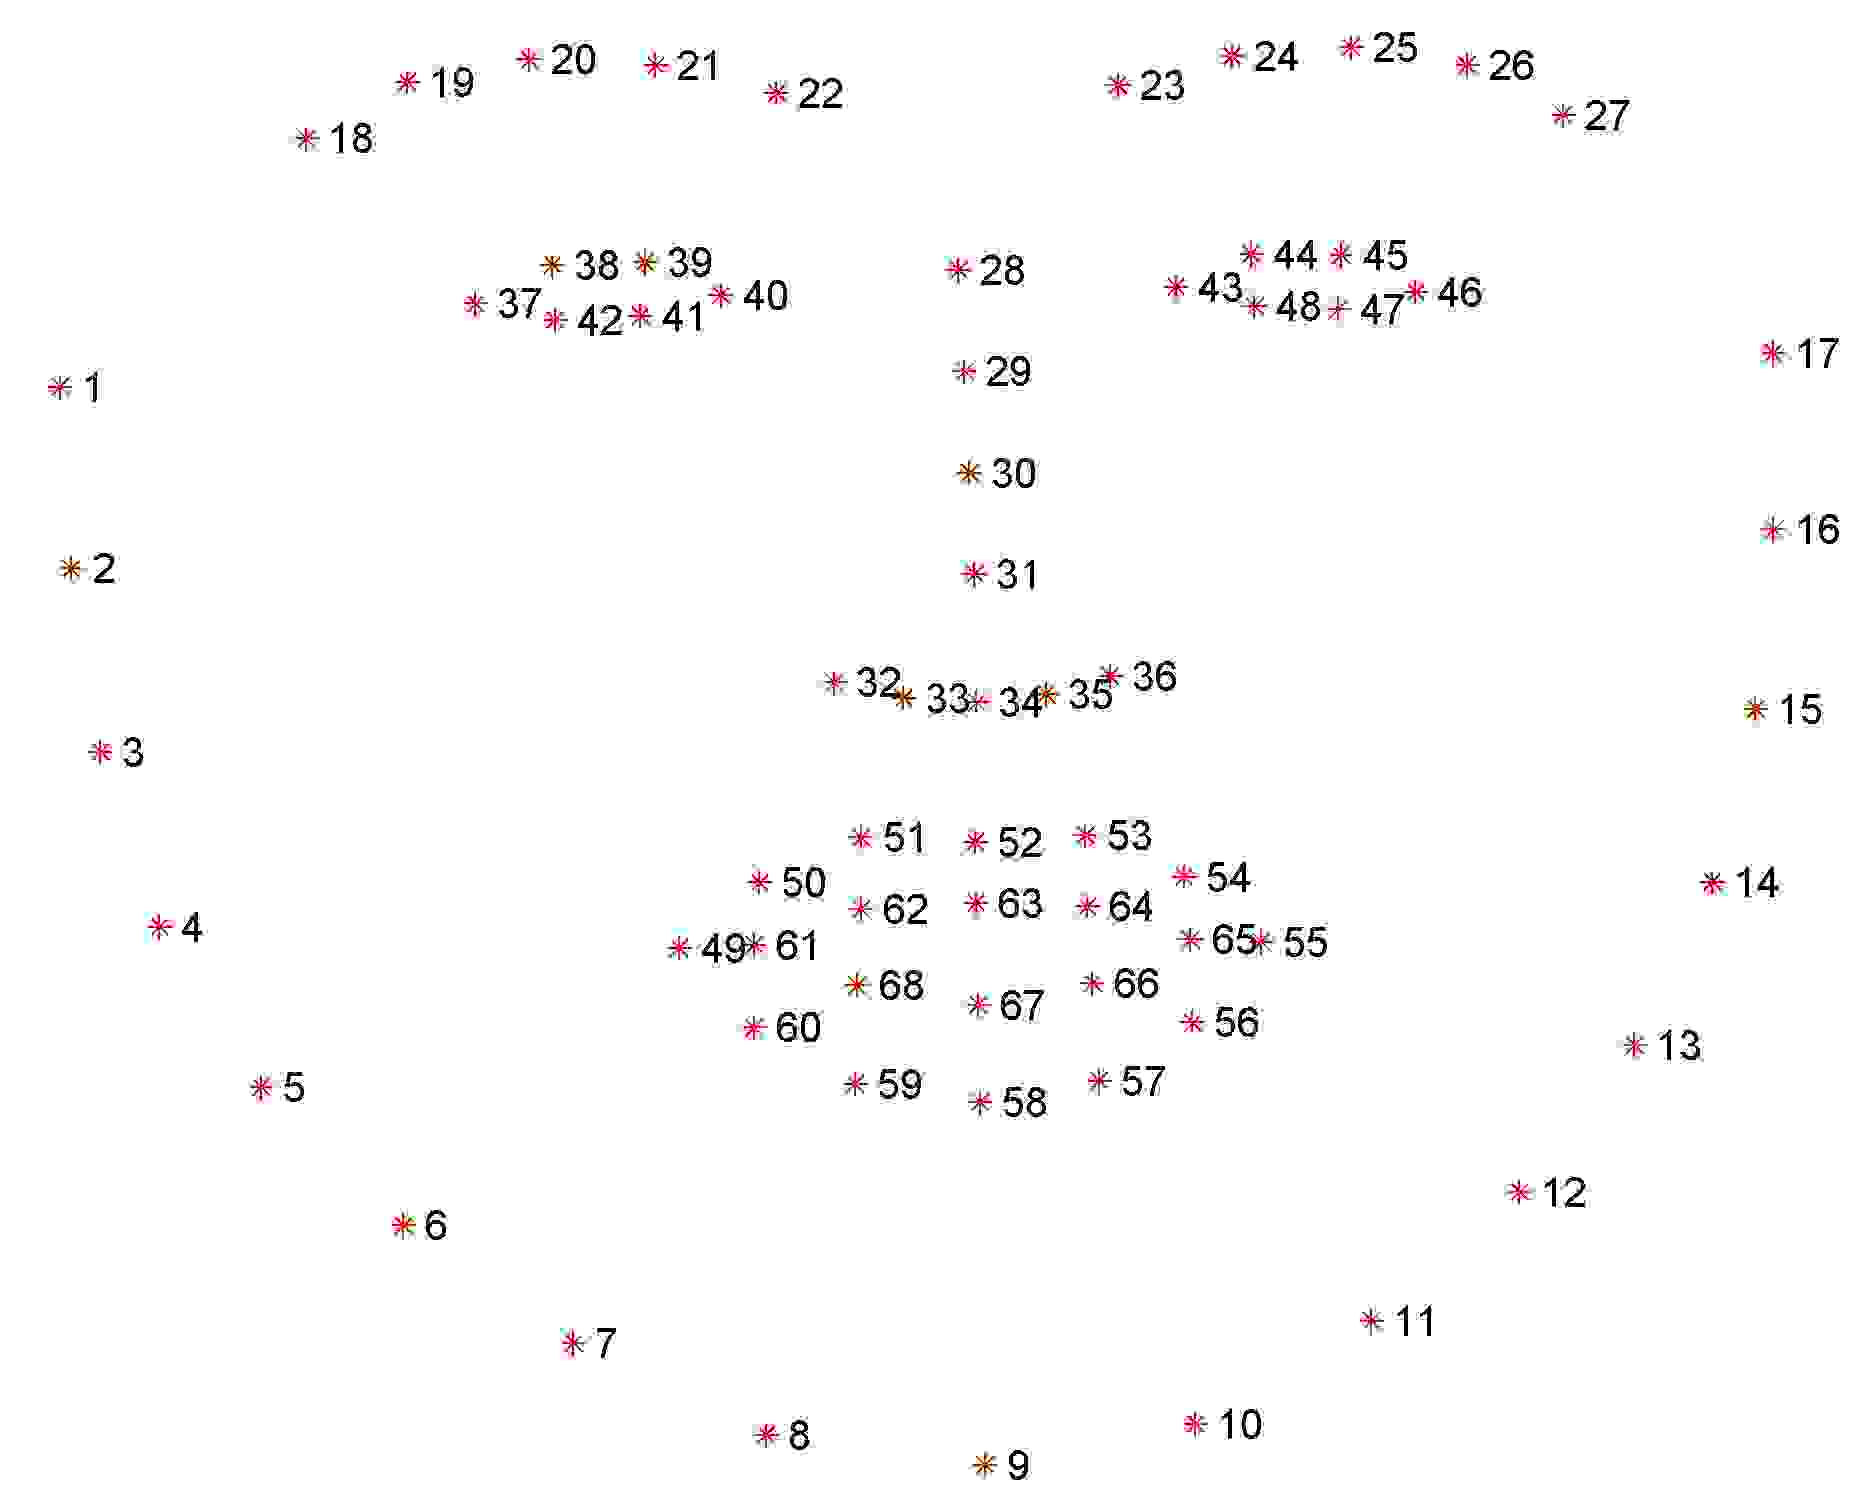
该模型能够检测人脸的68个特征点(facial landmarks),定位图像中的眼睛,眉毛,鼻子,嘴巴,下颌线(ROI,Region of Interest)

下颌线[1,17]左眼眉毛[18,22]右眼眉毛[23,27]鼻梁[28,31]鼻子[32,36]左眼[37,42]右眼[43,48] 上嘴唇外边缘[49,55] 上嘴唇内边缘[66,68] 下嘴唇外边缘[56,60] 下嘴唇内边缘[61,65]在使用的过程中对应的下标要减1,像数组的下标是从0开始。
二、眨眼检测
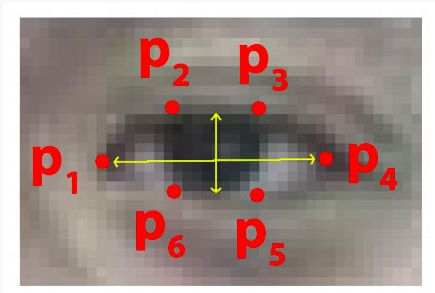
基本原理:计算眼睛长宽比 Eye Aspect Ratio,EAR.当人眼睁开时,EAR在某个值上下波动,当人眼闭合时,EAR迅速下降,理论上会接近于零,当时人脸检测模型还没有这么精确。所以我们认为当EAR低于某个阈值时,眼睛处于闭合状态。为检测眨眼次数,需要设置同一次眨眼的连续帧数。眨眼速度比较快,一般1~3帧就完成了眨眼动作。两个阈值都要根据实际情况设置。


程序实现:
from imutils import face_utilsimport numpy as npimport dlibimport cv2# 眼长宽比例def eye_aspect_ratio(eye): # (|e1-e5|+|e2-e4|) / (2|e0-e3|) A = np.linalg.norm(eye[1] - eye[5]) B = np.linalg.norm(eye[2] - eye[4]) C = np.linalg.norm(eye[0] - eye[3]) ear = (A + B) / (2.0 * C) return ear# 进行活体检测(包含眨眼和张嘴)def liveness_detection(): vs = cv2.VideoCapture(0) # 调用第一个摄像头的信息 # 眼长宽比例值 EAR_THRESH = 0.15 EAR_CONSEC_FRAMES_MIN = 1 EAR_CONSEC_FRAMES_MAX = 3 # 当EAR小于阈值时,接连多少帧一定发生眨眼动作 # 初始化眨眼的连续帧数 blink_counter = 0 # 初始化眨眼次数总数 blink_total = 0 print("[INFO] loading facial landmark predictor...") # 人脸检测器 detector = dlib.get_frontal_face_detector() # 特征点检测器 predictor = dlib.shape_predictor("model/shape_predictor_68_face_landmarks.dat") # 获取左眼的特征点 (lStart, lEnd) = face_utils.FACIAL_LANDMARKS_IDXS["left_eye"] # 获取右眼的特征点 (rStart, rEnd) = face_utils.FACIAL_LANDMARKS_IDXS["right_eye"] print("[INFO] starting video stream thread...") while True: flag, frame = vs.read() # 返回一帧的数据 if not flag: print("不支持摄像头", flag) break if frame is not None: gray = cv2.cvtColor(frame, cv2.COLOR_BGR2GRAY) # 转成灰度图像 rects = detector(gray, 0) # 人脸检测 # 只能处理一张人脸 if len(rects) == 1: shape = predictor(gray, rects[0]) # 保存68个特征点坐标的<class 'dlib.dlib.full_object_detection'>对象 shape = face_utils.shape_to_np(shape) # 将shape转换为numpy数组,数组中每个元素为特征点坐标 left_eye = shape[lStart:lEnd] # 取出左眼对应的特征点 right_eye = shape[rStart:rEnd] # 取出右眼对应的特征点 left_ear = eye_aspect_ratio(left_eye) # 计算左眼EAR right_ear = eye_aspect_ratio(right_eye) # 计算右眼EAR ear = (left_ear + right_ear) / 2.0 # 求左右眼EAR的均值 left_eye_hull = cv2.convexHull(left_eye) # 寻找左眼轮廓 right_eye_hull = cv2.convexHull(right_eye) # 寻找右眼轮廓 # mouth_hull = cv2.convexHull(mouth) # 寻找嘴巴轮廓 cv2.drawContours(frame, [left_eye_hull], -1, (0, 255, 0), 1) # 绘制左眼轮廓 cv2.drawContours(frame, [right_eye_hull], -1, (0, 255, 0), 1) # 绘制右眼轮廓 # EAR低于阈值,有可能发生眨眼,眨眼连续帧数加一次 if ear < EAR_THRESH: blink_counter += 1 # EAR高于阈值,判断前面连续闭眼帧数,如果在合理范围内,说明发生眨眼 else: if EAR_CONSEC_FRAMES_MIN <= blink_counter <= EAR_CONSEC_FRAMES_MAX: blink_total += 1 blink_counter = 0 cv2.putText(frame, "Blinks: {}".format(blink_total), (0, 30), cv2.FONT_HERSHEY_SIMPLEX, 0.7, (0, 0, 255), 2) cv2.putText(frame, "EAR: {:.2f}".format(ear), (300, 30), cv2.FONT_HERSHEY_SIMPLEX, 0.7, (0, 0, 255), 2) elif len(rects) == 0: cv2.putText(frame, "No face!", (0, 30), cv2.FONT_HERSHEY_SIMPLEX, 0.7, (0, 0, 255), 2) else: cv2.putText(frame, "More than one face!", (0, 30), cv2.FONT_HERSHEY_SIMPLEX, 0.7, (0, 0, 255), 2) cv2.namedWindow("Frame", cv2.WINDOW_NORMAL) cv2.imshow("Frame", frame) # 按下q键退出循环(鼠标要点击一下图片使图片获得焦点) if cv2.waitKey(1) & 0xFF == ord('q'): break cv2.destroyAllWindows() vs.release()liveness_detection()
三、张口检测
检测原理:类似眨眼检测,计算Mouth Aspect Ratio,MAR.当MAR大于设定的阈值时,认为张开了嘴巴。
1:采用的判定是张开后闭合计算一次张嘴动作。
mar # 嘴长宽比例
MAR_THRESH = 0.2 # 嘴长宽比例值
mouth_status_open # 初始化张嘴状态为闭嘴
当mar大于设定的比例值表示张开,张开后闭合代表一次张嘴动作
# 通过张、闭来判断一次张嘴动作 if mar > MAR_THRESH: mouth_status_open = 1 else: if mouth_status_open: mouth_total += 1 mouth_status_open = 02: 嘴长宽比例的计算
# 嘴长宽比例def mouth_aspect_ratio(mouth): A = np.linalg.norm(mouth[1] - mouth[7]) # 61, 67 B = np.linalg.norm(mouth[3] - mouth[5]) # 63, 65 C = np.linalg.norm(mouth[0] - mouth[4]) # 60, 64 mar = (A + B) / (2.0 * C) return mar原本采用嘴唇外边缘来计算,发现嘟嘴也会被判定为张嘴,故才用嘴唇内边缘进行计算,会更加准确。
这里mouth下标的值取决于取的是“mouth”还是“inner_mouth”,由于我要画的轮廓是内嘴,所以我采用的是inner_mouth
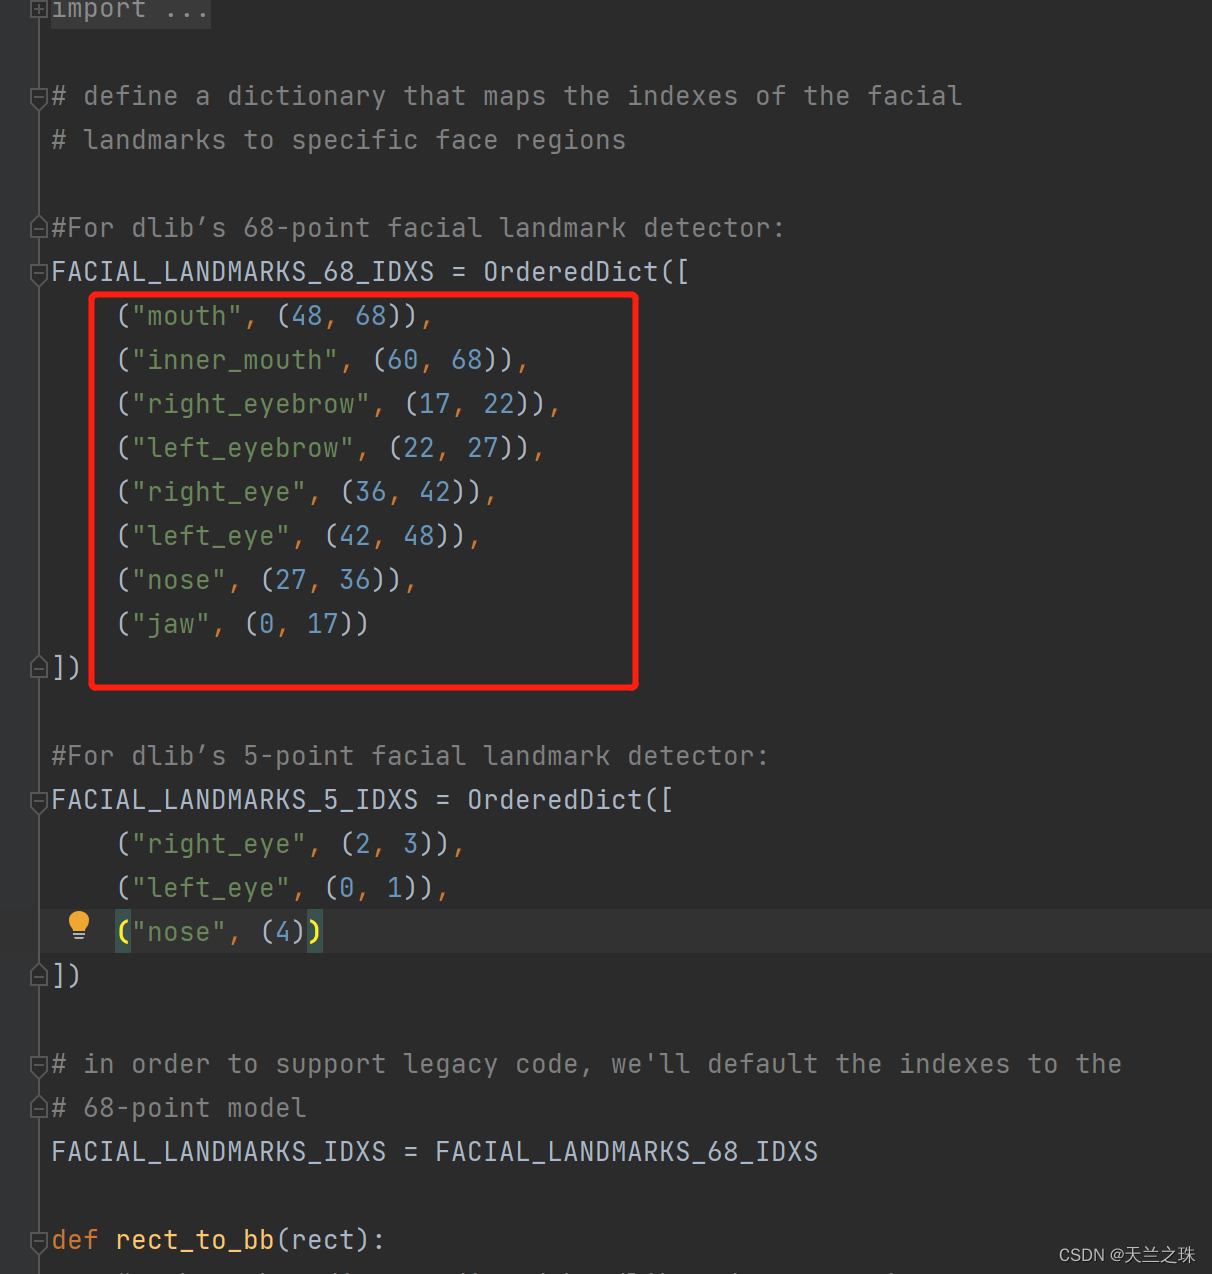
(mStart, mEnd) = face_utils.FACIAL_LANDMARKS_IDXS["inner_mouth"]打开以下方法,进入到源码,可以看到每个特征点对应的下标是不一样的,对应的mouth特征点的下标也是不同的


(以上的区间包左边代表开始下标,右边值-1)从上面可知mouth是从(48,68),inner_mouth从(60, 68),mouth包含inner_mouth,如果取得是mouth的值,则嘴长宽比例的计算如下
# 嘴长宽比例def mouth_aspect_ratio(mouth): # (|m13-m19|+|m15-m17|)/(2|m12-m16|) A = np.linalg.norm(mouth[13] - mouth[19]) # 61, 67 B = np.linalg.norm(mouth[15] - mouth[17]) # 63, 65 C = np.linalg.norm(mouth[12] - mouth[16]) # 60, 64 mar = (A + B) / (2.0 * C) return mar3:完整程序实现如下
from imutils import face_utilsimport numpy as npimport dlibimport cv2# 嘴长宽比例def mouth_aspect_ratio(mouth): A = np.linalg.norm(mouth[1] - mouth[7]) # 61, 67 B = np.linalg.norm(mouth[3] - mouth[5]) # 63, 65 C = np.linalg.norm(mouth[0] - mouth[4]) # 60, 64 mar = (A + B) / (2.0 * C) return mar# 进行活体检测(张嘴)def liveness_detection(): vs = cv2.VideoCapture(0) # 调用第一个摄像头的信息 # 嘴长宽比例值 MAR_THRESH = 0.2 # 初始化张嘴次数 mouth_total = 0 # 初始化张嘴状态为闭嘴 mouth_status_open = 0 print("[INFO] loading facial landmark predictor...") # 人脸检测器 detector = dlib.get_frontal_face_detector() # 特征点检测器 predictor = dlib.shape_predictor("model/shape_predictor_68_face_landmarks.dat") # 获取嘴巴特征点 (mStart, mEnd) = face_utils.FACIAL_LANDMARKS_IDXS["inner_mouth"] print("[INFO] starting video stream thread...") while True: flag, frame = vs.read() # 返回一帧的数据 if not flag: print("不支持摄像头", flag) break if frame is not None: # 图片转换成灰色(去除色彩干扰,让图片识别更准确) gray = cv2.cvtColor(frame, cv2.COLOR_BGR2GRAY) rects = detector(gray, 0) # 人脸检测 # 只能处理一张人脸 if len(rects) == 1: shape = predictor(gray, rects[0]) # 保存68个特征点坐标的<class 'dlib.dlib.full_object_detection'>对象 shape = face_utils.shape_to_np(shape) # 将shape转换为numpy数组,数组中每个元素为特征点坐标 inner_mouth = shape[mStart:mEnd] # 取出嘴巴对应的特征点 mar = mouth_aspect_ratio(inner_mouth) # 求嘴巴mar的均值 mouth_hull = cv2.convexHull(inner_mouth) # 寻找内嘴巴轮廓 cv2.drawContours(frame, [mouth_hull], -1, (0, 255, 0), 1) # 绘制嘴巴轮廓 # 通过张、闭来判断一次张嘴动作 if mar > MAR_THRESH: mouth_status_open = 1 else: if mouth_status_open: mouth_total += 1 mouth_status_open = 0 cv2.putText(frame, "Mouth: {}".format(mouth_total), (130, 30), cv2.FONT_HERSHEY_SIMPLEX, 0.7, (0, 0, 255), 2) cv2.putText(frame, "MAR: {:.2f}".format(mar), (450, 30), cv2.FONT_HERSHEY_SIMPLEX, 0.7, (0, 0, 255), 2) elif len(rects) == 0: cv2.putText(frame, "No face!", (0, 30), cv2.FONT_HERSHEY_SIMPLEX, 0.7, (0, 0, 255), 2) else: cv2.putText(frame, "More than one face!", (0, 30), cv2.FONT_HERSHEY_SIMPLEX, 0.7, (0, 0, 255), 2) cv2.namedWindow("Frame", cv2.WINDOW_NORMAL) cv2.imshow("Frame", frame) # 按下q键退出循环(鼠标要点击一下图片使图片获得焦点) if cv2.waitKey(1) & 0xFF == ord('q'): break cv2.destroyAllWindows() vs.release()liveness_detection()三:眨眼和张嘴结合(摄像头)
from imutils import face_utilsimport numpy as npimport dlibimport cv2# 眼长宽比例def eye_aspect_ratio(eye): # (|e1-e5|+|e2-e4|) / (2|e0-e3|) A = np.linalg.norm(eye[1] - eye[5]) B = np.linalg.norm(eye[2] - eye[4]) C = np.linalg.norm(eye[0] - eye[3]) ear = (A + B) / (2.0 * C) return ear# 嘴长宽比例def mouth_aspect_ratio(mouth): A = np.linalg.norm(mouth[1] - mouth[7]) # 61, 67 B = np.linalg.norm(mouth[3] - mouth[5]) # 63, 65 C = np.linalg.norm(mouth[0] - mouth[4]) # 60, 64 mar = (A + B) / (2.0 * C) return mar# 进行活体检测(包含眨眼和张嘴)def liveness_detection(): vs = cv2.VideoCapture(0) # 调用第一个摄像头的信息 # 眼长宽比例值 EAR_THRESH = 0.15 EAR_CONSEC_FRAMES_MIN = 1 EAR_CONSEC_FRAMES_MAX = 5 # 当EAR小于阈值时,接连多少帧一定发生眨眼动作 # 嘴长宽比例值 MAR_THRESH = 0.2 # 初始化眨眼的连续帧数 blink_counter = 0 # 初始化眨眼次数总数 blink_total = 0 # 初始化张嘴次数 mouth_total = 0 # 初始化张嘴状态为闭嘴 mouth_status_open = 0 print("[INFO] loading facial landmark predictor...") # 人脸检测器 detector = dlib.get_frontal_face_detector() # 特征点检测器 predictor = dlib.shape_predictor("model/shape_predictor_68_face_landmarks.dat") # 获取左眼的特征点 (lStart, lEnd) = face_utils.FACIAL_LANDMARKS_IDXS["left_eye"] # 获取右眼的特征点 (rStart, rEnd) = face_utils.FACIAL_LANDMARKS_IDXS["right_eye"] # 获取嘴巴特征点 (mStart, mEnd) = face_utils.FACIAL_LANDMARKS_IDXS["inner_mouth"] print("[INFO] starting video stream thread...") while True: flag, frame = vs.read() # 返回一帧的数据 if not flag: print("不支持摄像头", flag) break if frame is not None: # 图片转换成灰色(去除色彩干扰,让图片识别更准确) gray = cv2.cvtColor(frame, cv2.COLOR_BGR2RGB) rects = detector(gray, 0) # 人脸检测 # 只能处理一张人脸 if len(rects) == 1: shape = predictor(gray, rects[0]) # 保存68个特征点坐标的<class 'dlib.dlib.full_object_detection'>对象 shape = face_utils.shape_to_np(shape) # 将shape转换为numpy数组,数组中每个元素为特征点坐标 left_eye = shape[lStart:lEnd] # 取出左眼对应的特征点 right_eye = shape[rStart:rEnd] # 取出右眼对应的特征点 left_ear = eye_aspect_ratio(left_eye) # 计算左眼EAR right_ear = eye_aspect_ratio(right_eye) # 计算右眼EAR ear = (left_ear + right_ear) / 2.0 # 求左右眼EAR的均值 inner_mouth = shape[mStart:mEnd] # 取出嘴巴对应的特征点 mar = mouth_aspect_ratio(inner_mouth) # 求嘴巴mar的均值 left_eye_hull = cv2.convexHull(left_eye) # 寻找左眼轮廓 right_eye_hull = cv2.convexHull(right_eye) # 寻找右眼轮廓 mouth_hull = cv2.convexHull(inner_mouth) # 寻找内嘴巴轮廓 cv2.drawContours(frame, [left_eye_hull], -1, (0, 255, 0), 1) # 绘制左眼轮廓 cv2.drawContours(frame, [right_eye_hull], -1, (0, 255, 0), 1) # 绘制右眼轮廓 cv2.drawContours(frame, [mouth_hull], -1, (0, 255, 0), 1) # 绘制嘴巴轮廓 # EAR低于阈值,有可能发生眨眼,眨眼连续帧数加一次 if ear < EAR_THRESH: blink_counter += 1 # EAR高于阈值,判断前面连续闭眼帧数,如果在合理范围内,说明发生眨眼 else: # if the eyes were closed for a sufficient number of # then increment the total number of blinks if EAR_CONSEC_FRAMES_MIN <= blink_counter <= EAR_CONSEC_FRAMES_MAX: blink_total += 1 blink_counter = 0 # 通过张、闭来判断一次张嘴动作 if mar > MAR_THRESH: mouth_status_open = 1 else: if mouth_status_open: mouth_total += 1 mouth_status_open = 0 cv2.putText(frame, "Blinks: {}".format(blink_total), (0, 30), cv2.FONT_HERSHEY_SIMPLEX, 0.7, (0, 0, 255), 2) cv2.putText(frame, "Mouth: {}".format(mouth_total), (130, 30), cv2.FONT_HERSHEY_SIMPLEX, 0.7, (0, 0, 255), 2) cv2.putText(frame, "EAR: {:.2f}".format(ear), (300, 30), cv2.FONT_HERSHEY_SIMPLEX, 0.7, (0, 0, 255), 2) cv2.putText(frame, "MAR: {:.2f}".format(mar), (450, 30), cv2.FONT_HERSHEY_SIMPLEX, 0.7, (0, 0, 255), 2) elif len(rects) == 0: cv2.putText(frame, "No face!", (0, 30), cv2.FONT_HERSHEY_SIMPLEX, 0.7, (0, 0, 255), 2) else: cv2.putText(frame, "More than one face!", (0, 30), cv2.FONT_HERSHEY_SIMPLEX, 0.7, (0, 0, 255), 2) cv2.namedWindow("Frame", cv2.WINDOW_NORMAL) cv2.imshow("Frame", frame) # 按下q键退出循环(鼠标要点击一下图片使图片获得焦点) if cv2.waitKey(1) & 0xFF == ord('q'): break cv2.destroyAllWindows() vs.release()# 调用摄像头进行张嘴眨眼活体检测liveness_detection()四:采用视频进行活体检测
最大的区别是原来通过摄像头获取一帧一帧的视频流进行判断,现在是通过视频获取一帧一帧的视频流进行判断
1:先看下获取摄像头的图像信息
# -*-coding:GBK -*-import cv2from PIL import Image, ImageDrawimport numpy as np# 1.调用摄像头# 2.读取摄像头图像信息# 3.在图像上添加文字信息# 4.保存图像cap = cv2.VideoCapture(0) # 调用第一个摄像头信息while True: flag, frame = cap.read() # 返回一帧的数据 # #返回值:flag:bool值:True:读取到图片,False:没有读取到图片 frame:一帧的图片 # BGR是cv2 的图像保存格式,RGB是PIL的图像保存格式,在转换时需要做格式上的转换 img_PIL = Image.fromarray(cv2.cvtColor(frame, cv2.COLOR_BGR2RGB)) draw = ImageDraw.Draw(img_PIL) draw.text((100, 100), 'press q to exit', fill=(255, 255, 255)) # 将frame对象转换成cv2的格式 frame = cv2.cvtColor(np.array(img_PIL), cv2.COLOR_RGB2BGR) cv2.imshow('capture', frame) if cv2.waitKey(1) & 0xFF == ord('q'): cv2.imwrite('images/out.jpg', frame) breakcap.release()2:获取视频的图像信息
# -*-coding:GBK -*-import cv2from PIL import Image, ImageDrawimport numpy as np# 1.调用摄像头# 2.读取摄像头图像信息# 3.在图像上添加文字信息# 4.保存图像cap = cv2.VideoCapture(r'video\face13.mp4') # 调用第一个摄像头信息while True: flag, frame = cap.read() # 返回一帧的数据 if not flag: break if frame is not None: # BGR是cv2 的图像保存格式,RGB是PIL的图像保存格式,在转换时需要做格式上的转换 img_PIL = Image.fromarray(cv2.cvtColor(frame, cv2.COLOR_BGR2RGB)) draw = ImageDraw.Draw(img_PIL) draw.text((100, 100), 'press q to exit', fill=(255, 255, 255)) # # 将frame对象转换成cv2的格式 frame = cv2.cvtColor(np.array(img_PIL), cv2.COLOR_RGB2BGR) cv2.imshow('capture', frame) if cv2.waitKey(1) & 0xFF == ord('q'): cv2.imwrite('images/out.jpg', frame) breakcv2.destroyAllWindows()cap.release()五:视频进行人脸识别和活体检测
1:原理
计算当出现1次眨眼或1次张嘴就判断为活人,记录下一帧的人脸图片,和要判定的人员图片进行比对,获取比对后的相似度,进行判断是否是同一个人,为了增加判断的速度,才用2帧进行一次活体检测判断。
2:代码实现
import face_recognitionfrom imutils import face_utilsimport numpy as npimport dlibimport cv2import sys# 初始化眨眼次数blink_total = 0# 初始化张嘴次数mouth_total = 0# 设置图片存储路径pic_path = r'images\viode_face.jpg'# 图片数量pic_total = 0# 初始化眨眼的连续帧数以及总的眨眼次数blink_counter = 0# 初始化张嘴状态为闭嘴mouth_status_open = 0def getFaceEncoding(src): image = face_recognition.load_image_file(src) # 加载人脸图片 # 获取图片人脸定位[(top,right,bottom,left )] face_locations = face_recognition.face_locations(image) img_ = image[face_locations[0][0]:face_locations[0][2], face_locations[0][3]:face_locations[0][1]] img_ = cv2.cvtColor(img_, cv2.COLOR_BGR2RGB) # display(img_) face_encoding = face_recognition.face_encodings(image, face_locations)[0] # 对人脸图片进行编码 return face_encodingdef simcos(a, b): a = np.array(a) b = np.array(b) dist = np.linalg.norm(a - b) # 二范数 sim = 1.0 / (1.0 + dist) # return sim# 提供对外比对的接口 返回比对的相似度def comparison(face_src1, face_src2): xl1 = getFaceEncoding(face_src1) xl2 = getFaceEncoding(face_src2) value = simcos(xl1, xl2) print(value)# 眼长宽比例def eye_aspect_ratio(eye): # (|e1-e5|+|e2-e4|) / (2|e0-e3|) A = np.linalg.norm(eye[1] - eye[5]) B = np.linalg.norm(eye[2] - eye[4]) C = np.linalg.norm(eye[0] - eye[3]) ear = (A + B) / (2.0 * C) return ear# 嘴长宽比例def mouth_aspect_ratio(mouth): A = np.linalg.norm(mouth[1] - mouth[7]) # 61, 67 B = np.linalg.norm(mouth[3] - mouth[5]) # 63, 65 C = np.linalg.norm(mouth[0] - mouth[4]) # 60, 64 mar = (A + B) / (2.0 * C) return mar# 进行活体检测(包含眨眼和张嘴)# filePath 视频路径def liveness_detection(): global blink_total # 使用global声明blink_total,在函数中就可以修改全局变量的值 global mouth_total global pic_total global blink_counter global mouth_status_open # 眼长宽比例值 EAR_THRESH = 0.15 EAR_CONSEC_FRAMES_MIN = 1 EAR_CONSEC_FRAMES_MAX = 5 # 当EAR小于阈值时,接连多少帧一定发生眨眼动作 # 嘴长宽比例值 MAR_THRESH = 0.2 # 人脸检测器 detector = dlib.get_frontal_face_detector() # 特征点检测器 predictor = dlib.shape_predictor("model/shape_predictor_68_face_landmarks.dat") # 获取左眼的特征点 (lStart, lEnd) = face_utils.FACIAL_LANDMARKS_IDXS["left_eye"] # 获取右眼的特征点 (rStart, rEnd) = face_utils.FACIAL_LANDMARKS_IDXS["right_eye"] # 获取嘴巴特征点 (mStart, mEnd) = face_utils.FACIAL_LANDMARKS_IDXS["inner_mouth"] vs = cv2.VideoCapture(video_path) # 总帧数(frames) frames = vs.get(cv2.CAP_PROP_FRAME_COUNT) frames_total = int(frames) for i in range(frames_total): ok, frame = vs.read(i) # 读取视频流的一帧 if not ok: break if frame is not None and i % 2 == 0: # 图片转换成灰色(去除色彩干扰,让图片识别更准确) gray = cv2.cvtColor(frame, cv2.COLOR_BGR2GRAY) rects = detector(gray, 0) # 人脸检测 # 只能处理一张人脸 if len(rects) == 1: if pic_total == 0: cv2.imwrite(pic_path, frame) # 存储为图像,保存名为 文件夹名_数字(第几个文件).jpg cv2.waitKey(1) pic_total += 1 shape = predictor(gray, rects[0]) # 保存68个特征点坐标的<class 'dlib.dlib.full_object_detection'>对象 shape = face_utils.shape_to_np(shape) # 将shape转换为numpy数组,数组中每个元素为特征点坐标 left_eye = shape[lStart:lEnd] # 取出左眼对应的特征点 right_eye = shape[rStart:rEnd] # 取出右眼对应的特征点 left_ear = eye_aspect_ratio(left_eye) # 计算左眼EAR right_ear = eye_aspect_ratio(right_eye) # 计算右眼EAR ear = (left_ear + right_ear) / 2.0 # 求左右眼EAR的均值 mouth = shape[mStart:mEnd] # 取出嘴巴对应的特征点 mar = mouth_aspect_ratio(mouth) # 求嘴巴mar的均值 # EAR低于阈值,有可能发生眨眼,眨眼连续帧数加一次 if ear < EAR_THRESH: blink_counter += 1 # EAR高于阈值,判断前面连续闭眼帧数,如果在合理范围内,说明发生眨眼 else: if EAR_CONSEC_FRAMES_MIN <= blink_counter <= EAR_CONSEC_FRAMES_MAX: blink_total += 1 blink_counter = 0 # 通过张、闭来判断一次张嘴动作 if mar > MAR_THRESH: mouth_status_open = 1 else: if mouth_status_open: mouth_total += 1 mouth_status_open = 0 elif len(rects) == 0 and i == 90: print("No face!") break elif len(rects) > 1: print("More than one face!") # 判断眨眼次数大于2、张嘴次数大于1则为活体,退出循环 if blink_total >= 1 or mouth_total >= 1: break cv2.destroyAllWindows() vs.release()# video_path, src = sys.argv[1], sys.argv[2]video_path = r'video\face13.mp4' # 输入的video文件夹位置# src = r'C:\Users\666\Desktop\zz5.jpg'liveness_detection()print("眨眼次数》》", blink_total)print("张嘴次数》》", mouth_total)# comparison(pic_path, src)六:涉及到的代码
代码包含face_recognition库所有功能的用例,和上面涉及到的dilb库进行人脸识别的所有代码
使用dilb、face_recognition库实现,眨眼+张嘴的活体检测、和人脸识别功能。包含摄像头和视频-Python文档类资源-CSDN下载
参考:
使用dlib人脸检测模型进行人脸活体检测:眨眼+张口_Lee_01的博客-CSDN博客
python dlib学习(十一):眨眼检测_hongbin_xu的博客-CSDN博客_眨眼检测算法
Python开发系统实战项目:人脸识别门禁监控系统_闭关修炼——暂退的博客-CSDN博客_face_encodings

登录后可发表评论
点击登录