目录
前言
环境准备
软件安装
其它库安装启动项目
FASTAPI
小结
前言
人工智能大模型是一种能够利用大数据和神经网络来模拟人类思维和创造力的人工智能算法。它利用海量的数据和深度学习技术来理解、生成和预测新内容,通常情况下有数十亿乃至数百亿个参数,可以在不同的领域和任务中表现出智能拟人的效果。
现在大模型火的不行,项目中如果没有大模型好像都缺少点啥?没办法要跟着时代进步,最近研究了一下开源的通义千问大模型,翻阅了大量文档,记录一下使用心得。我使用的是通义千问Qwen-VL-Chat多模态模型。LLM模型可以通过Ollama下载官网最新推出的Qwen2模型,网上教程很多比较简单,但我们怎么可能仅仅只用聊天,必须得上多模态,Ollama的多模态模型很少,并且尝试过效果都不好,最后盯上modelScope上的Qwen-VL-Chat多模态,官网提供了modelScope和transformers两种途径获取模型,本人都尝试了下最终选择了modelScope,官网也推荐使用modelScope,第一modelScope不需要搭梯子,第二下载Qwen-VL-Chat源码后运行transformers会报错,源码中transformers版本为4.32.0,需要升级到更高版本才能正常运行,modelScope不需要进行其它包的升级。
环境准备
硬件: 本人使用的是window10系统,电脑为工作站内存,显存不需要考虑,正常情况下16G内存,6G显存能跑低7亿参数的模型。
软件: Anconda、Pytorch、Python、cuda(有GPU的考虑)主要用到这3个,其它包稍后说明。版本之间要按照官网上的说明来寻找适合的版本。我使用的版本如下:
Anconda:23.3.1;
Pytorch:2.0.1;
Python:3.10;
cuda:11.7;
软件安装
开源项目最大的麻烦就是环境问题,安装错误会报一堆问题,还无从查找。网上有很多使用docker安装的,这里我使用的是conda安装的Python虚拟环境。
Anconda下载:清华大学开源软件镜像站点;
网上搜一下conda和python3.10版本对应名称下载,安装的话除了指定安装位置外其它的都是next就好了,conda内置了python版本无需再安装一次python。
安装程序结束后需要配置conda的环境变量。

在系统变量的path中添加以下五个自己安装的conda的对应文件夹位置的变量然后 win+r 输入cmd 查看是否安装成功。

下载Qwen-VL-Chat源码:
git clone https://github.com/QwenLM/Qwen-VL.git下载完成后打开命令管理行创建conda虚拟环境;
# 创建虚拟环境conda create qwen-vl进入到虚拟环境;
# 进入虚拟环境conda activate qwen-vl安装Pytorch;
Pytorch官网:pytorch官网; 
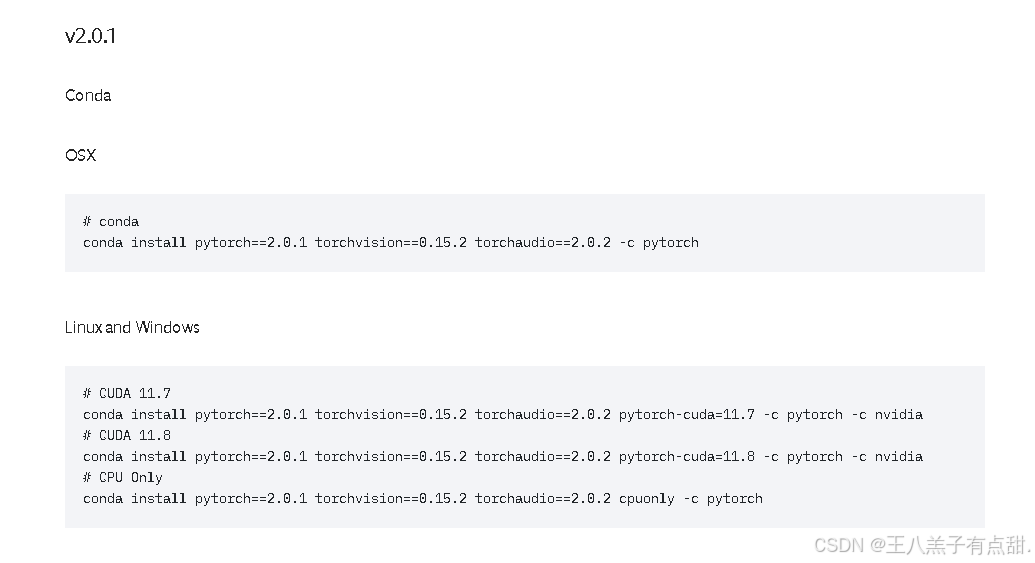
找到2.0.1版本对应的安装命令,windows中前两个是GPU的命令,最后一个是CPU的命令。根据自己硬件复制命令执行。
# 在qwen-vl空间下安装pytorchconda install pytorch==2.0.1 torchvision==0.15.2 torchaudio==2.0.2 pytorch-cuda=11.7 -c pytorch -c nvidia需要安装cuda的去英伟达官网直接下载自己电脑支持的cuda版本即可。
其它库安装启动项目
# 进入qwen-vl空间下conda activate qwen-vl# 进入到qwen-vl安装目录下cd qwen-vl安装目录# 初始化依赖pip install requirements.txt# 安装modelscopepip install modelscope -U# 安装gradiopip install gradio# 运行web_demo 0.0.0.0设置其它主机访问,# 也可以在pycharm里面打开项目web_demo_mm.py# 文件编辑server-name设置default为0.0.0.0python web_demo_mm.py --server-name 0.0.0.0启动成功访问:http://127.0.0.1:8000 ;
FASTAPI
Qwen-VL-Chat提供了openai_api.py web接口,想要运行接口需要安装一些依赖;
# 进入qwen-vl虚拟空间,进入项目根路径conda activate qwen-vlcd 。。。项目路径# 安装依赖pip install requiredments_openai_api.txt运行 penai_api.py需要transformers,文章开头提到了要运行还需要升级transformers到最近版本。
# 升级transformerspip install transformers -U# 运行apipython openai_api.py --server-name 0.0.0.0访问:http://127.0.0.1:8000/docs ;
我试了几次都调用失败,于是自己写了一个api接口调用成功。(缺少啥依赖直接pip install 包名安装即可)
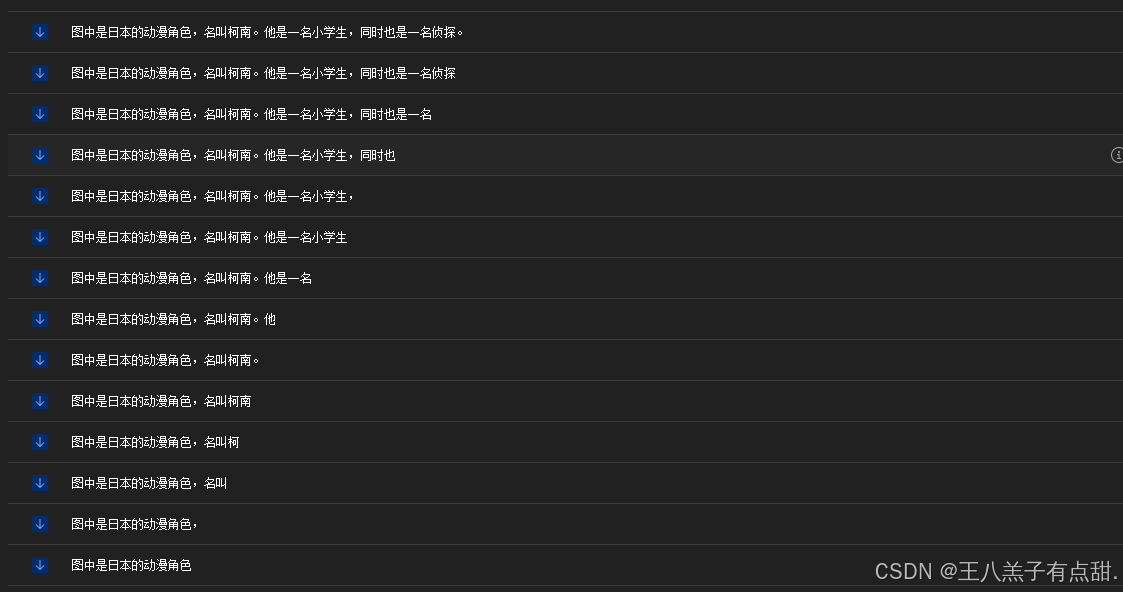
from argparse import ArgumentParserfrom contextlib import asynccontextmanagerimport torchimport uvicornfrom fastapi import FastAPI, Responsefrom fastapi.middleware.cors import CORSMiddlewarefrom pydantic import BaseModel, Fieldfrom modelscope import ( AutoModelForCausalLM, AutoTokenizer, GenerationConfig)from sse_starlette.sse import EventSourceResponseDEFAULT_CKPT_PATH = 'qwen/Qwen-VL-Chat'@asynccontextmanagerasync def lifespan(app: FastAPI): # collects GPU memory yield if torch.cuda.is_available(): torch.cuda.empty_cache() torch.cuda.ipc_collect()app = FastAPI()app.add_middleware( CORSMiddleware, allow_origins=["*"], allow_credentials=True, allow_methods=["*"], allow_headers=["*"],)class RequestParams(BaseModel): image: str text: str@app.post("/v1/chat/demo")async def _launch_demo(params: RequestParams, resp: Response): # 设置响应头部信息 resp.headers["Content-Type"] = "text/event-stream" resp.headers["Cache-Control"] = "no-cache" global model, tokenizer message = params.content query = tokenizer.from_list_format([ {'image': 'C:/Users/LENOVO/Desktop/kn.jpeg'}, {'text': '他是谁'}, ]) return EventSourceResponse(stream_generate_text(query))async def stream_generate_text(message): for response in model.chat_stream(tokenizer, message, history=[]): yield _parse_text(response)# 设置模型参数def _get_args(): parser = ArgumentParser() parser.add_argument("-c", "--checkpoint-path", type=str, default=DEFAULT_CKPT_PATH, help="Checkpoint name or path, default to %(default)r") parser.add_argument("--cpu-only", action="store_true", help="Run demo with CPU only") parser.add_argument("--share", action="store_true", default=False, help="Create a publicly shareable link for the interface.") parser.add_argument("--inbrowser", action="store_true", default=False, help="Automatically launch the interface in a new tab on the default browser.") parser.add_argument("--server-port", type=int, default=8000, help="Demo server port.") parser.add_argument("--server-name", type=str, default="0.0.0.0", help="Demo server name.") args = parser.parse_args() return argsdef _parse_text(text): lines = text.split("\n") lines = [line for line in lines if line != ""] count = 0 for i, line in enumerate(lines): if "```" in line: count += 1 items = line.split("`") if count % 2 == 1: lines[i] = f'<pre><code class="language-{items[-1]}">' else: lines[i] = f"<br></code></pre>" else: if i > 0: if count % 2 == 1: line = line.replace("`", r"\`") line = line.replace("<", "<") line = line.replace(">", ">") line = line.replace(" ", " ") line = line.replace("*", "*") line = line.replace("_", "_") line = line.replace("-", "-") line = line.replace(".", ".") line = line.replace("!", "!") line = line.replace("(", "(") line = line.replace(")", ")") line = line.replace("$", "$") lines[i] = "<br>" + line text = "".join(lines) return text# 加载模型def _load_model_tokenizer(args): tokenizer = AutoTokenizer.from_pretrained( args.checkpoint_path, trust_remote_code=True, resume_download=True, revision='master', ) if args.cpu_only: device_map = "cpu" else: device_map = "cuda" model = AutoModelForCausalLM.from_pretrained( args.checkpoint_path, device_map=device_map, trust_remote_code=True, resume_download=True, revision='master', ).eval() model.generation_config = GenerationConfig.from_pretrained( args.checkpoint_path, trust_remote_code=True, resume_download=True, revision='master', ) return model, tokenizerif __name__ == "__main__": args = _get_args() model, tokenizer = _load_model_tokenizer(args) uvicorn.run(app, host=args.server_name, port=args.server_port, workers=1)我将多余的请求参数都去掉只保留text、image字段 。通过postman测试可以访问到结果。接口只是简单测了一下,并没有完全封装,如果用java-web的方式调用还需要实现图片上传功能,并返回图片的服务器地址,封装成代码中query 的数据格式访问即可实现离线本地化接口调用。

小结
本文介绍了开源Qwen-VL-Chat多模态环境搭建,以及运行demo和api功能展示,供小白参考。后续会写如何本地化训练多模态模型。